Automatic Speech Recognition (ASR)
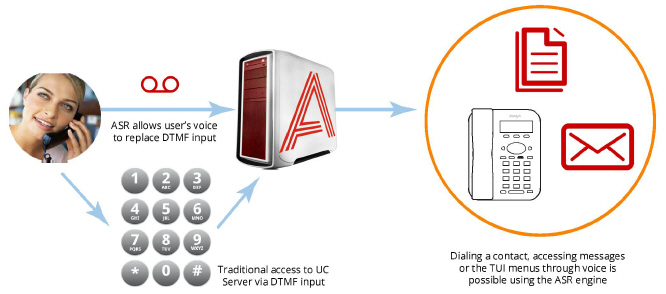
Automatic Speech Recognition (ASR) is a vital component of the UC system. ASR allows the system to recognize human speech, so that users to speak contact names and menu selections, instead of entering them through the telephone keypad.
Avaya Messaging uses Media Resource Control Protocol (MRCP) for communications with the ASR services provider.

ASR provides the base for all speech recognition functions, such as Speech Contacts and Speech Commands. ASR interprets a user’s voice input as a number or a character (e.g. alphabet) based on the grammar settings on the server. This allows users to speak the name of the contact they want to dial, or to say a number instead of pressing the digit on the telephone keypad. By replacing traditional input with speech, users can efficiently find what they were looking for. It also give users easy access to the system without having to use their hands.
For specific features such as Speech Commands, please refer to the appropriate chapters in this guide.
|
Requirements |
Details |
|---|---|
|
License |
ASR License |
|
Software |
Officelinx/IX Messaging version 8.0 - 10.8 Avaya Messaging version 11.0 or higher |
Server configuration for ASR is completed in several steps.
First, verify the Avaya Messaging license that you have. In order to use ASR, you must have the ASR license.
Once the license is confirmed, make the necessary settings in the Avaya Messaging Administrator and from the ASR Configurator.
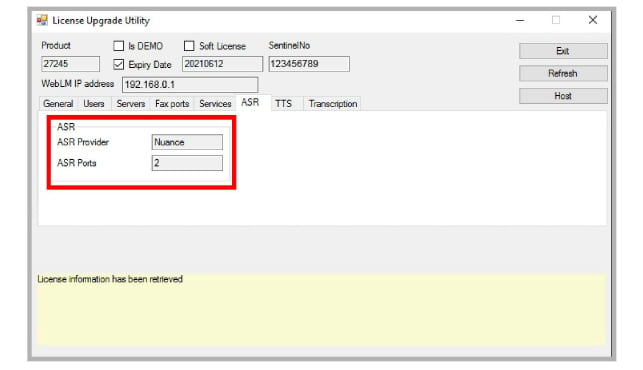
Setting up ASR begins by making sure that you have purchased and installed the license. ASR is provided under an add-on to the standard license and must be purchased separately.
Check the UCLicenseWebLM under Start > Programs > Avaya Messaging.
Go to the ASR tab and ensure that the information contains the appropriate details.
With the license confirmed, launch the Avaya Messaging Administrator to configure the application.
Avaya Messaging Admin Configuration
1.Open Avaya Messaging Admin and go to
Configuration > Advanced. In the right pane, set
Voice recognition mode to Nuance.

2.Once this option has been set, go to Company Properties.
3.Right-click on the company that will use ASR. Choose Properties.
4.Go to the Speech Options tab and enable Voice Recognition.
Enable the other features as required.
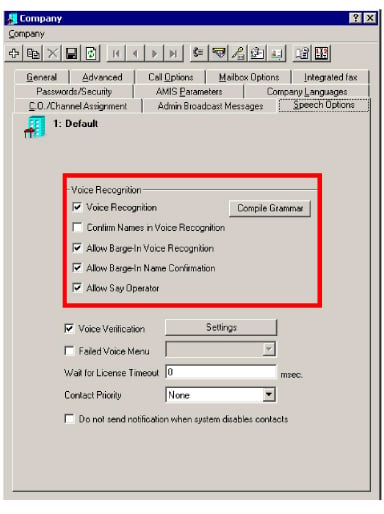
Confirm names in voice recognition: The system will confirm a recognized name no matter what
Allow barge-in voice recognition: This allows you to say a name while the system is playing a greeting or a prompt.
Allow barge-in confirm names: The system will allow you to interrupt it to confirm that a name that it found is correct.
Allow Say Operator: For the systems with a default operator defined, it will recognize the word “Operator” as a dial request for the operator.
From the Voice Verification section of the interface, you can specify the sensitivity level for the feature via Security Level. The number of questions the voice server will ask during login can also be controlled through Number of Questions.
Security Level has 5 levels to choose between. These range from Very-High to Medium Low. Refer to the chart below to see the difference between each level, along with the typical False Acceptance rate (the rate in which the system will log in a wrong person to the mailbox).
Since the FA rate for Very-High is the lowest, it may seem logical to always choose this option. However, while the number of FAs decreases, the number of FRs (False Rejection) increases. At the highest security setting, people may have problems logging into their mailbox if their voice changes even slightly. This might be caused by a sore throat, added environmental noise or using a different device. It is up to the site administrator to choose the setting which best fits the company’s requirements.
Number of Questions: Choose the number of random questions that the system will ask when verifying the user's voice print. The system can be set to ask between 1 and 3 questions.
There are three types of questions that the system will ask at random.
•Full Name: The system will ask the user to speak out their full name associated with the mailbox.
•Recognition Keywords: The system will randomly choose a keyword from the database (defined by the administrator) and ask the user to repeat the word.
•Random 4 Digit Number: The system will generate a random 4 digit number and ask the user to repeat the numbers.
The default setting will ask a minimum of 1 and maximum of 3 questions. This means that if the answer to the first question was satisfactory, the user will be logged. If not, the system will ask a second question. If the answer to the second question was satisfactory, the user will be logged in. If not, the system will ask the final question. If the answer to the final question was satisfactory, the user will be logged in. If not, the verification process will fail and the user will either be disconnected from the system, or be asked to manually enter their password through DTMF keys depending on the security settings of the site.
Security Level:
|
Security Level |
Typical Usage Recommendation |
FA Rate |
|---|---|---|
|
Very-High |
Access to mailbox accounts with critical information |
0.1Internet to 0.2Internet |
|
High |
Access to mailbox accounts with high privilege |
0.2Internet to 1.5Internet |
|
Medium-High |
Access to typical mailbox accounts |
1.5Internet to 3Internet |
|
Medium |
Access to typical mailbox accounts in open environment |
3Internet to 5Internet |
|
Medium-Low |
Generic access where Voice Verification is used for convenience |
5Internet to 7Internet |
|
Caution: The Voice Verification feature will shortly be discontinued. |
The ASR feature should work well immediately after installation. However, if there are issues with the feature, such as excessive requests to “Please repeat that”, the administrator can adjust the program settings.
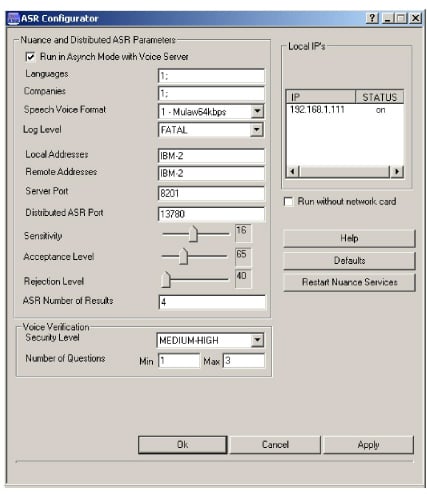
1.On the hard drive where Avaya Messaging is installed, open the \UC\MRCP folder and run UCMRCPConfig.
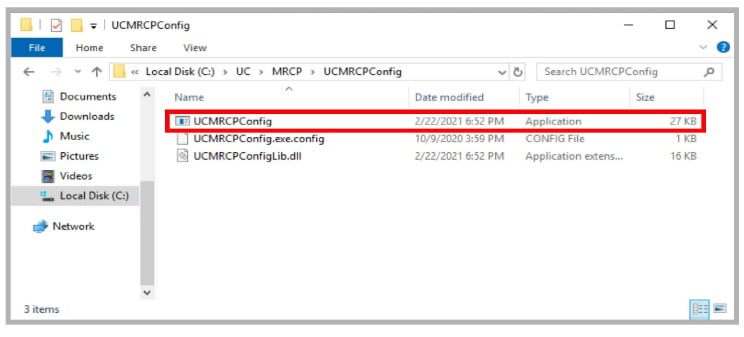
2.The ASR parameters are shown. Change these settings as necessary to correct any issues with the feature.
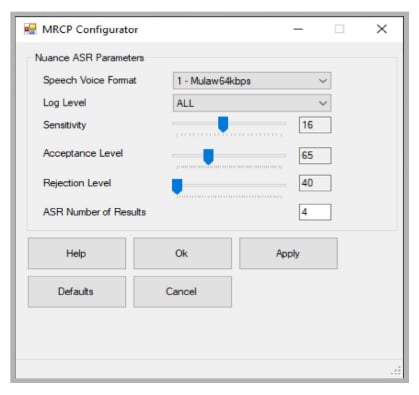
Speech Voice Format: Select the desired format for voice traffic:
0 - Linear 128kbps, 1 - Mulaw 64kbps, or 2 Alaw 64kbps. Mulaw is recommended.
Log Level: Provides control over the amount of information collected by the system regarding ASR. The amount of detail in the log increases with the selection as follows: FATAL (least data collected), ERROR, WARN, USER_ERROR, USER_WARN, STATUS, INFO, D_INFO, VD_INFO and ALL (most data collected). Choosing NONE disables logging.
Sensitivity: This adjusts the ability of the system to handle line noise. Drag the slider to select a value between 5 and 30. Higher settings make ASR less sensitive to noise.
For TAPI/Dialogic boards, set this to 14. For Rhetorex boards, set to 20.
Acceptance Level: Drag the slider to select a value between 50 and 100. The ASR server recevies the voice stream and returns a score (as a %) regarding how certain it is that it understood. Scores at or above the value selected here are processed normally. Scores below this minimum are compared to the Rejection Level.
Rejection Level: Drag the slider to select a value between 40 and 80 (must be lower than the Acceptance Level). Scores below the Acceptance level but above the Rejection Level mean that the ASR server is uncertain whether it understood. The caller will be prompted to verify the result. Scores below the Rejection level are unuseable and stop the process.
ASR Number of Results: Specify the number of results to return (minimum 1) when more than one directory entry is found. For example, if there are 10 John Smiths at the company, this value will limit the number of results offerred to the caller (4 by default) instead of listing all of them.
Click Defaults to return all values to their base values.
When ready, click Apply.