
Avaya CPaaS is a robust development platform — create what you need and integrate it seamlessly with Avaya Messaging and go!
Integrating with an Avaya Messaging system, either on a single server or high availability installation, gives you the ability to receive SMS messages through a number purchased on Avaya CPaaS, anywhere in the world. Messages are delivered directly to your Avaya Messaging mailbox.
•Officelinx/IX Messaging/Messaging 10.5 or later.
•An Internet connection.
•An Avaya CPaaS account and telephone number.
An account with Avaya must be setup, and a number with support for SMS messaging must be purchased from Avaya CPaaS.
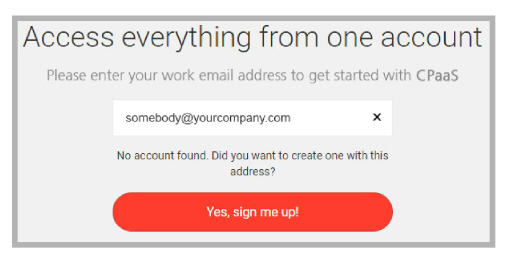
1.Open an Internet browser and go to accounts.avayacloud.com. Enter your Avaya account credentials and click Log In.
If you do not already have one, you can create a new account now. Enter your email address in the space provided,
click Yes, sign me up! and follow the prompts to create a new account.
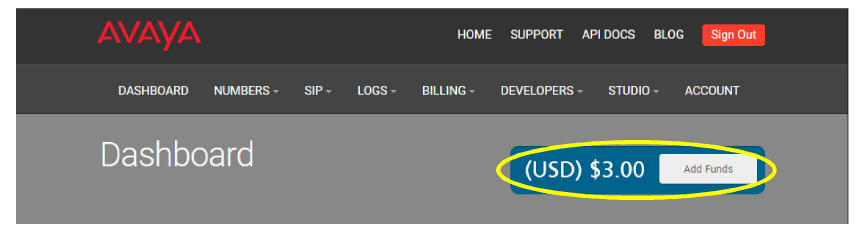
2.New accounts are given a few dollars to get started. If necessary, click Add Funds and add cash to your account balance. Numbers typically cost from $1 to $3 / month, depending upon the country and if it is local or toll free.
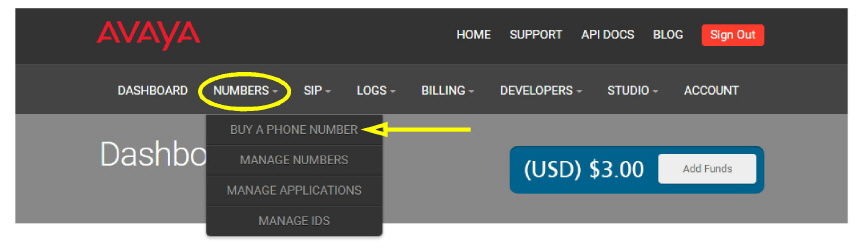
3.With your account properly funded, select Numbers and click Buy a Phone Number.
4.Choose between Local or TollFree numbers.
Select the country that will host the number. You can also enter the area / city code to narrow the search. Leave the search field empty to view all numbers available in the selected country.
When ready, click Search and the list of available numbers will appear.
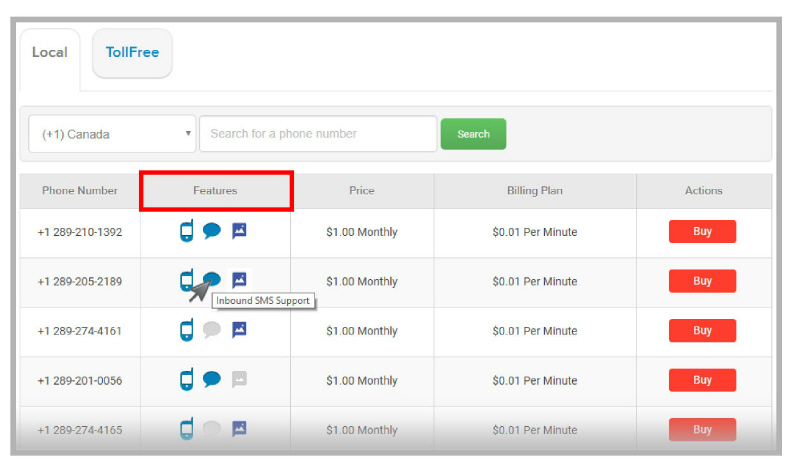
5.Locate the number you want. For the number to work with Avaya Messaging, the number must support SMS Messaging. In the Features column, look for numbers that have a blue ![]() icon indicating that the number can be used with incoming SMS messages. Number with gray
icon indicating that the number can be used with incoming SMS messages. Number with gray ![]() icons do NOT have that feature available.
icons do NOT have that feature available.
When you have located a suitable number, click Buy to add the number to your account.
6.From the Avaya CPaaS Dashboard, record the Account SID and the Auth Token values.
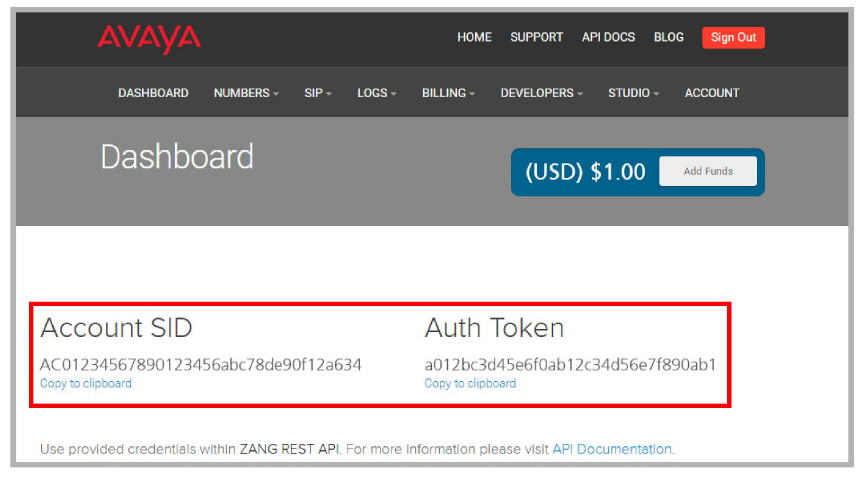
Continue with the configuration of Avaya Messaging.
Avaya Messaging Voice Server Configuration
The configuration of Avaya Messaging is done using the Avaya Messaging Admin program on the Voice Server. In a High Availability environment, the configuration is done on the Consolidated Server only.
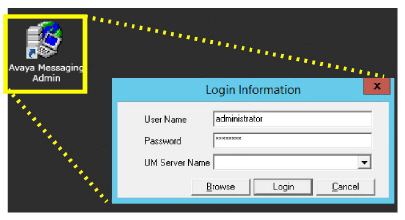
1.On the Avaya Messaging Voice Server, or the HA Consolidated Server, open Avaya Messaging Admin and login.
2.Go to Configuration > Advanced and scroll down to the SMS options.
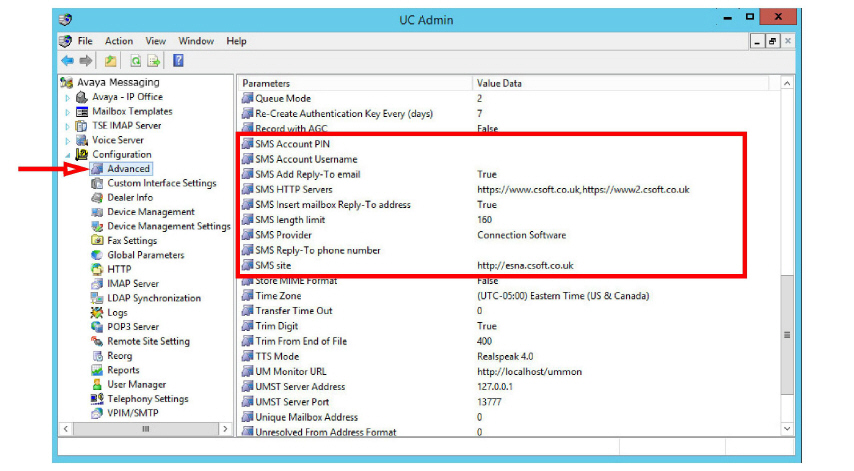
3.Make the following configuration changes. For each entry, double-click the item and modify the details where necessary.
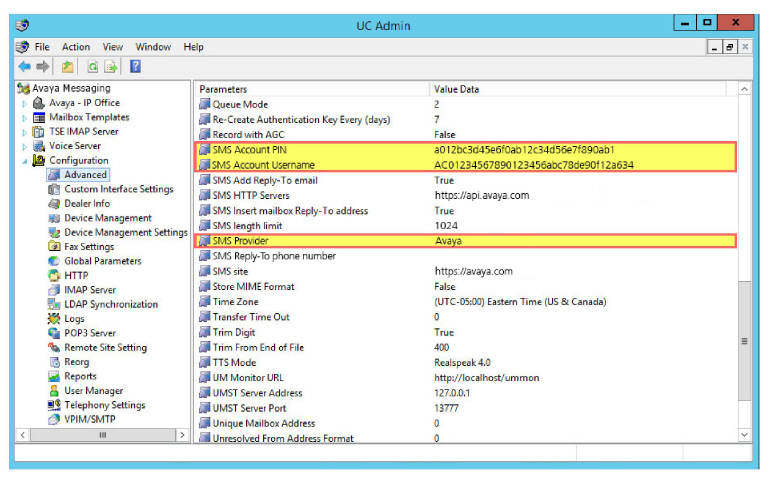
•SMS Provider: From the dropdown menu, select Avaya. Most of the other fields should be filled in automatically.
•SMS Account Username: Enter the Account SID of your Avaya CPaaS account.
•SMS Account PIN: Enter the Auth Token of your Avaya CPaaS account.
Avaya Messaging User Configuration
The Avaya CPaaS telephone number must be associated with a user’s mailbox to ensure that the SMS messages are delivered correctly. There are four methods that you can use. Some require changing the user mailbox through Avaya Messaging Admin, others need an INI file to route incoming messages, and two require the sender to include additional addressing details in the body of the message.
Pick the one that best matches your needs.
One-to-one:
•Personal number / Direct number: Each user has their own dedicated Avaya CPaaS telephone number.
Any-to-many
•Mailbox / Keyword: Your company has one or more Avaya CPaaS telephone numbers, each supporting many users.
|
Method |
Modify Mailbox |
INI File Entry |
Sender Addressing |
|---|---|---|---|
|
Personal number |
|
|
|
|
Direct number |
|
|
|
|
|
|
|
|
|
Mailbox |
|
|
|
|
Keyword |
|
|
|
Use one of these methods if each user has exclusive use of a Avaya CPaaS telephone number.
Associating the number with the mailbox is done by modifying the user profile in Avaya Messaging Admin.
No INI file entry or additional Sender Addressing is required.
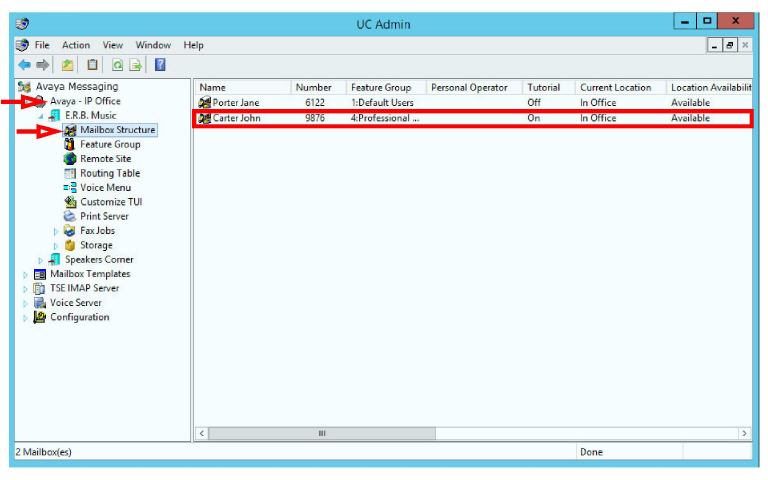
1.In Avaya Messaging Admin, open the PBX and go to the Company menu. Select Mailbox Structure.
2.Double-click a user and open the Addresses tab.
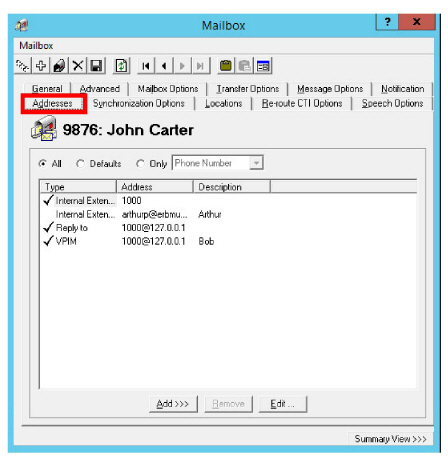
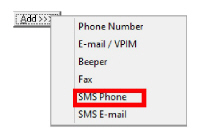
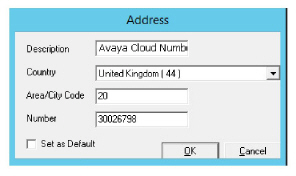
3.Click Add and choose SMS Phone.
4.Enter the required information and click OK when ready.
•Description: Give this address a label.
•Country: From the dropdown menu, select the country that this number applies to.
•Area/City Code: Enter the city or area code for this number.
•Number: Enter the Avaya CPaaS telephone number here.
•Set as Default: This field should be disabled.
5.The new address has been added to the user. Click Save.
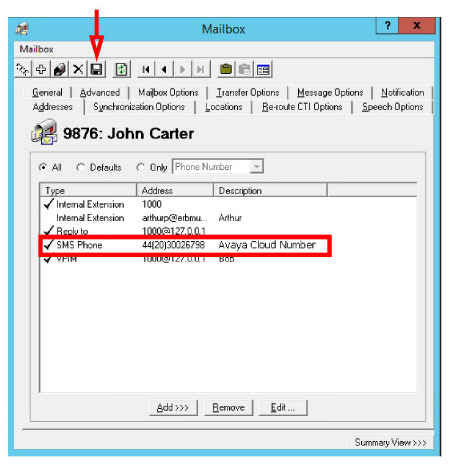
All incoming SMS messages sent to the Avaya CPaaS telephone number will be directed to this user’s mailbox.
Associating the number with the mailbox is done through the INI file.
No additional Sender Addressing or changes to the user profile are required.
1.Open a text editing software program such as Windows Notepad and create/modify the INI file.
2.Each person using Direct number must have an entry in the INI file, and each entry contains four elements.
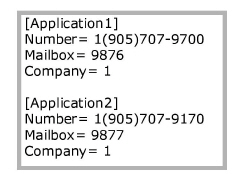
•[ApplicationX]: This is an incrementing label, ApplicationX, where X is a unique identifier for each user (i.e. [Application1] , [Application2] , etc.). There are no spaces in this title, and it must be enclosed in square brackets.
•Number= : Specify the Avaya CPaaS telephone number for the recipient. This is where the sender addresses the message.
|
Caution: The number in an incoming message must match this value exactly or the message cannot be delivered. |
•Mailbox= : Enter the mailbox for the recipient. The incoming SMS message will be delivered here.
•Company= : For sites that have multiple tenants / companies, enter the company number for this user here. This value must match the company numbers defined on the Avaya Messaging voice server. In most cases, where there is only a single company using the server, set this value to 1.
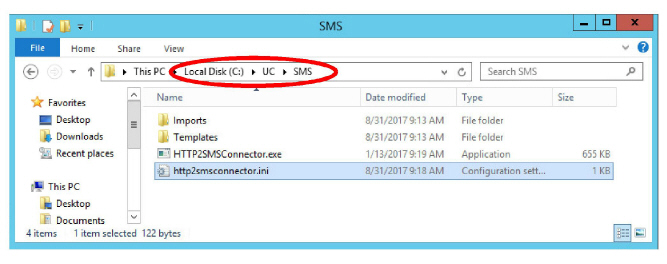
3.Once all users have been added, save the file with the name: http2smsconnector.ini
Save it on the Avaya Messaging Voice Server installation drive in the UC/SMS folder.
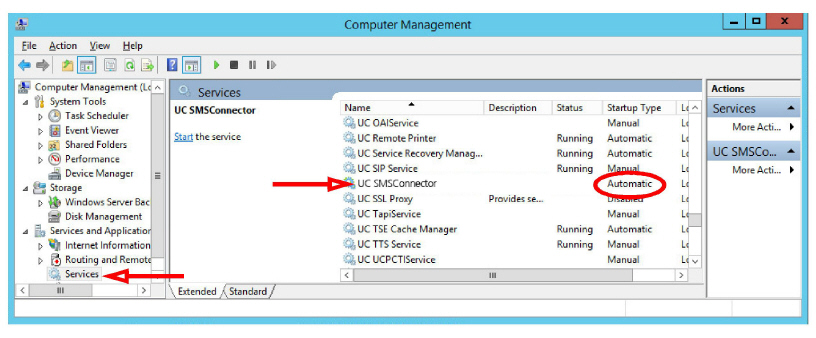
4.Stop and re-Start the UC SMSConnector service on the Voice Server, or reboot the server.
This service should also be configured to start automatically.
|
Note: You can combine both Direct number and Keyword entries in the same INI file. Only the information in each entry will change. 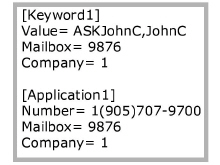
|
All incoming SMS messages sent to the Avaya CPaaS telephone number will be directed to the user’s mailbox defined in the INI file.
Use one of these methods if your company has one or more Avaya CPaaS telephone numbers with many people using each one.
The sender must begin the message with ## followed by the mailbox number of the recipient. This mailbox must be followed by  or
or  .
.
Associating the number with the mailbox is done explicitly by the sender within the body of the message.
No INI file entry or changes to the user profile are required.
All incoming SMS messages sent to the Avaya CPaaS telephone number will be directed to the user’s mailbox based upon the value that the sender includes within the body of message.
A unique Keyword is used to identify the recipient of the message.
Associating the number with the mailbox requires both addressing within the body of the message and an entry in the INI file.
No changes to the user profile are required.
1.Open a text editing software program such as Windows Notepad and create/modify the INI file.
2.Each person using Keyword must have an entry in the INI file, and each entry contains four elements.
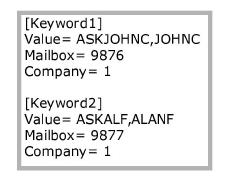
•[KeywordX]: This is an incrementing label, KeywordX, where X is a unique identifier for each user
(i.e. [Keyword1], [Keyword2] , etc.). There are no spaces in this title, and it must be enclosed in square brackets.
•Value= : Specify the unique keyword that identifies the recipient. Multiple keywords can be included if they are separated by a comma. This keyword must be included in the body of the message as the first item, followed by  or
or  .
.
|
Caution: Keyword values are case sensitive. The keyword in an incoming message must match this value exactly or the message cannot be delivered. |
•Mailbox= : Enter the mailbox for the recipient. The incoming SMS message will be delivered here.
•Company= : For sites that have multiple tenants / companies, enter the company number for this user here. This value must match the company numbers defined on the Avaya Messaging Voice Server. In most cases, where there is only a single company configured, set this value to 1.
3.Once all users have been added, save the file with the name: http2smsconnector.ini
Save it on the Avaya Messaging Voice Server installation drive in the UC/SMS folder.

4.Stop and re-Start the UC SMSConnector service on the Voice Server, or reboot the server.
This service should also be configured to start automatically.

All incoming SMS messages sent to the Avaya CPaaS telephone number will be directed to the user’s mailbox using both the addressing within the body of the message and the entry within the INI file.
|
Note: You can combine both Keyword and Direct number entries in the same INI file. Only the information in each entry will change. 
|
Once the Avaya CPaaS telephone number has been purchased and Avaya Messaging configured to use it, messages sent to that number will be received in the recipient’s inbox.
Contacts wishing to send a message to the user address it to the Avaya CPaaS telephone number. Additional addressing by the sender may be required.
The sender only needs to provide the number (e.g. 442030026798) to address the message.
The Voice Server spots the telephone number and uses the Avaya Messaging Admin Addresses tab to direct the message to the correct mailbox.
Enter the recipient’s Avaya CPaaS telephone number (e.g. 1(905)707-9700) exactly as it is configured in the INI file.
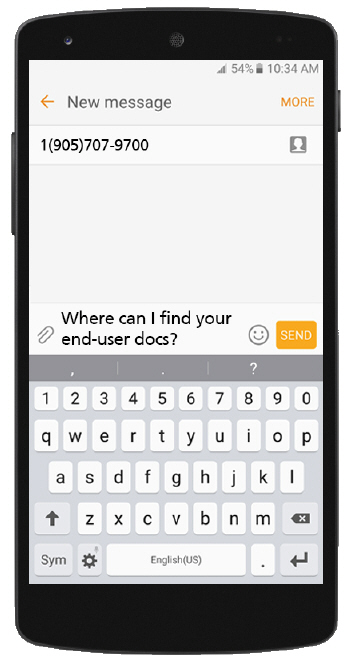
The Voice Server spots the telephone number and uses the INI file to direct the message to the correct mailbox.
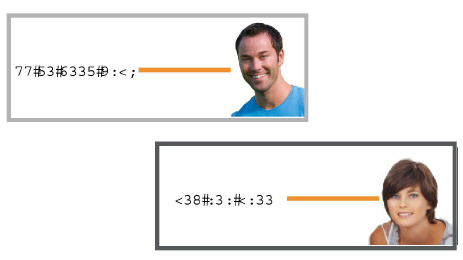
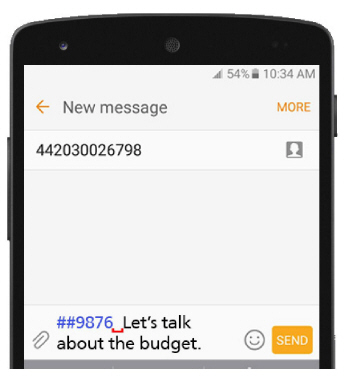
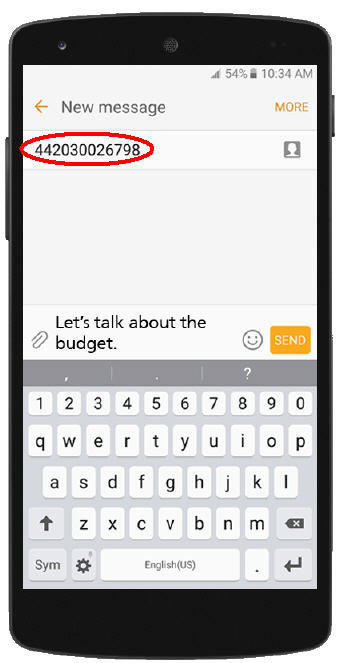
Mailbox
The sender must include the recipient’s mailbox number in the body of the message. The number must be preceded by ## (e.g. ##9876).
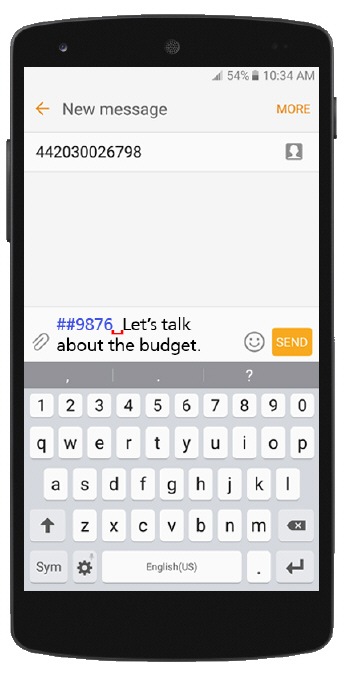
The ## marker tells the server that the number that follows is the extension of the recipient and the message is delivered accordingly.
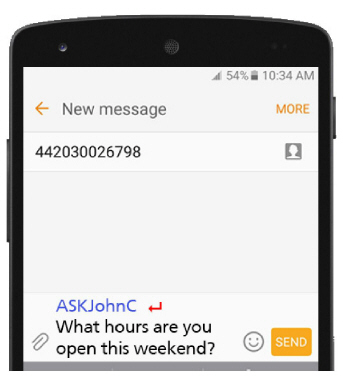
Keyword
The sender must include the keyword exactly as it is configured for that user in the INI file (e.g. ASKJohnC). The keyword is case sensitive.

The Voice Server spots the keyword and uses the INI file to direct the message to the correct mailbox.


