
Avaya Messaging and a IBM Domino server are able to integrate through the IMAPCSE services, providing a truly unified messaging experience. Once the configuration is complete the servers communicate and synchronize all data among themselves, eliminating the need for you to constantly manage multiple locations.
The use of the administrator account from IBM Domino allows you to streamline the sign on process while still maintaining individual password security protocols on each mailbox. The Domino administrator account credentials are entered through the Avaya Messaging Admin console.
When a voice server integrates with an email server, the data between the two is synchronized, allowing for accurate information regardless of the point of access. Receiving messages, and any actions performed by the users is synchronized between the two servers constantly, ensuring that your content is always up-to-date.
Administrators can also customize what will be synchronized. A full synch includes contact and calendar entries along with messages. If the system has telephone and message light integration, MWI (message waiting lights) will also remain accurate since the status of messages are synchronized between the servers.
|
Requirements |
Details |
|---|---|
|
License |
IMAPCSE License |
|
Software |
Officelinx/IX Messaging version 8.5 - 10.9 Avaya Messaging version 11.0 or higher |
IBM Domino configuration is largely divided into two parts. First is the configuration of both the Domino server and the Avaya Messaging server to synchronize messages between the mailboxes on both systems. Second is configuring UC forms for IBM Notes so that end users will have the ability to record and playback voice messages from their IBM Notes client. While specific variables regarding settings will differ from site to site, this guide provides a general guideline for integrating IBM Domino with Avaya Messaging.
Setting up IMAP CSE Synchronization
To configure IBM Notes for Avaya Messaging users:
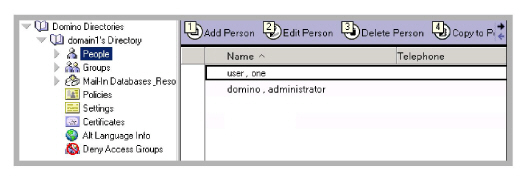
1.Access the IBM Notes Administrator.
2.Under the Domain/People directory, double click User and enter a nickname, a user name and an Internet password.
3.On the IBM Domino Console, run the following command:
Load Convert –m mail\username.nsf * ucmail.ntf.
|
Note: In the above command, username is the IBM mail file, and ucmail.ntf is the template into which the forms were installed. |
|
Note: Once the forms have been installed and distributed to the users, their inbox will need to be closed and reopened in order for the templates to be refreshed. This needs to be done every time the Master Template is updated. |
The following procedure is optional.
To prevent the IBM Window from scrolling while logging in / out in IMAP:
1.On the IBM Notes Server, open the notes.ini file.
2.Set the Log_Session=1 to 0.
3.Click Save, then click Close.
Avaya Messaging Configuration: Single User
|
Note: Configuring Avaya Messaging for use with Superuser credentials is no longer supported. |
With this option, Avaya Messaging connects to the IBM Domino server on a mailbox-by-mailbox basis, using each individual client’s account credentials for each connection.
It is necessary to establish IMAP CSE connections before setting up Unified Messaging.
To begin the setup of your unified messaging you need to create a CSE IMAP connection. The purpose of this connection is to tell the voicemail what IP address it is supposed to connect to in order to connect to your IBM Domino server.
To create CSE IMAP connections
1.Login to Avaya Messaging Admin. The following screen appears.
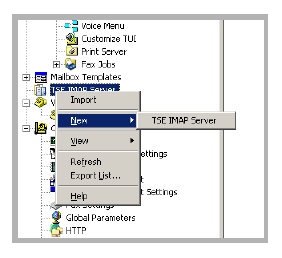
2.Locate TSE IMAP Server in the left-hand pane. Right-click and select
New > TSE IMAP Server. The following screen appears.
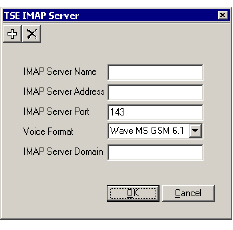
3.Complete the following fields:
•In the IMAP Server Name text field, enter a descriptive name of the server.
•In the IMAP Server Address text field, enter the Domino server’s IP address.
|
Note: If you are using an SSL connection, you should use the server’s domain name (DNS) instead of the IP address so that the certificate can be authenticated properly. SSL connections should always use port 993. |
•Accept the default value in the IMAP Server Port field or enter the server port field provided to you by your network Admin.
•Select the Voice Format that your servers will use to handle voice messages.
•In the IMAP Server Domain field, enter the domain name of the mail server to avoid looping messages during synchronization. This server address will be cross referenced with the Reply To address of each mailbox.
|
Note: CSE was formerly known as TSE. |
Setting Up Unified Messaging (UM)
Mailbox integration is a configuration where each individual user on your Domino server is given their own mailbox on the Avaya Messaging system.
1.Obtain the list of the users you are going to integrate.
|
Hint: Contact your system administrator to verify that the usernames and passwords are correct before proceeding. |
2.On the voice server machine, open Avaya Messaging Admin.
3.Open the Mailbox properties.
4.On the Addresses tab, verify that the Reply To email address is the address of the user’s IBM Domino account. Click Save.
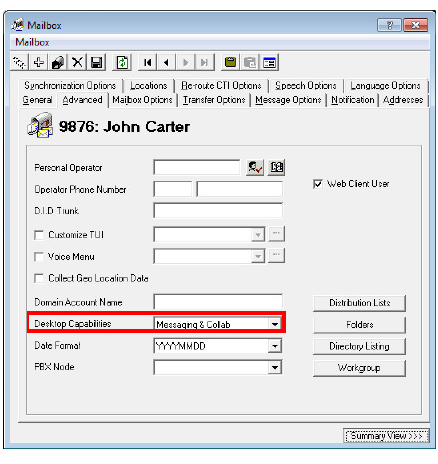
5.Click on the Advanced tab.
6.From the Desktop Capabilities dropdown list, select
Messaging & Collab.
7.Click the Save Mailbox toolbar button.
|
Warning: The following steps must be completed in the specified order. |
8.Click on the Synchronization Options tab.
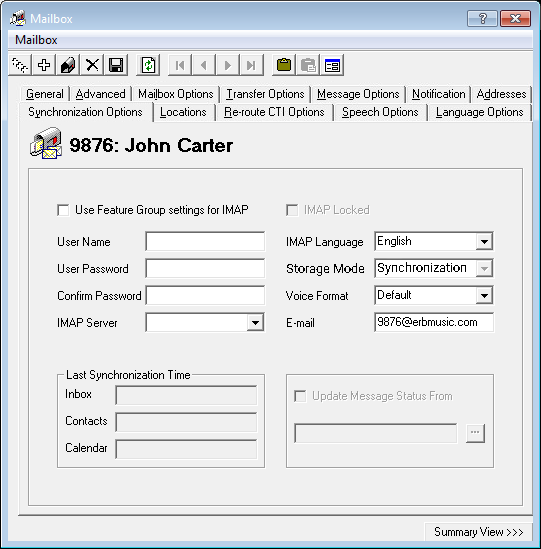
9.In the User Name field, enter the details of the user’s IBM Domino email account. Change all forward slashes / to pipes |, such as:
Firstname Lastname|Organizationname
|
Note: Organizationname may include the domain and other information. Separate all fields by a pipe instead of a slash. 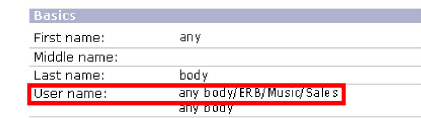
|
10.From the Storage Mode dropdown list, select IMAP.
11.Enter the mailbox Internet password in the User Password and Confirm Password fields.
12.For IMAP Server, select the Domino server.
13.Disable the Use Feature Group setting for IMAP checkbox.
14.In the IMAP Language field, choose the language of the mailbox. You must make a choice in this field.
15.Do not use the Message Status feature. Make sure that the Update Message Status From checkbox is not checked.
16.Click on the Save Mailbox toolbar button.
17.On the voice server machine, open IMAP Tester.

18.Click on IMAP Synchronization Settings. ![]()
19.Click on the Performance/Tuning tab.

20.Disable the High Performance Pack checkbox.
21.Click Apply to save the changes. Exit the utility.
22.Restart the UC TSE Cache Manager service.
Installing UC Forms for IBM Notes
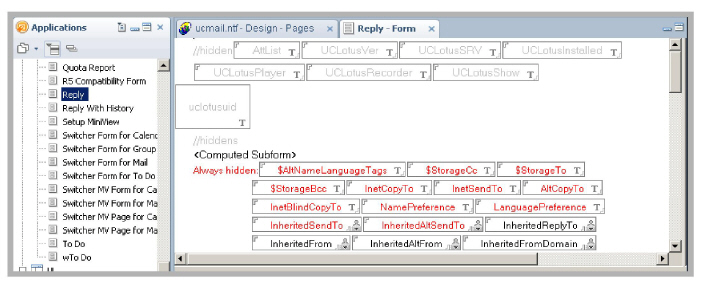
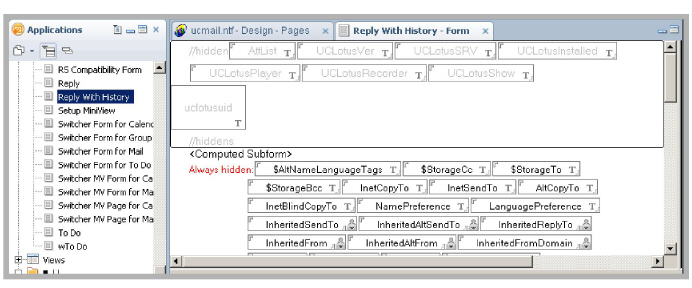
This section describes the installation and configuration of UC forms for IBM clients. UC forms components are packaged in the UCMail.ntf IBM template database, which can be found on the installation DVD. The UCMail template contains the following:
•UC Player subform that can be used to extend other forms with an audio player/recorder.
•A subform to indicate the location of iLink Pro Desktop installation file.
•Modified versions of Memo, Reply, and Reply with History forms with UC Player subform added to each.
There are two methods for installing UC forms onto the server:
•A - Use a provided template as the basis for all UC users.
•B - Copy design elements from a provided templates into another, and modify standard forms to include the UC Player subform. This method allows you to add UC player to existing custom templates.
Regardless of which method is used, the design is made available to the IBM Notes client through a manual design refresh initiated by the client, or by running the designer task on the server. Once the design elements are propagated to the target database, each user is provided with an install button within IBM Notes that allows the installation of binary components on the client PC.
Using the Provided Template as Design (Method A)
1.Insert the Avaya Messaging Installation DVD.
2.Copy the ucmail.ntf from the DVD (located inside IBM folder) and paste it into the Domino Data folder
(e.g. C:\Program Files\IBM\IBM\Domino\Data).
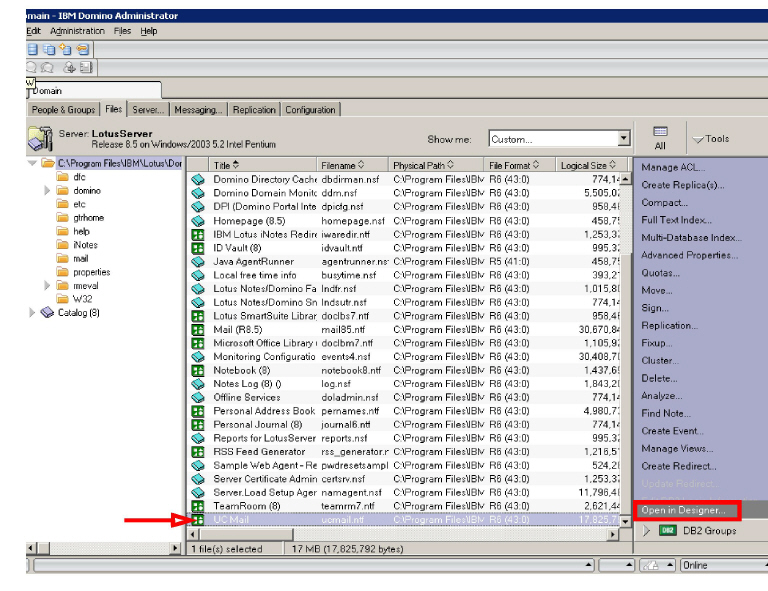
3.When you open Domino Administrator, you will notice UC Mail in the list of available templates. Select the template then open it in the Domino Designer.
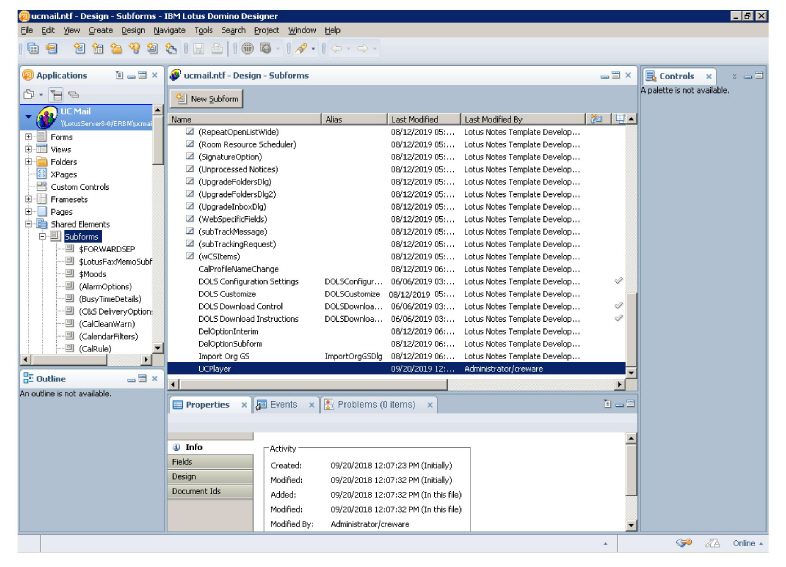
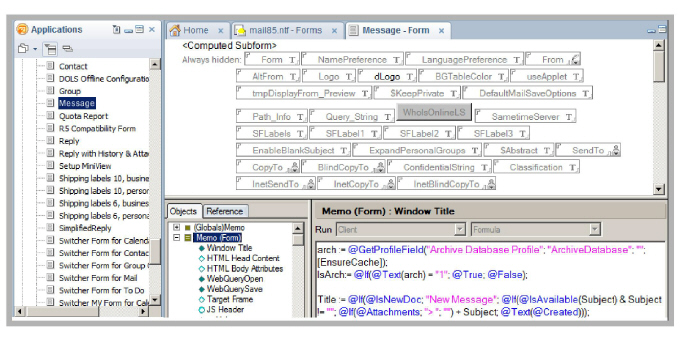
4.Expand Shared Elements > Subforms in the left pane of the Designer window. From the main pane locate UCPlayer and double click to open.
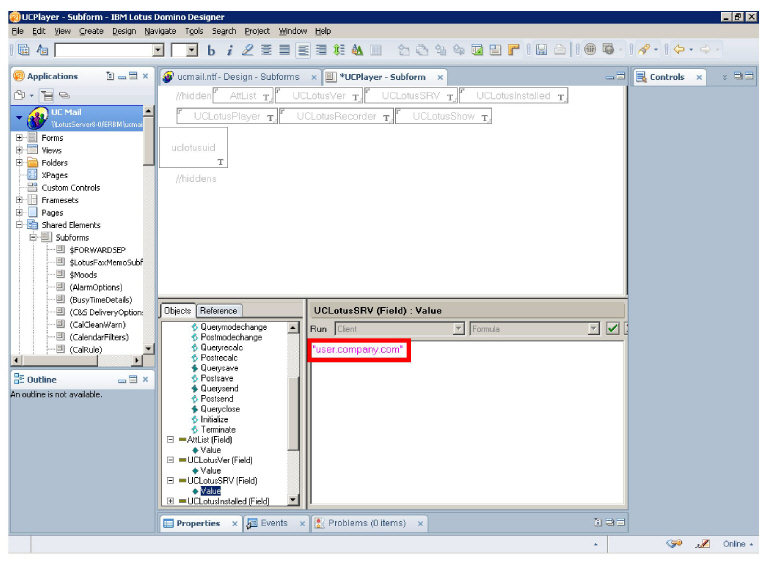
5.The fields associated with the UC Player subform appear. Open the UCIBMSRV variable and enter the Avaya Messaging server’s domain name or IP address. This is where end users download the iLink Pro Desktop application. When ready, Save and Close the subform. This will update the design element signer.
|
Hint: Use the UCIBMVer field to manage version control with UC form. |
6.From the Forms section, double click on Memo. Save and close the Memo form to update the design element signer.

7.Repeat the process for Reply form. Open the form then Save and close to update the design element signer.
8.Repeat the process for Reply with history form. Open the form then Save and close to update the design element signer.
9.Repeat the process for any other forms you wish to add the UC Player to, and then exit Domino Designer.
IBM Domino uses an Execution Control List (ECL) to set up workstation data security. An ECL limits the actions of formulae, scripts, forms and other objects run on a workstation. For example, an ECL can prevent another person's code from running on a PC and damaging or erasing data.
Domino administrators have the power to allow users to modify their ECLs or to control all changes to their ECLs across an organization. In order to limit workstation access, an ECL will look for a database, template and item signature before opening on the workstation. The ECL will then check this signature against its settings to determine what level of access can be granted.
Groupware forms are subject to an ECL check as well, since they contain scripts and COM objects. Thus, on the first installation of Groupware forms within an organization, you are advised to:
•Modify the Administrative ECL on the Domino Server.
•Propagate the changes to all clients.
1.Open Domino Administrator. Locate the People & Groups tab.
From Actions menu, select Edit Administration ECL.
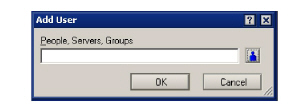
2.From the Workstation Security: Execution Control List window, click on the Add button.
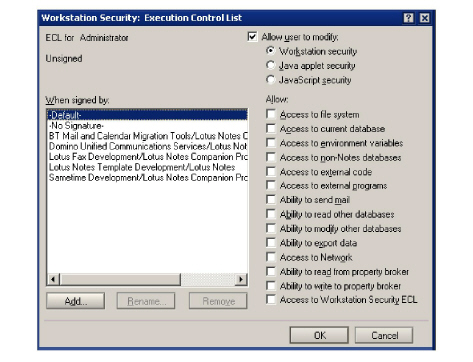
3.In the People, Servers, or Groups field, enter the name of the person/server/group to be added to the ECL. This should be the person that performed the installation, most likely the Domino Administrator.
Once you have selected a user, click OK.
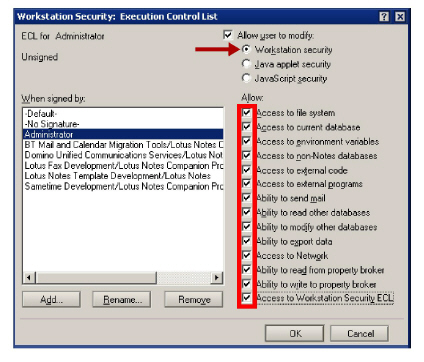
4.Now select the user or object added in the previous step (Administrator in this example). Enable Allow user to modify, then select the Workstation security radio button. Enable all checkboxes under Allow then click OK.
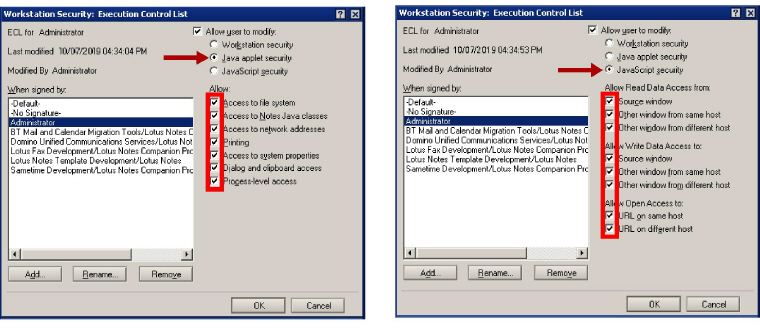
5.Repeat for both the Java applet security and JavaScript security radio buttons.
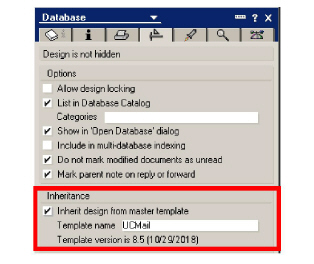
6.For each mailbox database that will include UC forms, configure them to inherit the design from the UCMail template. This can be done using the load convert command, or manually through mailbox database properties.
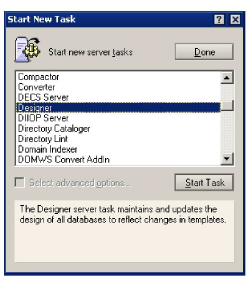
7.Now that the forms are ready, you must append the new design. From Status > Server Tasks, click Start... in the list of tasks on the right pane.
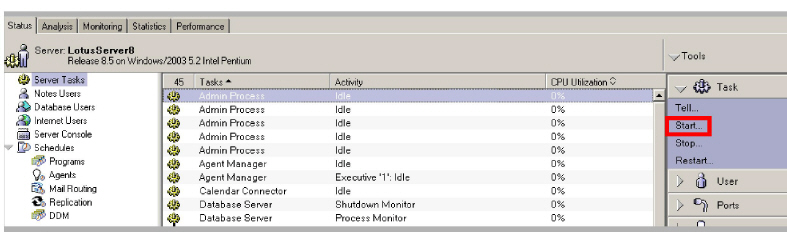
8.Select Designer from the list then click Start Task. The design will be updated for all Users. Users can now take advantage of the forms packaged with iLink Pro Desktop in IBM Notes.
|
Note: Once the design elements have been propagated to the client database, the forms are almost complete. A few additional components must be installed to fully enable forms on the client. |
Adding UC Forms to Existing Design (Method B)
1.This procedure is similar to Method A, but you will be importing the UC form into an existing database template so that you can utilize UC form within an existing custom form design. Please refer to the details within Method A to familiarize with yourself with the procedure before proceeding.
2.Insert the Installation DVD.
3.Copy the ucmail.ntf from the DVD and paste into the Domino Data folder
(e.g. C:\Program Files\IBM\IBM\Domino\Data).
4.Navigate to File > Database > Open. Select the ucmail.ntf file from Step 3 and open it in Domino Designer.
5.Open the copied template. This template should contain the UC forms. As a rule, all users in an organization will inherit design elements from a single template. Should it be necessary to provide UC functionality to a select group of users, it is recommended that a copy of the default template be created and all UC elements placed there. Design elements for UC user databases can then be inherited from the created template.
6.Edit the UCIBMSRV variable to point to your Web Access for iLink Pro Desktop download.
7.Copy the UCPlayer subform and paste it into the target template. If the UCPlayer subform is already present in the target template (upgrade scenario), then remove it prior to upgrading.
8.Open the Memo form in the target template and select Create > Resource > Insert Subform.
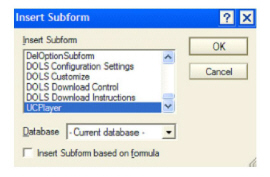
9.Click OK. The UCPlayer subform will be inserted into the Message form.
10.Click Save and close the form.
11.Repeat Steps 7-10 for each form that is to include the UCPlayer subform.
12.Create three copies of the modified Memo form and give them the following names: TelNTVoice, TelNTFax, and TelNTText.
13.Follow the procedures on ECL Configuration on page 307 to complete the process.
Installing UC Forms in IBM Notes
To use UC forms within IBM Notes, you must install iLink Pro Desktop. Obtain iPD from IBM Notes.
Installing UC Bar and iLink Pro Desktop
|
Note: Subforms must be inserted in all areas which require voice message playback function. |
1.Run IBM Notes.
2.Open the mail database.
3.Create or open a document that uses a form with the UC Player subform (e.g. Memo).
4.In the Actions pane click on the Install UC bar button.

5.IBM Notes will open a web page to download the iLink Pro Desktop software. iPD must be installed for UC forms to work.

6.Download the installation package then install the application.
7.Once iLink Pro Desktop is installed, the button will change to Show UC bar. Click on this button to open the UC form.
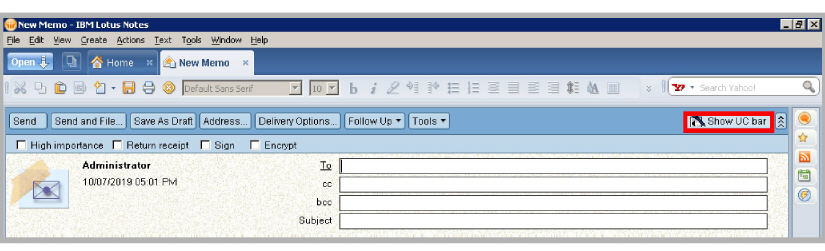
|
Note: You may have to restart IBM Notes or reopen a form in order to see the new button. You must also be logged into iLink Pro Desktop to use the UC forms. |
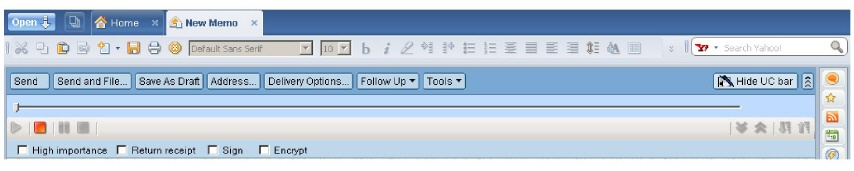
8.You will now have access to Record and Playback actions through the form.
Verifying the IBM Notes client ECL setup
1.Open IBM Notes.
2.Select File > Security > User Security > What Others Do > Using Workstation. The User Security dialog box appears.
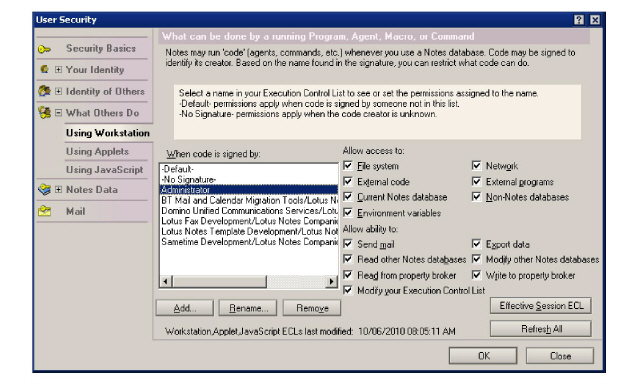
3.The ECL should contain all of the entries that were defined in the Administration ECL.
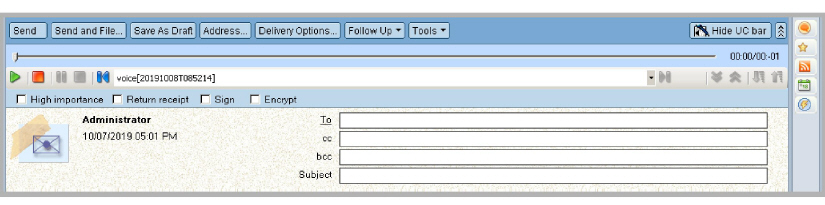
Composing a Voice Message
1.Create a new message.
2.Fill out the To, Subject and any other fields as you would normally do.
3.Use the UC bar provided to record a message.
•Click  to begin recording the voice message with your microphone.
•Click  to begin recording the voice message with your phone.
•Click  to pause recording or playback.
•Click  to stop recording or playback.
•Click  to playback recorded message.
|
Note: Some actions may not be available depending on site settings. |
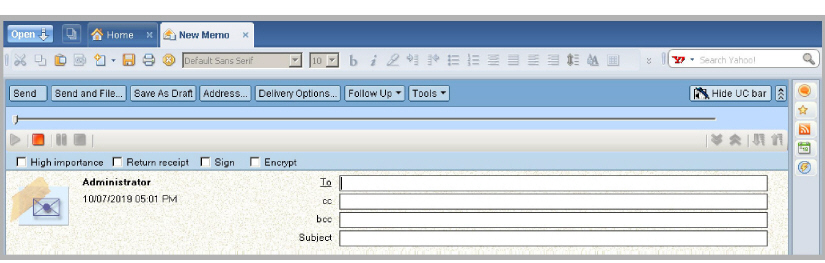
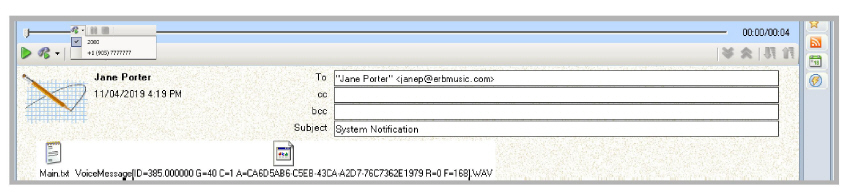
4.When you finish recording a message, you will see an attachment automatically created as shown.
Click Send to transmit your message.
Listening to a Voice Message
1.Open a voice message from IBM Notes. UC forms will detect voice messages and provide options for message playback.

•Click  to begin playing the voice message on your PC speaker.
•Click  to begin playing the voice message on your phone.
•Click  to pause playback. • Click
  to stop playback.
|
Note: Some actions may not be available depending on site settings. |
2.If you choose to play the message on your phone, you will be given an option to choose which number to listen from. The list depends on your current UC location and the extensions defined through iLink Pro Desktop. When you select a number to listen from, UC server will dial that number, then playback the message once the call is answered.
Configuring UC Mailbox to Synchronize with IBM Notes
|
Note: If you do not have access to Web Access, this configuration can be performed by your administrator. |
1.Log into Web Access.
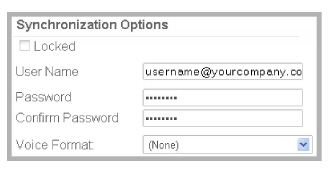
2.Click on the Account icon.
3.If the Locked checkbox is selected, deselect this checkbox.
4.Provide the following information:
User Name: Enter your mail server user name.
|
Note: The user name you enter in this field will be the same user name for the email account as it exists on the mail server. |
Password: Enter the password for your mail account.
|
Note: The password you enter in this field will be the same password for the email account as it exists on the mail server. |
Confirm Password: Confirm the above password.
Voice Format: From the dropdown menu, select the voice format which will be used for voice messages. You should leave this field as default in most cases.
5.Click on Save and Close button at the top.