Dialogic SR140 Fax Integration
Avaya Messaging permits high volume fax users to integrate their Dialogic SR140 fax software with the voice server platform.
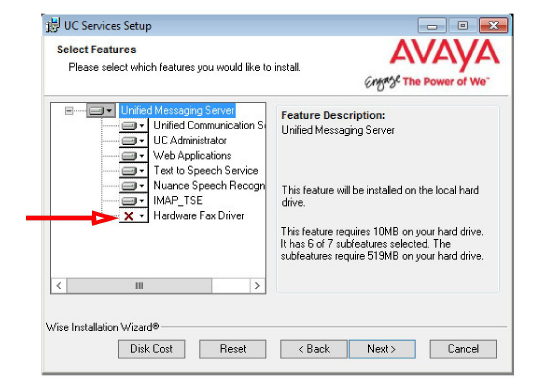
Install the Avaya Messaging program onto the computer that will act as the Voice Server. Ensure that the Hardware Fax Drivers option is installed at the Features Selection screen during program installation. This will ensure that the necessary program elements are included with Avaya Messaging.
Once both the Dialogic SR140 and the Avaya Messaging voice server have both been installed, the fax software must be configured to communicate with the UC platform.
The following procedures must be performed on each computer that is running the SR140 software.
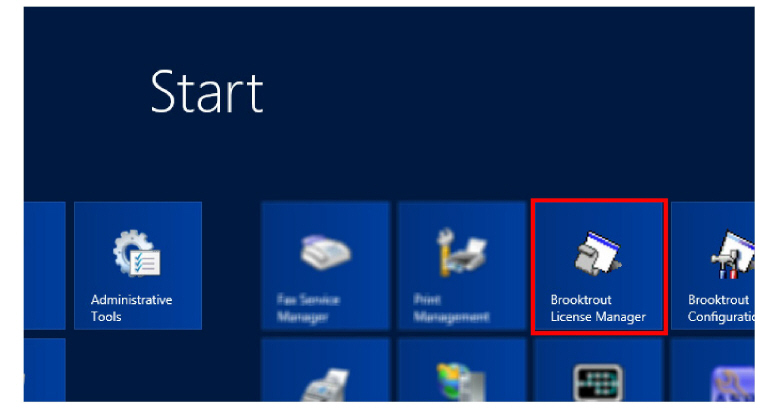
1.Open the Brooktrout License Manager program.
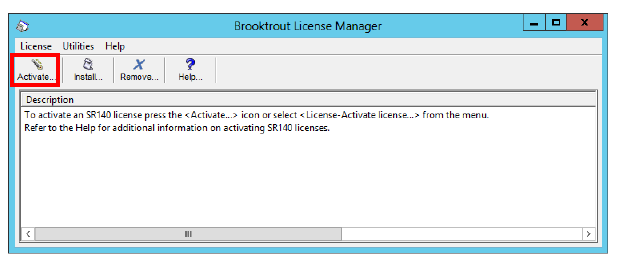
2.Enable the SR140 license by clicking on the Activate button.
|
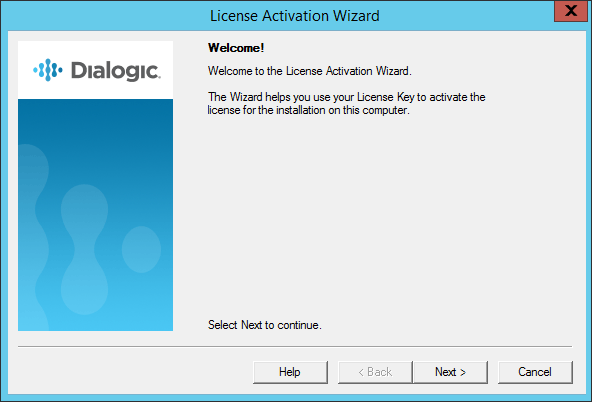
Note: The procedure shown here uses the Activation Wizard and an Internet connection. |
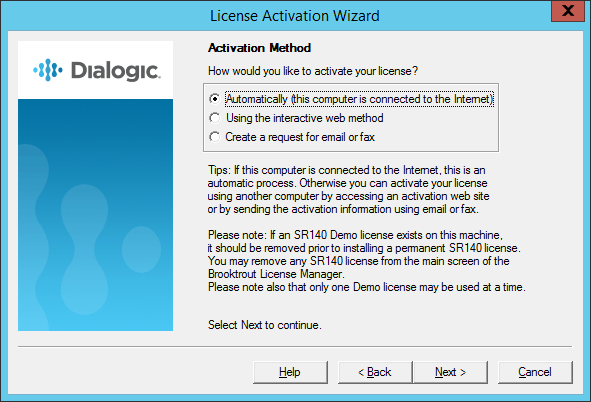
3.Click Next.
4.Make sure that Automatically is selected as the Activation Method, then click Next.
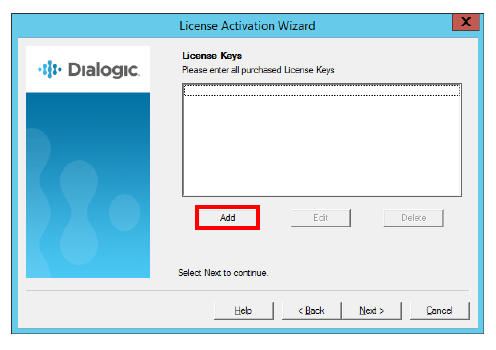
5.Currently, no License Keys are installed. Click Add.
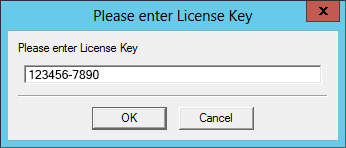
6.Enter the SR140 license key number that came with the fax software package. Click OK when ready.
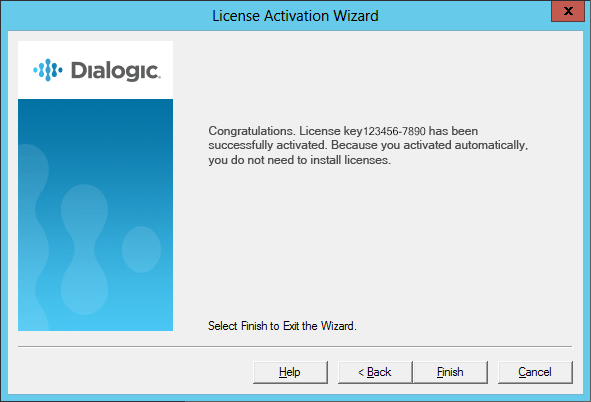
7.The new license key has been successfully added to the system. Click Next.

8.Click Next to continue to the Product Registration pages.
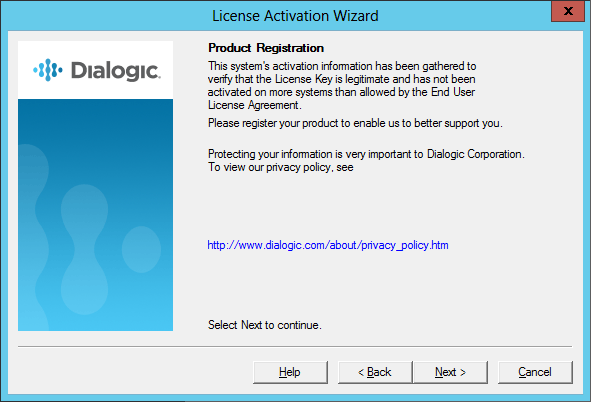
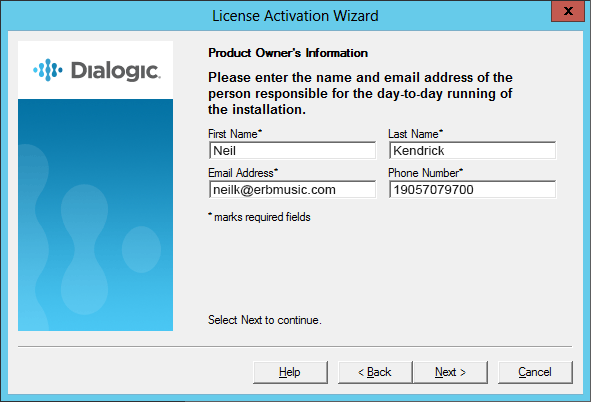
9.Enter the details of the site administrator. All fields are required for registration. Click Next when ready.
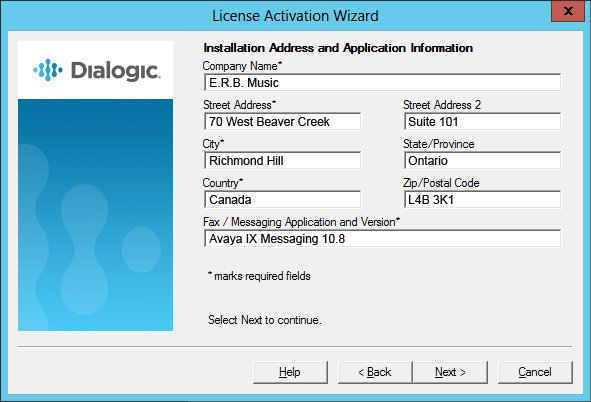
10.Enter all of the required information into the fields provided. This is the site where the software is installed.
Click Next to continue.
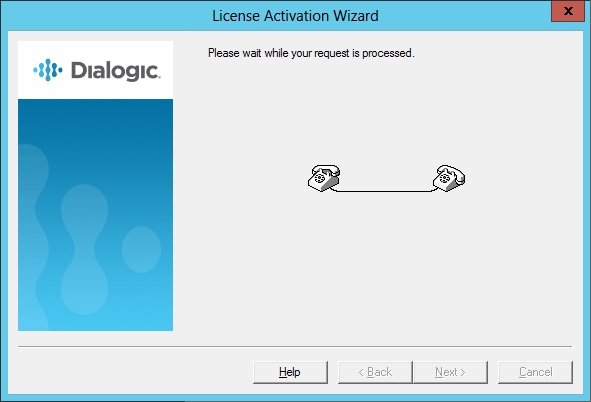
11.The program will connect to the Dialogic servers to upload the registration details. This requires a working Internet connection, and must be completed successfully before the license will be activated.
When it has finished, click Next to continue.
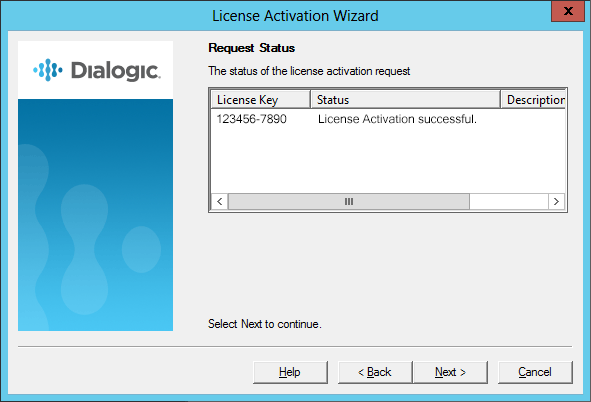
12.The new license has been added to the Wizard. Click Next.
13.Click Next to complete the activation Wizard.
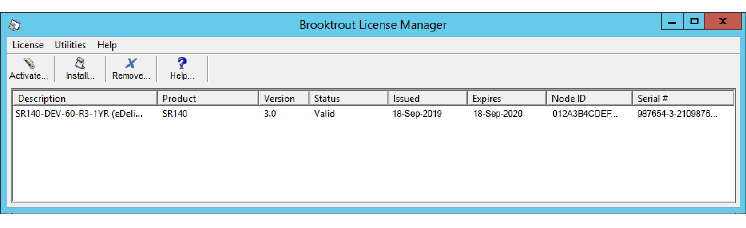
14.The added license appears in the Brooktrout License Manager.
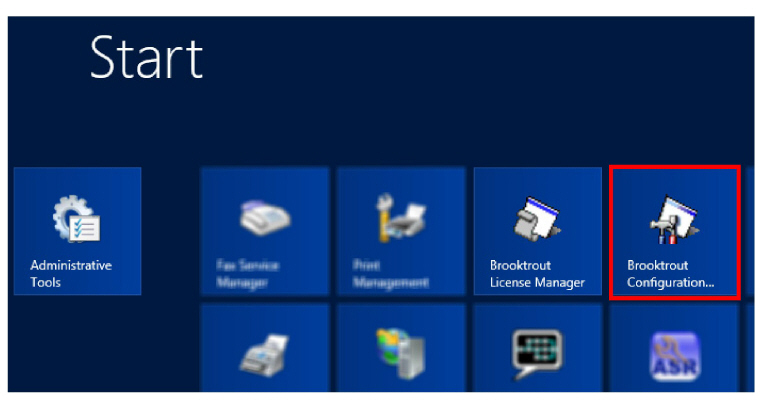
1.Open the Brooktrout Configuration Manager program.
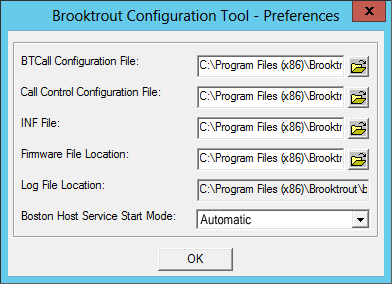
2.At Configuration Tool - Preferences, change Boston Host Service Start Mode to Automatic and click OK.
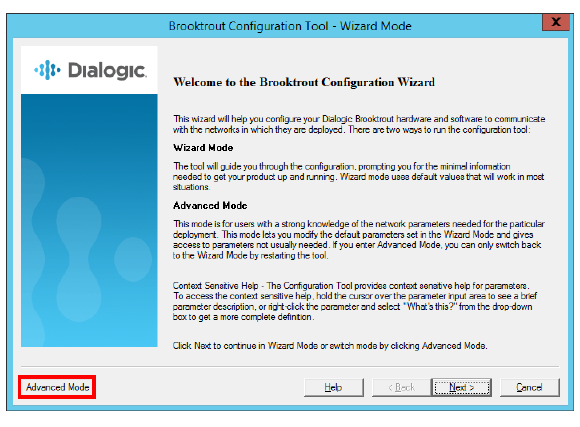
3.When the Configuration Wizard starts, choose Advanced Mode.
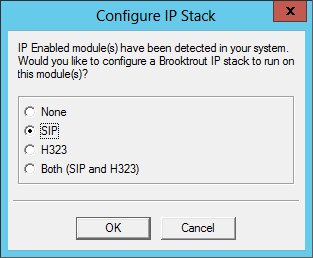
4. Enable the option for SIP. Click OK to continue.
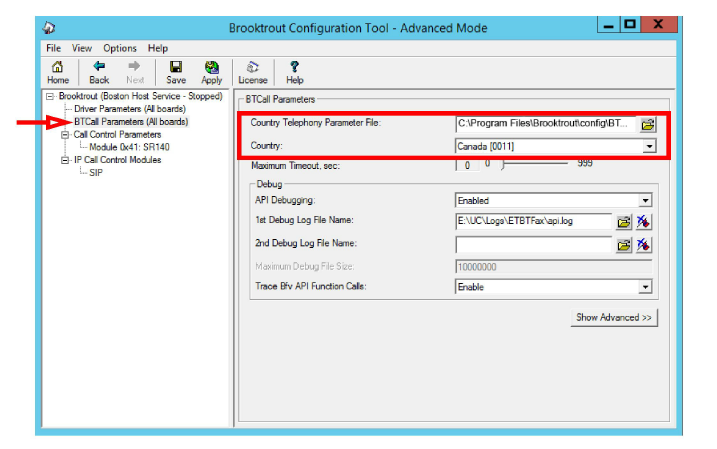
1.Select BTCall Parameters (All boards).
Enter the path to the appropriate file in the space beside Country Telephony Parameter File. By default, this will be:
C:\Program Files\Brooktrout\config\BT_CPARM.cfg
Modify the path according to the location where your administrator has installed the program.
Select your Country from the dropdown list.
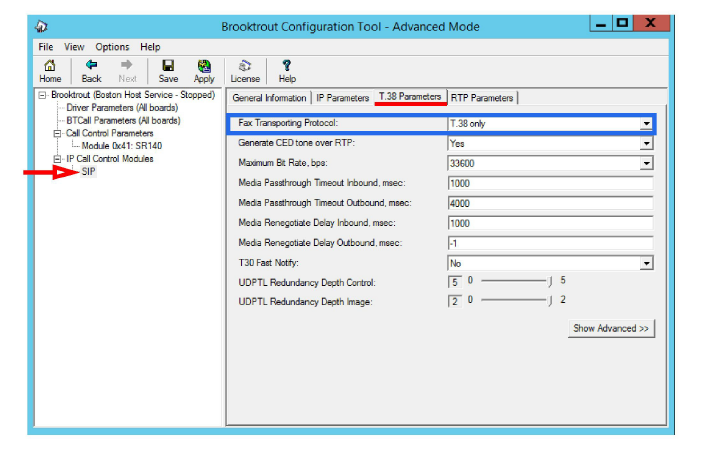
2.In the left-hand window, select SIP under IP Call Control Modules. Go to the T.38 Parameters tab.
For Fax Transporting Protocol, the recommended value is T.38 only.
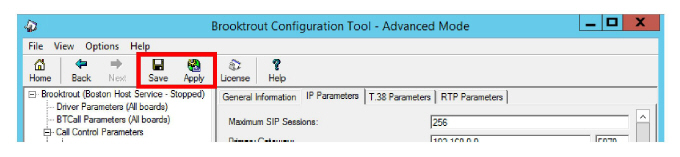
3.Move to the IP Parameters tab.
For Primary Gateway, enter the IP address and port number to be used for all outbound fax traffic.

4.For Contact IPv4 Address, enter sr140@ followed by the IP address and port used for inbound faxing. This must be a different port than the one used for the Avaya Messaging voice server (5060).
5.Click Save to confirm the changes.
6.Click Apply to restart all affected services.
The configuration of the SR140 software is complete.
The voice server must be configured to send faxes to the SR140, and to prepare to receive them across the same channel. A setting for incoming, and another for outgoing faxes must be configured on the server using Avaya Messaging Admin.
1.Go to Start > All Programs > Avaya Messaging > Avaya Messaging Admin, or click the Avaya Messaging Admin icon on the server desktop. Enter the username and password at the prompt.
2.Open Configuration and click on Fax Settings.
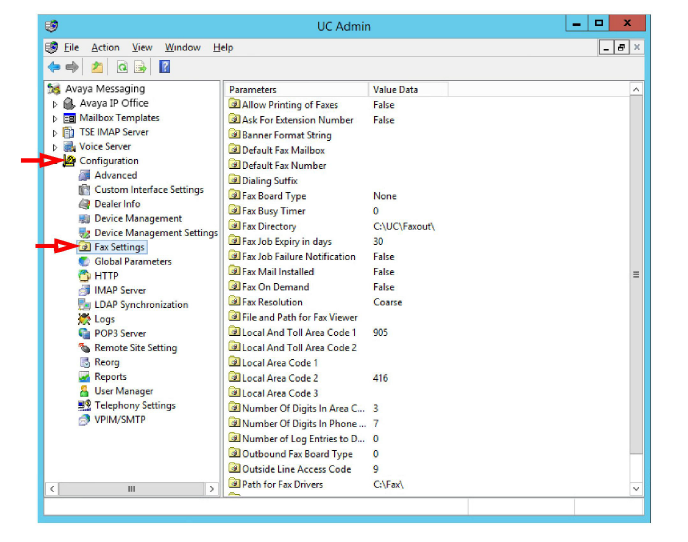
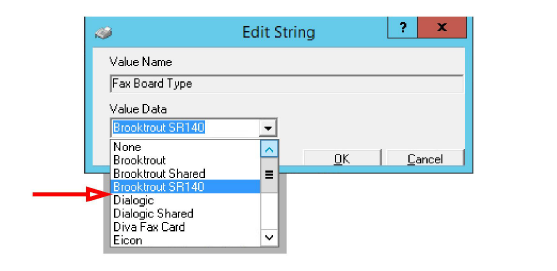
3.In the right-hand pane, locate the entry for Fax Board Type. Double-click to open its settings.
From the dropdown menu, choose Brooktrout SR140.
Click OK.
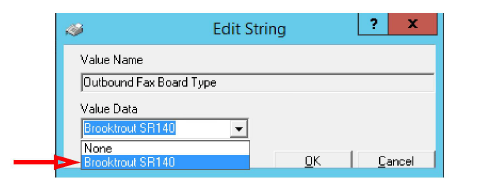
4.Double-click on Outbound Fax Board Type. Choose Brooktrout SR140 from the dropdown menu.
Click OK.
|
Hint: If faxes will only be received through the SR140 software, the Outbound Fax Board Type can be set to another value if required. |
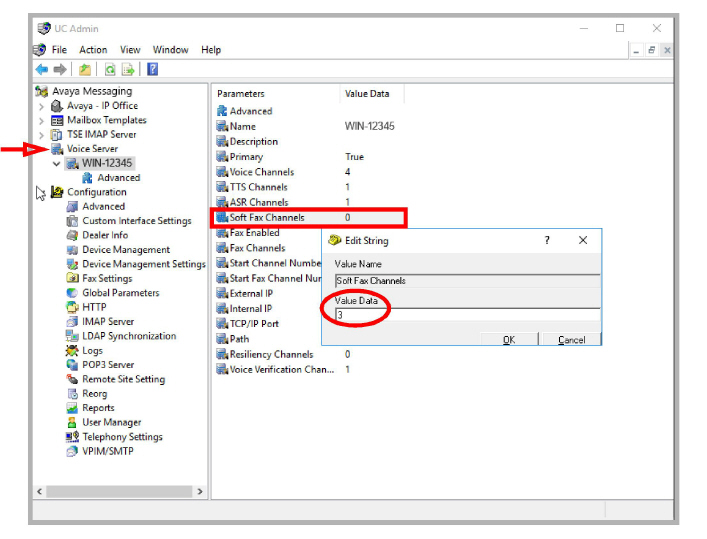
5.Under Voice Server, select your voice server. Double-click Soft Fax Channels and change its value data from 0 to the number of channels you have. Click OK when finished.
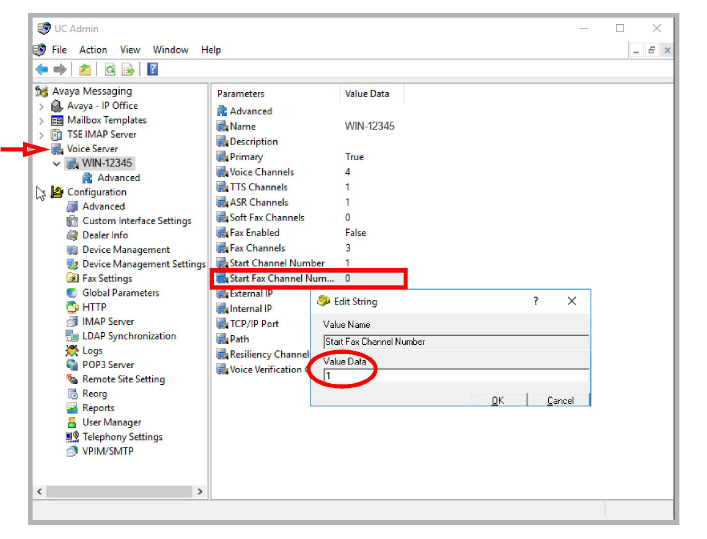
6.Double-click Start Fax Channel Number and change its value data to 1. Click OK when finished.
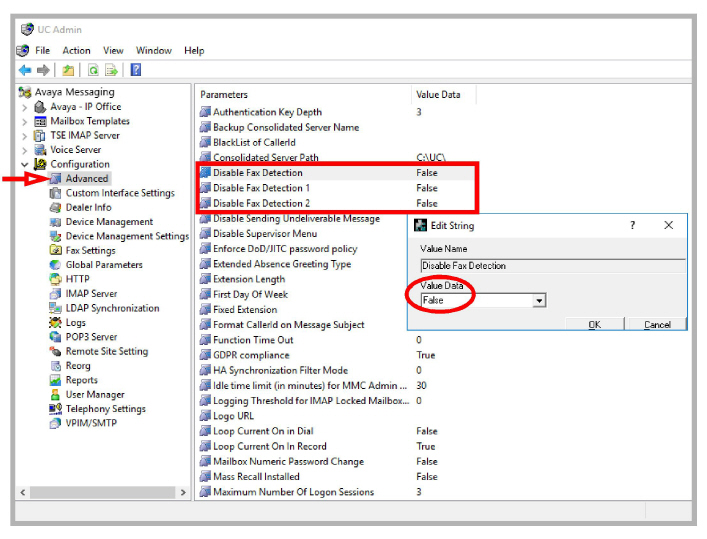
7.Open Configuration > Advanced. Set Disable Fax Detection to False for all entries shown.
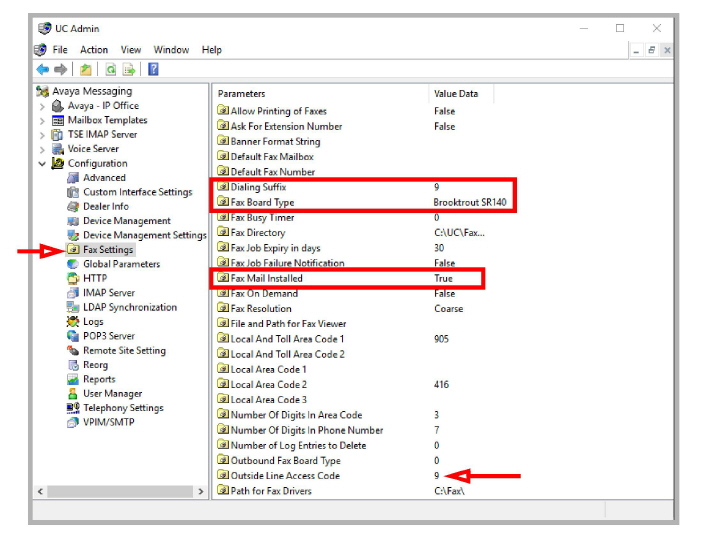
8.Go to Configuration > Fax Settings.
Double-click Dialing Suffix and set the Value Data field match your Outside Line Access Code. Click OK.
Double-click Fax Board Type and set the Value Data field to Brooktrout SR140. Click OK.
Double-click Fax Mail Installed and set the Value Data field to True. Click OK.
9.Restart the voice server.
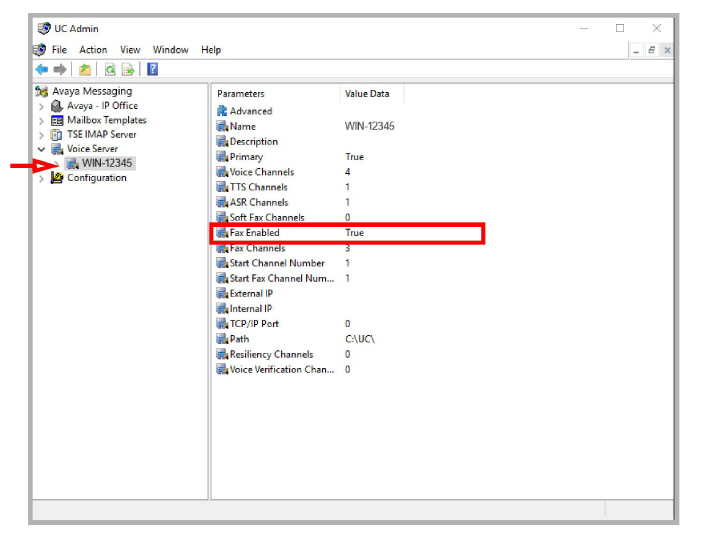
10.Once the server is online, open UC Admin and under Voice Server, verify that the Fax Enabled field is set to True.
11.Setup one mailbox to be used as the default destination for incoming fax traffic.
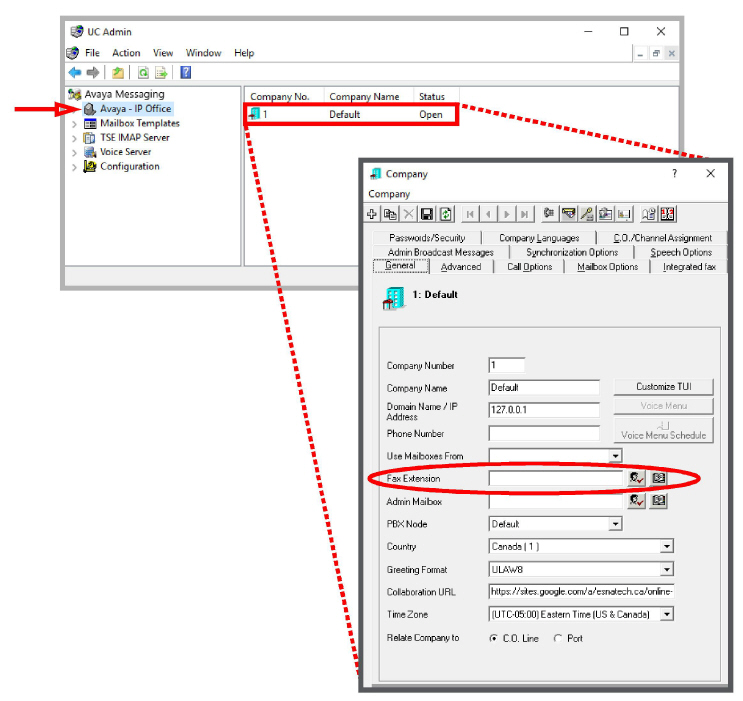
In UC Admin, double-click your company to open the properties window.
On the General tab, locate Fax Extension and specify which mailbox to send faxes into.
When ready, click Save.
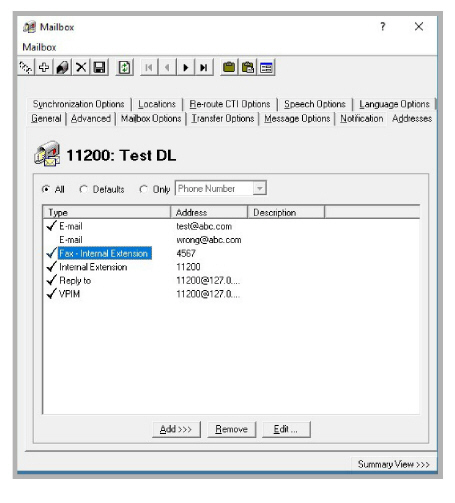
12.Inbound faxes require routing calls through port 5070 to Avaya Messaging since Brooktrout listens on that port. This requires a DID for each mailbox configured for fax. Add the fax DID number in the Addresses tab of the mailbox. This can be an internal number for the fax DID. For example, for DID 705 213 4567, add the fax extension 4567 which can be dialed from outside and will be routed through port 5070 and will be received into that mailbox. If not properly configured, the fax will be sent to the default system mailbox.
Setup
To monitor the traffic through the fax software, the configuration file on the Avaya Messaging Voice Server must be setup to point to the correct file locations.
1.On the computer where Avaya Messaging is installed, use a text editor (i.e. Windows NotePad) to open the configuration file. By default, this will be:
C:\UC\ETBTFax\Config\ETBTFaxService.ini
Modify the path according to the location where your administrator has installed the program.
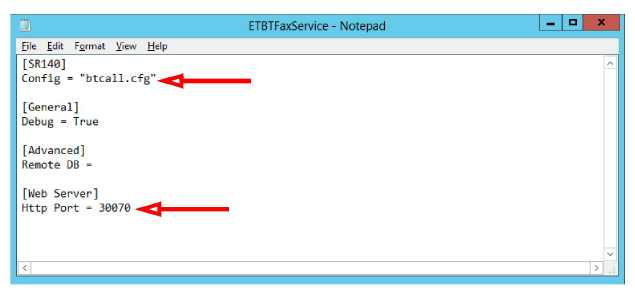
2.Modify the Config entry to include the full path to the btcall.cfg file. By default, this will be:
“C:\Program Files\Brooktrout\config\btcall.cfg”
Be sure to enclose the path within double quotation marks “ ”.
Modify the path according to the location where your administrator has installed the program.
Enter the HTTP Port number that will be used to monitor fax channel activity.
3.When all changes have been made, click File > Save.
Monitoring via Browser
To monitor activity on a fax server, open a browser and navigate to:
http:\\localhost:30070
Change localhost to the IP address of the fax server if you want to monitor from a different computer.
Change the port number (30070 in this example) to the value entered in step 2 above.
If an SR 140 is installed and configured on your system, a single telephone number can be setup to receive both voice and fax telephone calls.
During the auto attendant playback, and also during the personal message playback, the system monitors the call for the presence of a fax signal.
If no signal is detected, it is handled as a standard voice call.
If a fax carrier signal is detected, the call is routed to the fax number configured in the recipient’s mailbox.
Configuring Avaya Messaging
1.Open UC Admin and login.
2.Go to Configuration > Advanced.
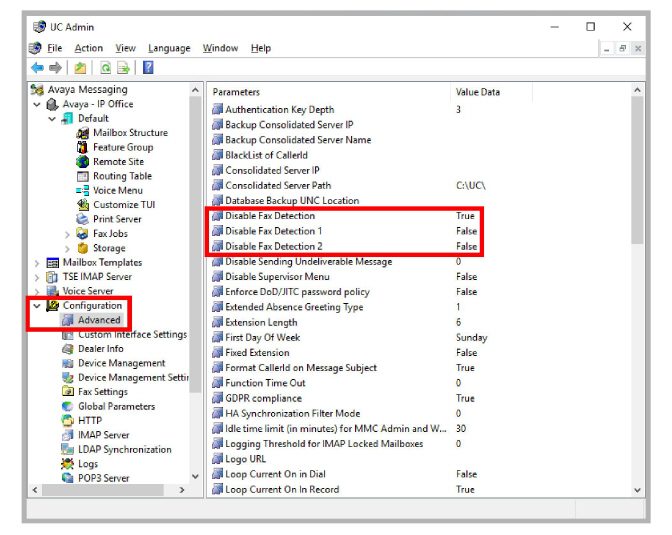
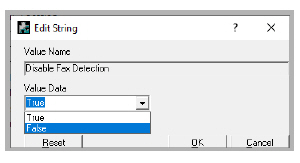
3.In the right-hand panel, double-click Disable Fax Detection and set the value to False. Click OK.
4.Repeat for Disable Fax Detection 1 and Disable Fax Detection 2.
5.Open a user mailbox and go to the Addresses tab.
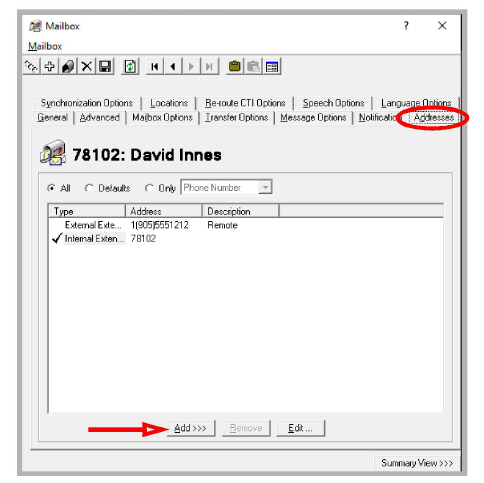
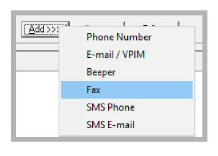
6.Click Add and select Fax from the list of options.
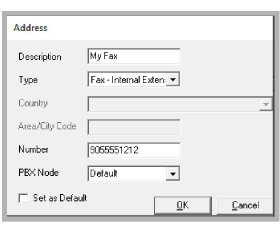
7.Provide a human readable description for the fax connection.
Type: Select one of the following options from the dropdown list.
Fax - External Extension: Enter the Country, the Area/City Code, and the fax number that will receive fax calls.
Fax - Internal Extension: Enter the internal company extension (6 digit maximum) that will receive fax calls.
Select the Node if more than one are present.
When ready, click OK.
8.Click Save to complete the configuration.
|
Note: If no fax number is configured for the mailbox, the fax is routed to the extension specified under Company > General > Fax Extension. 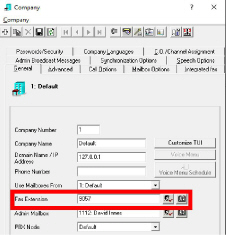
|
It is possible to use a single DID number for both voice and inbound fax traffic. While the voice mailbox greeting is being played, the system continues to listen for a fax signal. If one is detected, the system stops playing the greeting and begins the handshaking procedure necessary to receive the fax. A greeting must be a minimum of 6 seconds long to allow enough time for the detection of the fax tone.
This section covers the process to setup a single DID number to handle both voice and inbound fax traffic.
Avaya Aura Session Manager is required for this installation. ASM must be setup and running before proceeding further.
Overview
To use a single DID number for voice and fax, add to your existing voice messaging integration via the Avaya Aura Session Manager. Refer to the existing Aura Session Manager – Avaya Messaging configuration guide for complete details.
In this example, the voice messaging service number has been configured as 78000. Aura extensions are already configured to use 78000 for voice messaging.
This configuration shows one Aura extension / mailbox user (71802) with voice messaging coverage to 78000. With voice messaging working, enable single number faxing for this user. Refer to the previous sections for the installing and configuring the SR140 fax service on Avaya Messaging.
We will configure the unique prefix 52 for the SR140 service on the Avaya Messaging server, and then assign a unique fax internal extension number (52002) to the mailbox user. Communication Manager must be configured to use the prefix 52 to take the SIP route to Session Manager. Fax internal extensions are configured through Avaya Messaging Admin only so that the fax service can deliver the message to the correct mailbox. These extensions do not need to be configured on CM.
Session Manager Configuration
This section covers configuring the Avaya Messaging server SR140 as a SIP entity of Session Manager.
We will assign port 5070 as a SIP route prefix for the SR140 SIP entity. In this example, prefix 52 (length = 5) is used.
Avaya Messaging Configuration
Here we use the Avaya Messaging Admin to give each user a unique fax internal extension starting with 52. In this example, the user’s primary extension is 78102, and their fax internal extension is 52002.
Communication Manager Configuration
Using Communication Manager, configure prefix 52 to take the SIP route to Session Manager. The same SIP route can be employed for both voice and fax messaging.
Additional user mailboxes, such as 78103 and 78104, will have fax internal extensions configured as 52003, 52004, etc.
A Sample Use Case
An incoming fax is routed to extension 78102 and the user doesn’t answer the call and it goes to voicemail.
The Caller hits the Send button on the fax machine as soon as call is answered. The Avaya Messaging server detects the fax tone and initiates a call transfer (SIP REFER) to user 78102’s internal fax extension (52002) via Session Manager.
Session Manager routes the call to CM, and CM routes it back to SM based on prefix 52 and then onto the Avaya Messaging SR140 service. The SIP call transfer is completed. The SR140 connects to the call, processes the fax job and deposits the fax image into mailbox 78102 (based on fax internal extension 52002).
Configuring Session Manager
1. Add SR140 as SIP Entity
Login to the Session Manager Web UI and open Element > Routing > SIP Entities > Add new SIP entity.
Configure the following items.
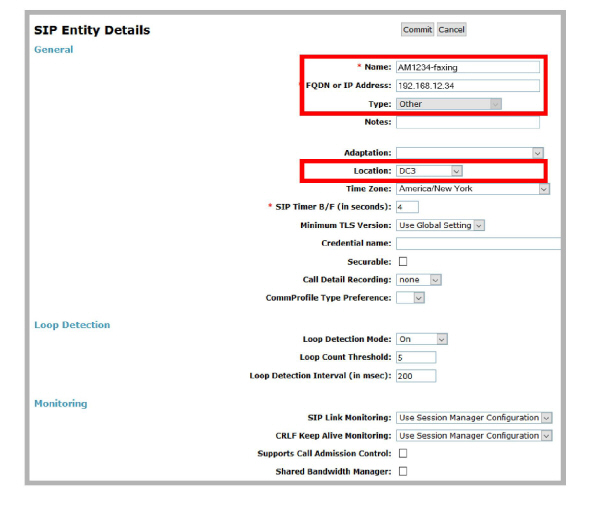
Name: Enter the Messaging server name.
FQDN or IP Address: Type the IP Address or the Fully Qualified Domain Name of the Messaging server. When using FQDN, make sure that Session Manager resolves to the correct IP address.
Type: Choose Other from the list.
Location: Select your location from the dropdown list.

Entity Links: Use port 5070 and the TCP protocol to route to the Avaya Messaging server SR140 faxboard.
|
Note: This entity must be different from the entity used for Avaya Messaging’s voice calling. |
2. Check Connection between SM and AM SR140
The Dialogic / Brooktrout SR140 configuration on the Avaya Messaging server must be configured before proceeding. Refer to the previous sections of this chapter for details.
Open the Session Manager UI and go to Element > Session manager > System status > SIP Entity monitoring.
Verify that the connection is UP.

|
Hint: If the connection fails, check that the Dialogic / Brooktrout configuration is correct, then restart the Dialogic Corporation Boston Host service on the Avaya Messaging server. |
This is the Brooktrout configuration tool for Session Manager (SIP Asset IP address 192.168.98.76) and the Avaya Messaging server (192.168.12.34) connection.
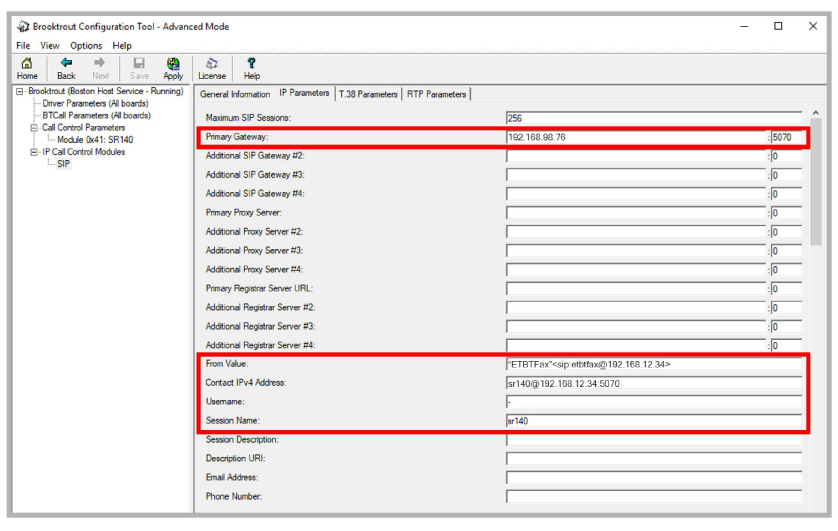
Primary Gateway: Enter the IP address of the Session Manager server. Use Port 5070.
From Value: Input the string “ETBTFax”<sip:[email protected]>.
Contact IPv4 Address: Enter sr140@ followed by the IP address and port (5070) used for inbound faxing.
For example: [email protected]:5070.
Username: Place a dash - in this field.
Session Name: Type sr140 here.
Click Save to confirm the changes. Click Apply and restart the Dialogic Corporation Boston Host service.
The configuration of the SR140 software is complete.
3. Dial Pattern
Add a new dial pattern for fax calling.
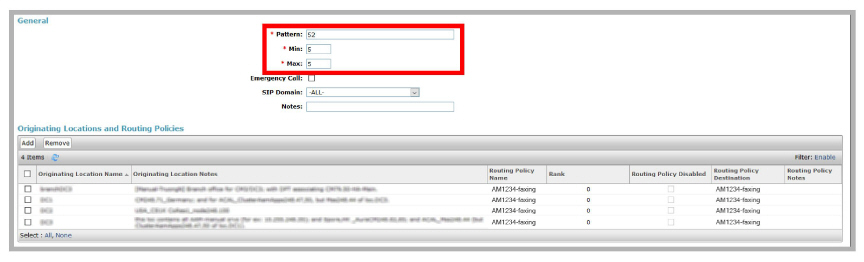
Add a value for Pattern ID that has not been previously used by SMGR. In this example, 52 is used.
Enter the minimum and maximum lengths.
Originating Location and Routing Policies: Add the SR 140 fax messaging server entity for routing Policies.
Avaya Messaging Server Configuration
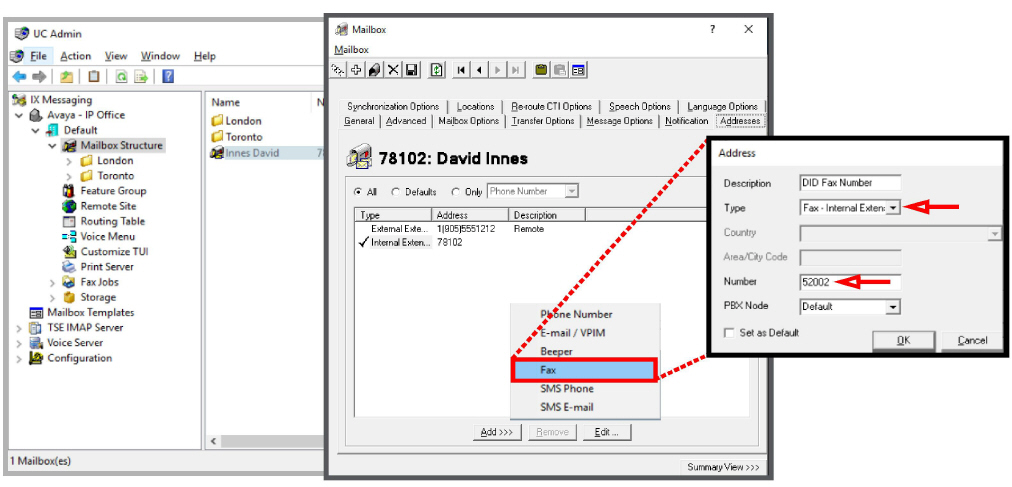
1. Create a Mailbox for the Fax Extension
Launch Avaya Messaging Admin and open the user’s mailbox at the Addresses tab.
Click Add and select Fax.
Enter a Description to identify this address.
For Type, choose Fax-Internal extension and enter the fax extension Number. This number must be different than the mailbox extension, and must begin with the prefix associated with the SR140 SIP entity.
In this example, prefix 52 was configured, the mailbox user’s primary extension is 78102, and the fax internal extension is 52002.
|
Note: The Fax number must begin with the prefix created in the Dial Pattern. |
|
Note: Each mailbox must have a unique fax extension. In this example, mailboxes 78103 and 78104 have the fax internal extension numbers 52003 and 52004 respectively. |
Communication Manager Configuration
1. Create Signaling Group
Using CM administrator, enter the command: add signaling-group <number>.
Replace <number> with the value that will identify this group. It must be a unique number not used by any other group.
For example, add signaling-group 4.

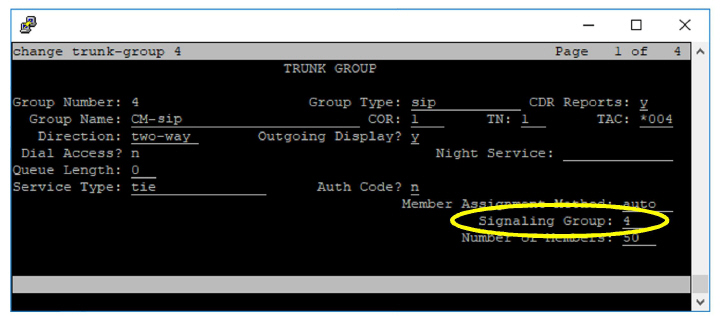
2. Configure Trunk Group
Using CM administrator, enter the command: add trunk-group <number>.
Replace <number> with the value that will identify this group.
Signaling Group: Enter the value for signaling-group created above.
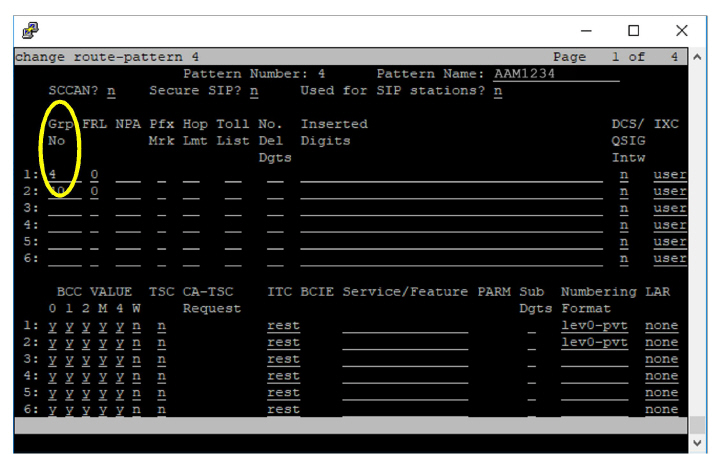
3. Define Route Pattern
Using CM administrator, enter the command: change route-pattern <number>.
Replace <number> with the value that will identify this pattern.
Grp No: Enter the trunk-group number created above.
4. Add the Fax Prefix to the Dial Plan
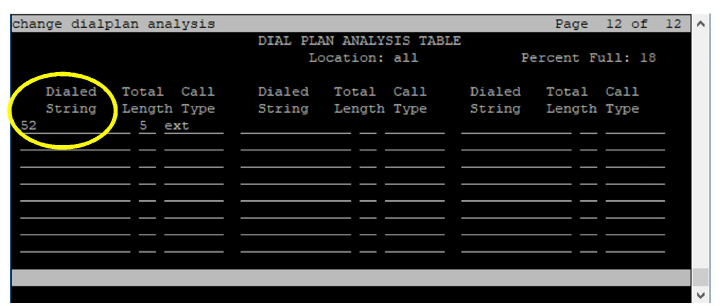
Using CM administrator, enter the command: change dialplan analysis.
Dialed String: Add the prefix configured in SMGR for fax extensions.
5. Change aar Analysis
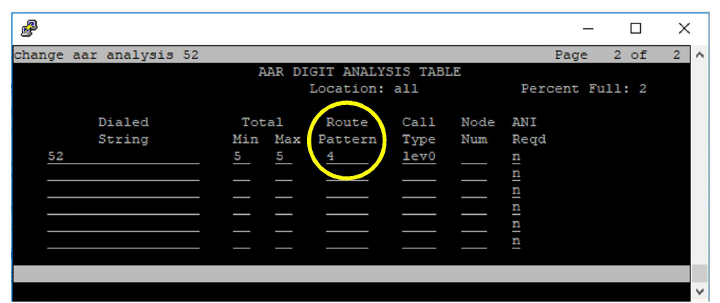
Using CM administrator, enter the command: change aar analysis.
Route Pattern: Use the same route pattern number configured for the Avaya Messaging server voice call that routes to SM. In this example, route pattern 4 is used for both the fax number and the call pilot number.
6. Extension for Mailbox Number
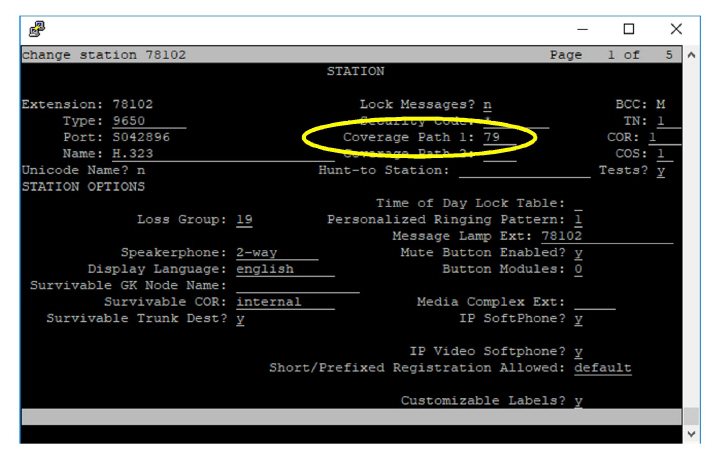
Using CM administrator, enter the command: change station <mailbox number on messaging server>.
Replace <mailbox number on messaging server> with the user’s voice extension (78102).
Coverage Path 1: Set the coverage path that uses the hunt group configured for the voice mail number.
The configuration is complete.