LDAP Import Utility
Introduction
The LDAP Import Utility allows you to import user information from your Active Directory servers or from text files into the Avaya Messaging database. This utility is suited to situations where there is already existing user information prior to installing Avaya Messaging.
The LDAP Import Utility is installed with Avaya Messaging. To access it from the Windows Desktop, click
Start > Programs > Avaya Messaging > LDAP Import Tool.
Toolbar Buttons
|
Button
|
Name
|
Function
|
|

|
Import mailboxes
|
Imports one or several mailboxes.
|
|

|
Import contacts
|
Imports one or many contacts.
|
|

|
Import Distribution List
|
Imports one or more distribution lists.
|
|

|
Print
|
Print a file.
|
|

|
Help
|
Accesses LDAP Import Utility help file.
|
|

|
What’s this?
|
Provides a brief explanation for the selected item.
|
|

|
Settings
|
Opens the Settings dialog box.
|
|

|
Connect LDAP Server
|
Connects to the LDAP server.
|
|

|
Disconnect from LDAP Server
|
Disconnects from the LDAP server.
|
|

|
Save mailboxes in database
|
Saves mailboxes data to the Avaya Messaging database.
|
|

|
Assign mailbox numbers
|
Allows you to modify the attributes of a range of mailboxes.
|
|

|
Reset mailbox numbers
|
Allows you to clear mailbox settings for selected users.
|
|

|
Select All
|
Select all mailboxes.
|
|

|
Read Mailboxes
|
Display all mailboxes.
|
|

|
Assign OU & Company
|
Import the company/organizational unit information from a database.
|
|

|
Assign Mailbox number and extension from database
|
Assigns a mailbox number and extension directly from a database.
|
|

|
Link User with database
|
Synchronizes the Voice Server database with the directory.
|
|

|
USN & Timestamp
|
Specify USN or Time.
|
|

|
Update Directory
|
Updates the directory.
|
|

|
Adjust mailbox number and extension
|
Edit the attributes associated with a mailbox in the directory.
|
|

|
Check for mailbox duplication
|
Validates mailbox information before importing.
|
|

|
Import Companies
|
Allows you to import all selected Companies.
|
|

|
Import OUs
|
Allows you to import all selected Organizational Units.
|
|

|
Check Selected Branch
|
Select all items/subitems of the selected object in the directory pane.
|
|

|
Uncheck Selected Branch
|
Deselect all items/subitems in the directory pane.
|
Importing a user into the system
The LDAP Import Tool allows you to gather user data from a text file or from your directory. When using LDAP to import a user from the directory to the voice server, the following steps must be performed:
1.Open the LDAP Importer. Go to Start > All Programs > Avaya Messaging > LDAP Import Tool.
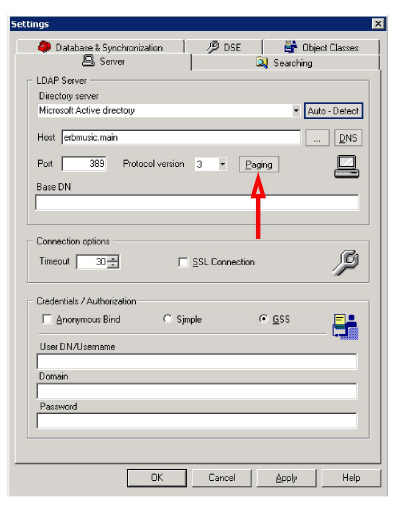
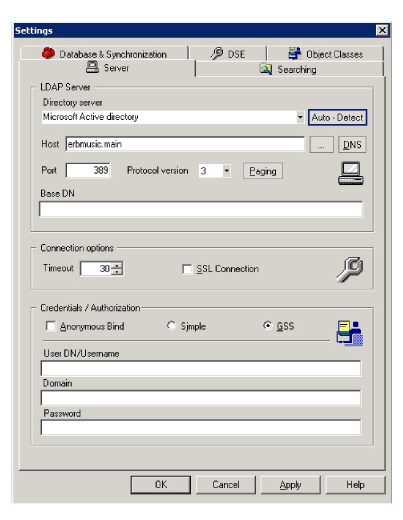
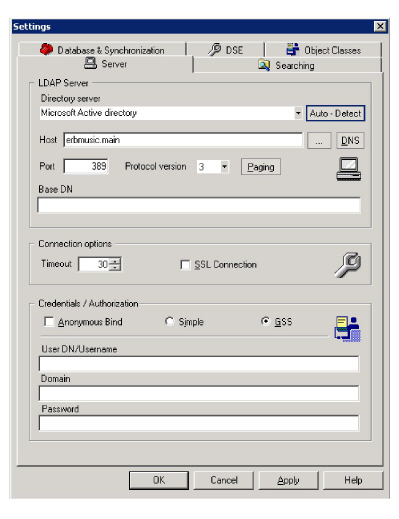
2.Click the Settings toolbar button  . The Settings screen (Server tab) appears.
3.Verify the following LDAP Server information:
•The Directory Server field contains the correct Directory Server.
•The Host field contains the correct directory server name.
|
Note: Click the ellipsis  or DNS button if you want to browse through the available server locations. or DNS button if you want to browse through the available server locations.
|
•The Port field contains the correct LDAP Server port number.
•The value in the Protocol Version dropdown list is correct.
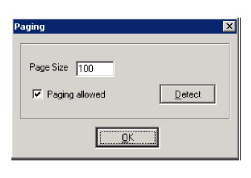
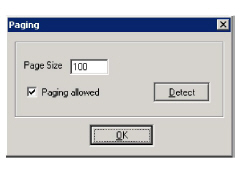
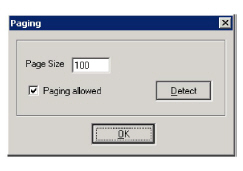
4.Click Paging. The Paging dialog box appears:
5.Set the Paging specifications:
•Page Size specifies the number of entries to show per page when retrieving results from the server.
•Enable Paging allowed to use paging specifications.
•Click the Detect button to check if the server supports the paging mode.
•Click OK to save specifications.
6.In the Connections options feature box, specify the following:
•In the Timeout field, enter the time (in minutes) for the length of a connection.
•Enable the SSL Connection checkbox to use Secure Sockets Layers.
7.In the Credentials/Authorization feature box:
•Enable the Anonymous Bind checkbox to allow login to LDAP by any client without authentication.
•Select either Simple, for no encryption, or GSS, to encrypt communications.
•Enter the User DN/Username for the administrator account.
•Enter the directory Domain name.
•Enter the administrator Password.
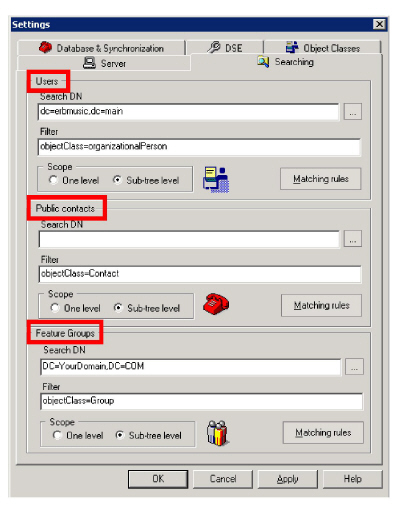
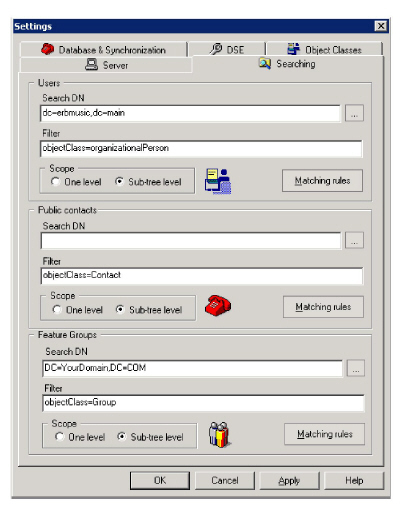
8.Click on the Searching tab.
9.You can search either by Users, Public Contacts or Feature Groups.
For all search methods:
10.In the Search DN field, enter a data string describing the directory server location. This defines where to search.
11.Enter a data string describing what you are looking for on in the Filter field.
12.Select either One level, to search only the current tier of the directory hierarchy, or Sub-tree level to include all levels in the search.
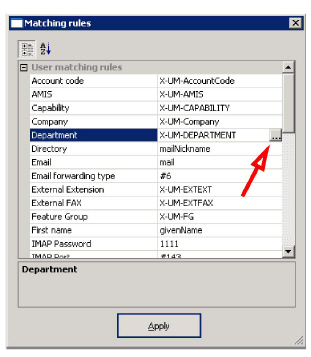
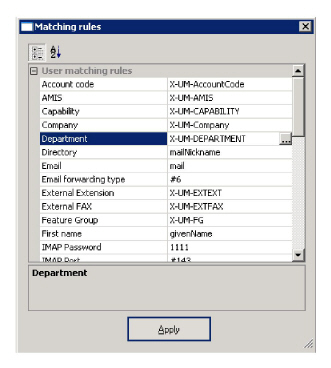
13.Select Matching Rules. This screen shows which fields in the Avaya Messaging database correspond to which fields in the directory database.
|
Note: By default, all attributes are predetermined to match most existing Directory servers. Also, this is where you will define which field in the AD will be used for mailbox number on the Avaya Messaging side. You may use any free field within AD to assign mailbox numbers, as long as you match them accordingly under the Matching Rules.
|
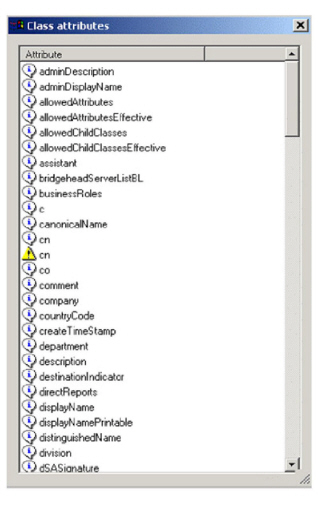
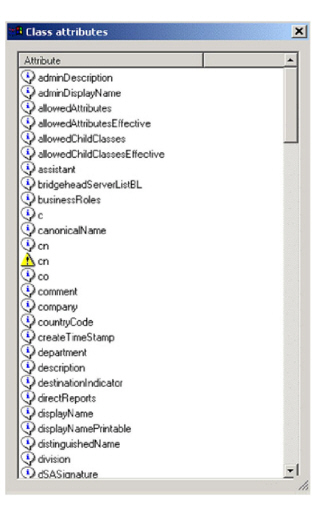
14.Highlight the Class Object for which you want to define a unique matching rule, and then click the ellipsis  button. The Class Attributes dialog box appears.
15.Select the attribute that you want to assign to the Class Object, then close the Class Attributes dialog box. The chosen Class Object will now be associated with the specified field in the Avaya Messaging database.
16.Repeat Steps 13-15 for all matching rules you want to define.
17.When finished click Apply.
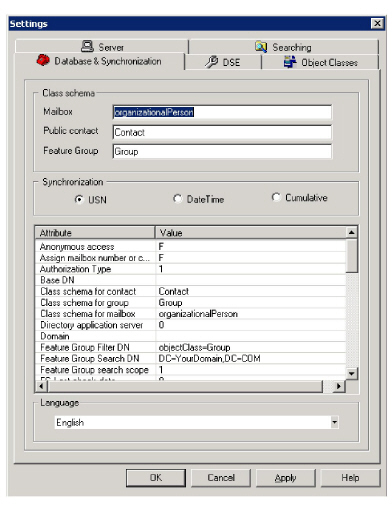
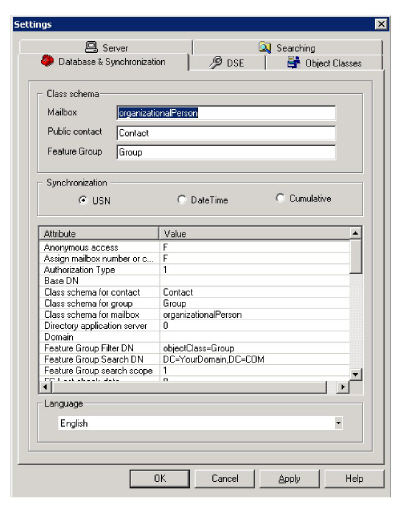
18.Click on the Database & Synchronization tab.
In the Class schema feature box complete the following:
•Enter the object class name to be synchronized with Mailbox.
•Enter the object class name to be synchronized with Public Contact.
•Enter the object class name to be synchronized with Feature Group.
In the Synchronization feature box:
•Choose USN to synchronize data based upon the Update Sequence Number. Choose DateTime to sync based upon time stamps. Select Cumulative to have both servers compare their contents and make updates where appropriate.
|
Note: USN is best for most applications. Time stamps between servers can be out of synch, which can prevent the accurate replication of data. Cumulative synchronization can be time consuming.
Not all servers support all methods of synchronization.
|
•Make sure the correct language for the interface is selected in the Language dropdown list.
19.Click Apply, then OK. You are returned to the main LDAP Import Tool screen.
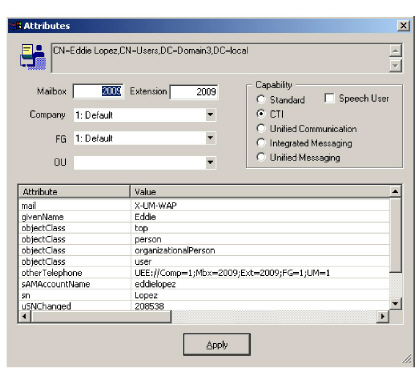
20.Back on the main LDAP Import screen, click on the Connect LDAP Server button  . Double click on a user.
The Attributes screen appears. You should see the same user parameters in this window as are defined in the Directory.
21.Return to the Directory and open the properties for the user.
22.Change the mailbox number value (Unified Messaging tab) and re-synchronize the LDAP. The user's mailbox number in both LDAP and the directory should be the same.
23.Press  to save the changes to the database. You will be prompted to enter additional information (password, IMAP Server, tutorial).
24.Click the Import Mailboxes toolbar button  , then go to the main system window and view the mailboxes pane.
The user should now be among the listed users.
Changing a user
To change a non-Messaging user to a Messaging user:
1.In the directory, select a user who does not have messaging options defined.
2.Add information to the required fields and save.
3.Press the Connect LDAP Server toolbar button  to view the users in the directory. You should see the old user, but now with additional fields declared.
4.Press the Save mailboxes in database toolbar button  to save the user to the database. You will be prompted to enter additional information (password, IMAP Server, tutorial).
5.Go to the Admin window to view the mailboxes pane. The user should be a part of the Admin.
Importing Directory users into the system
1.Open the LDAP Import Tool.
2.Select Tools > Settings, or click the Settings toolbar button  . The Settings screen (General tab) appears.
3.Enter the following information:
•Make sure the Directory Server dropdown list indicates the correct Directory Server.
•In the Host field, enter the directory server name.
|
Note: Click the ellipsis  or DNS button if you want to browse from a list of server locations. or DNS button if you want to browse from a list of server locations.
|
|
Note: Use if you want default server parameters to load automatically.
|
•Make sure the Port field contains the correct LDAP Server port number.
•Make sure the value in the Protocol Version dropdown list is correct.
4.Click Paging. The Paging dialog box appears.
5.Adjust the Paging specifications as follows:
•Indicate the number of entries to show per page when retrieving results from the server.
•Select the Paging allowed checkbox to enable paging specifications.
•Click the Detect button to check if the server supports the paging mode.
•Click OK to save specifications.
6.On the Server tab, check the following administrator credentials information:
•Select the Anonymous Bind checkbox to allow login to LDAP by any client, without authentication.
•Select either the Simple (no encryption) or GSS (encrypted) radio button.
•Make sure the User DN/Username field contains the correct administrator user name.
•Make sure the Domain field contains the correct directory domain name.
•Make sure the Password field contains the correct administrator password.
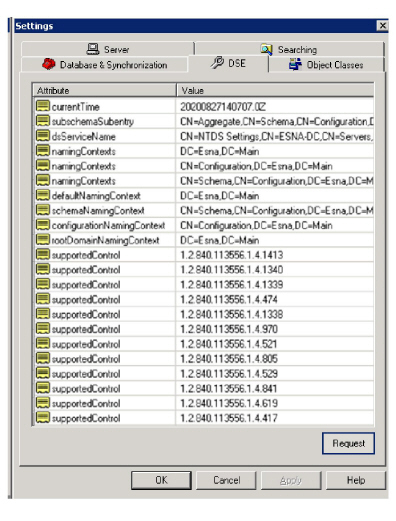
7.Click on the DSE tab.
8.If you want to view DSE information, click Request. The list box is populated with DSE entries:
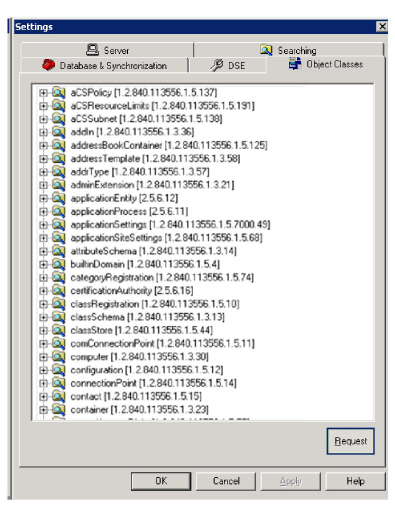
9.Click on the Object Classes tab.
10.If you want to view object class information, click Request. The listbox is populated with object class information.
Importing from a file
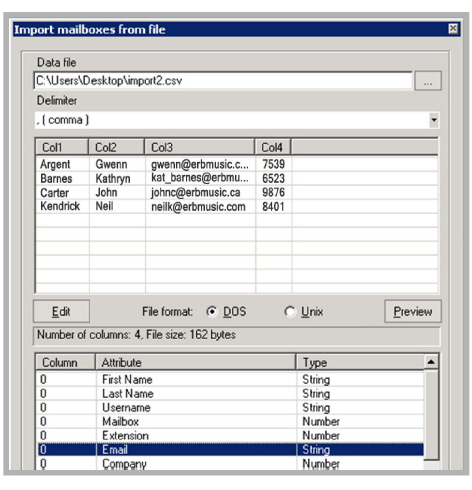
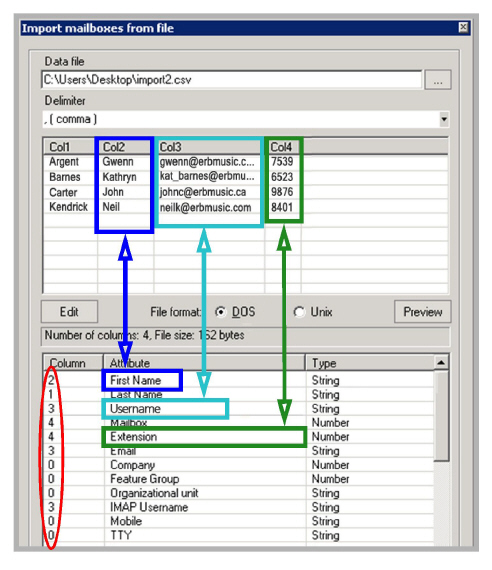
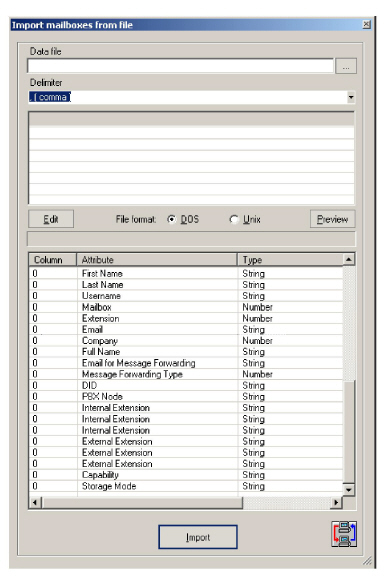
1.In the LDAP Importer toolbar, click File > Import Mailboxes. The Import from File dialog box appears.
2.In the Data File field, enter the path of the source file to import, or click Browse to select the source file.
3.In the Delimiter field, select the delimiter from the list of predefined characters, or define your own. Most csv files are comma delimited.
4.Select the file format of the Data file, either DOS or Unix.
5.Click Preview to view the data from the file and ensure that the settings are correct.
6.Click Edit to change the settings. The Notepad dialog box appears. Edits may be done here or on the original file.
7.Make your changes and restart the import tool.
8.To match a column with an attribute, click an attribute in the lower pane, then click the corresponding column in the upper pane.
The column number will appear in the Column field beside the attribute.
9.When all attributes have been assigned, click Import. The system copies the data from the selected file to the specified fields in the Avaya Messaging database.
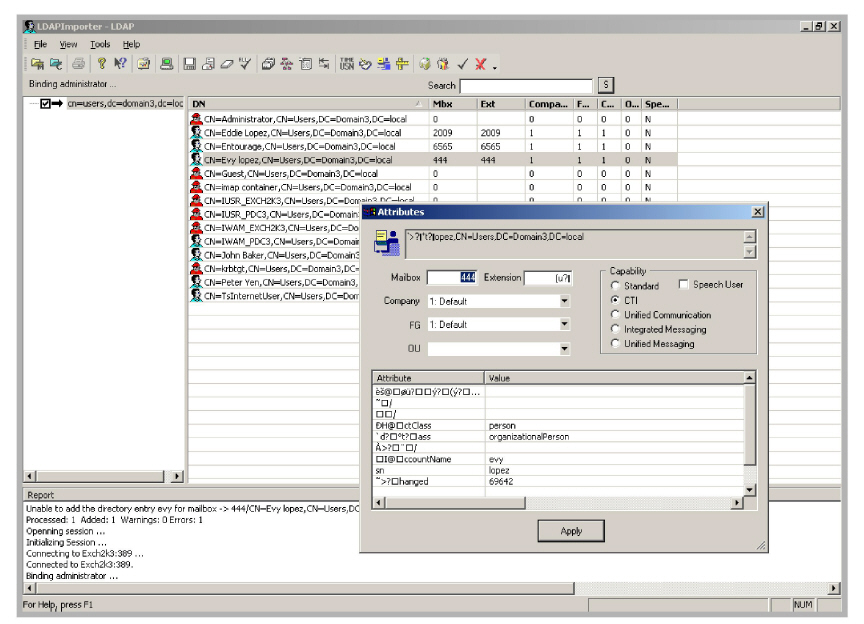
10.If the icon next to the account is red  , then there is not enough information to create that mailbox. The database may not include a required element, such as the Company Number or Feature Group. Add the missing data to the file and run the import again.
Changes can also be made using the GUI (see step 11 for individual changes, step 12 for bulk changes).
If the icon next to the account is green  , then there is enough information to create the mailbox.
11. To modify an individual account’s attributes, double-click the mailbox in the attributes window. Select the attribute to modify from the dropdown menus. You can also change its capabilities, but these can only be applied if the required user license has been purchased (all mailboxes are set to Standard by default). Refer to the Technical Operating Guidelines for further details on the specific license features. Click Apply when ready.
12.To make changes to multiple users, hold the Shift or Ctrl key and select all of the accounts to modify. Right-click one of them and select Assign Mailbox number.
Select the desired attribute from the dropdown menus and click Assign when ready.
13.Once all accounts have been updated, hold the Shift or CTRL key to select which users to add to the Avaya Messaging database. Click Save mailboxes in database to start the export.
|
Hint: You can use Ctrl + A to select all accounts.
|
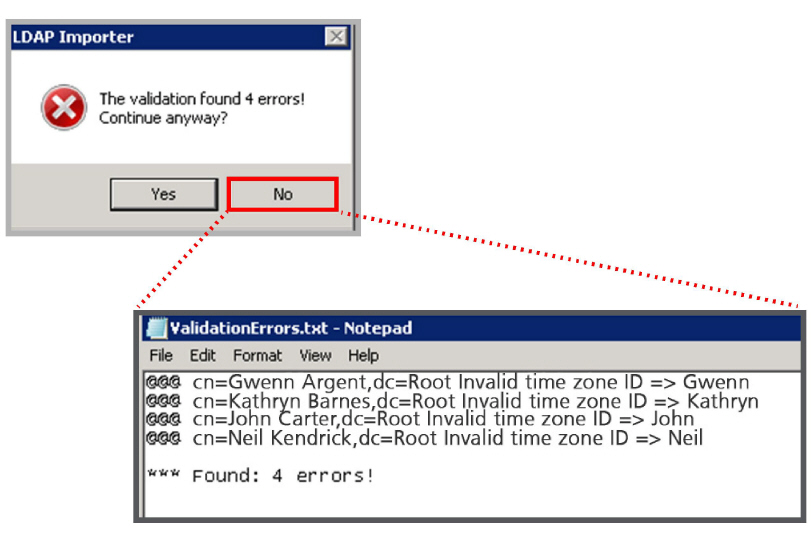
14.If a validation error occurs, click No to review what the error log.
Most errors can be ignored and modified in Avaya Messaging Admin once the mailboxes have been imported.
Close the ValidationErrors file, select the Save Mailboxes in Database icon, and chose Yes to complete the import.
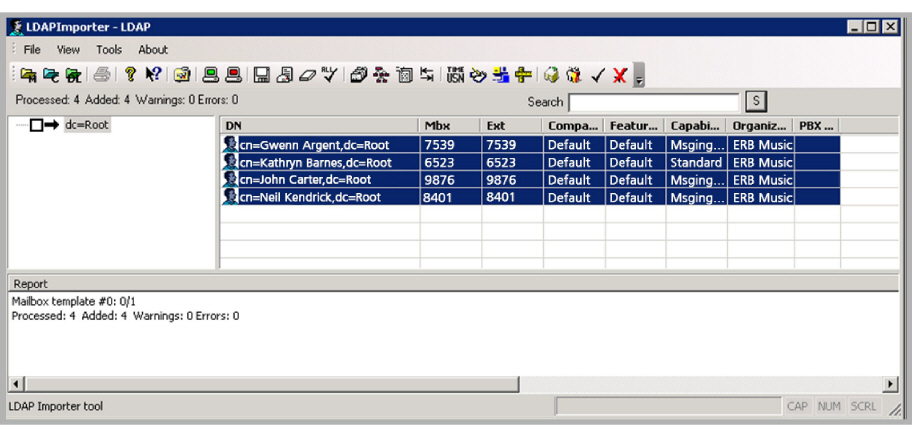
15.The results of the import will be displayed.
Configuring and Connecting
1.In the LDAP Importer toolbar, click the Settings toolbar button:
2.In the Host field, enter or select an LDAP server name or address.
3.In the Port field, enter the LDAP Port. (Also applicable to SSL).
4.In the Protocol version dropdown list, select the protocol version.
5.Click Paging. The Paging dialog box appears.
6.Adjust the paging specifications:
•In the Page Size text box, indicate the number of entries to show per page when retrieving results from the server.
•Select the Paging allowed checkbox to enable paging.
•Click the Detect button to check if the server supports paging mode.
•Click OK to save specifications and return to the Settings screen.
7.In the Base DN field, enter an unique name for the base.
8.In the Timeout box, indicate the maximum number of seconds before a connection or operation has timed out.
9.Select the SSL Connection checkbox if Secure Socket Layers are being used.
•In the Credentials/Authorization box, select Anonymous Bind if an anonymous bind is to be used.
OR
Select Simple if simple authentication is to be used.
OR
Select GSS if GSS authentication is to be used.
|
Note: If Anonymous Bind is selected, User DN/Username, Domain, and Password fields are disabled.
If Simple is selected, the User DN/Username and Password fields are enabled.
If GSS is selected, the User DN/Username, Domain, and Password fields are all enabled.
|
10.In the User DN/Username field, enter the user name.
11.In the Domain field, enter the domain name.
12.In the Password field, enter the user’s password.
13.Click Apply and OK, then click on the Searching tab.
14.You can search by Users, Public Contacts, and Feature Groups.
FOR EITHER SEARCH METHOD:
15.Make sure the Search DN field contains a data string describing the directory server location. This is the search location.
16.Make sure the Filter field contains a data string describing what you are looking for on the Directory server.
17.Select either the One level radio button for a one-level search, or the Sub-tree level radio button for a multiple-level search.
18.Select Matching Rules to redefine the Matching Rules to use.
The Matching Rules window appears.
|
Note: By default, all attributes are predetermined to match most existing Directory servers. Also, this is where you will define which field within AD will be used for mailbox number on the Avaya Messaging side. You may use any free field within AD to assign mailbox numbers, as long as you match them accordingly under the Matching Rules.
|
19.Highlight the Class Object that you want to define a unique matching rule for, and then click the ellipsis  button. The Class Attributes dialog box appears.
20.Select the attribute that you want to assign to the Class Object, then close the Class Attributes dialog box.
21.Repeat Steps step 19 and step 20 for all matching rules you want to define.
22.When finished click Apply and OK, then click on the Database & Synchronization tab.
|
Note: By default, the attributes are set. Double check them to ensure that they correspond with your specific Directory settings.
|
•Enter the object class name to be synchronized with Mailbox.
•Enter the object class name to be synchronized with Public Contact.
•Enter the object class name to be synchronized with Feature Group.
•Make sure the correct language is selected in the Language dropdown list.
In the Synchronization feature box:
•You will most likely select the USN radio button. Select the DateTime radio button only when you want synchronization between the messaging and directory servers to occur on a time basis.
•Select the Update telephone number checkbox if you want the telephone number to synchronized with the user’s mailbox number.
23.Click Apply, then OK to return to the main LDAP Import Tool screen.
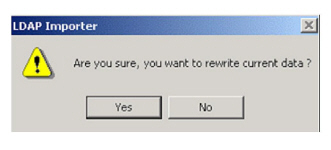
24.When all settings have been defined, click the Connect LDAP Server toolbar button. The following dialog box appears.
25.Click Yes.
The system attempts to connect to the Active Directory and will import all users that were defined in the IMAP server. It displays the hierarchy of the information and specified attributes can be viewed by double-clicking on each (The Attributes dialog box appears, displaying the attributes associated with the selected user).
Adding and Importing mailboxes
After connecting and receiving the data from the directory server, you can import a selection of users or assign mailbox attributes.
|
Note: The import time for 500+ users is approximately 15 minutes. This ensures that all mailbox information is correctly imported.
|
1.To import defined users, highlight the user(s) you want to import and click the Assign Mailbox number and extension from db toolbar button.
2.Click Import to import all selected users.
OR
To assign mailbox attributes to users before importing, highlight a user and hit the
Assign Mailbox Number and extension from db toolbar button.
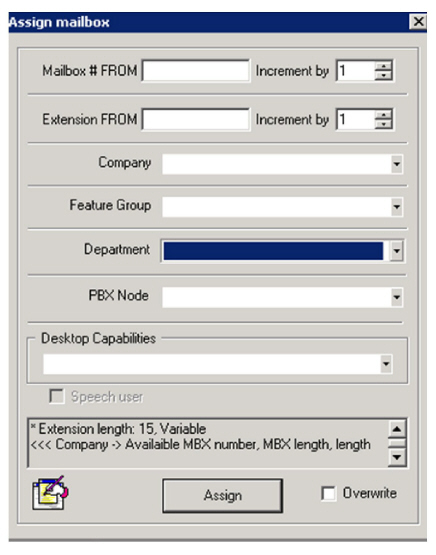
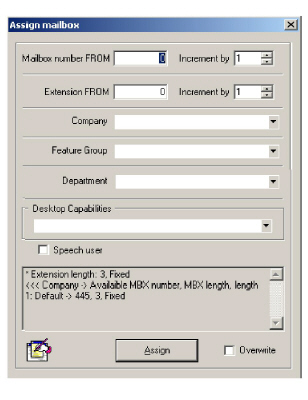
The Assign Mailbox dialog box appears.
3.In the Mailbox number FROM field, enter a mailbox number for the selected user.
4.In the Mailbox number FROM Increment by spinbox, select the number to increment the mailbox by.
5.In the Extension FROM field, enter the extension number.
6.In the Extension FROM Increment by spinbox, select the number to increment the extension by,
7.From the Company dropdown list, select the company that the user is to be associated with.
8.From the Feature Group dropdown list, select the feature group that the user is to be associated with.
9.From the Department dropdown list, select the department that the user is to be associated with.
10.From the Desktop Capabilities dropdown list, select which capability to assign to the user.
11.Click Assign and close the Assign Mailbox dialog box.
12.Repeat Steps step 4~step 11 to assign mailboxes for all users.
13.Click Import to import and save user settings.
|
Note: If any errors occur, the Report window displays all errors.
|
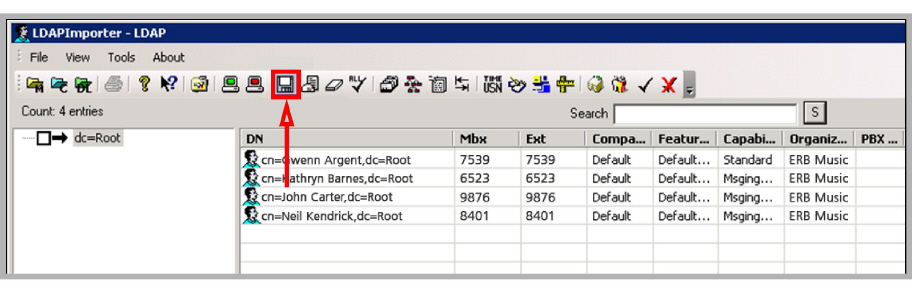
Checking Imported and Saved Mailboxes
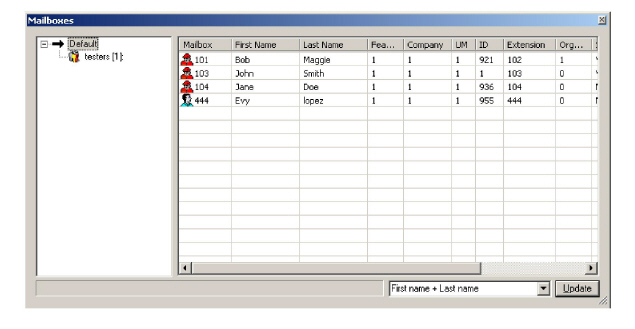
1.To check the imported and saved mailboxes, go to the LDAP Importer toolbar and click the Read Mailboxes button. The Mailboxes dialog appears, displaying all the assigned mailboxes and attributes.
Clearing a mailbox
To clear a mailbox, highlight a user in the LDAP Importer and click Clear.
Updating the Directory
Whenever attributes are defined or configured in the LDAP Import Utility, you need to update the objects (users) on the directory server.
In the LDAP Import Utility toolbar, click the Update Directory toolbar button. The system updates the directory server.
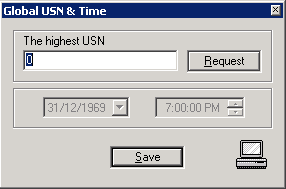
Synchronizing the database with the Directory
You must synchronize the Database with the Directory.
1.In the LDAP Import Utility toolbar, click the USN and Timestamp toolbar button. The Global USN & Time dialog box appears.
If you selected USN on the Avaya Messaging + Synchronization tab, the The Highest USN field is enabled. If you selected DateTime, the Date and Time boxes are enabled.
2.In the The Highest USN field, enter the highest unique sequence number.
3.Click Request to retrieve the USN.
Click Save.
OR
For the Date, indicate the date the object is to begin synchronizing from.
4.For Time, indicate the time the object is to begin synchronizing from.
5.Click Save.
6.In the LDAP Import Utility Toolbar, click on the Link User with database toolbar button. The system synchronizes the information from the Database with the Directory.