Mailbox templates are essentially pre-configured mailboxes. Mailbox templates contain settings that can be applied during the creation of new mailboxes. It is recommended that you create multiple templates on the system so that different groups of settings can be applied without having to create a custom format every time.
However, not all settings may be applied through a template. Many individual settings (e.g. user name, locations, etc.) cannot be managed through a template and must be modified individually. When you are creating a range of Mailboxes by copying a single Mailbox, individual settings will not be copied.
|
Note: Some items shown in the screenshots that follow are disabled in the Template editor. |
|
Caution: The tabs for Message Options, Addresses, Locations, and Re-Route CTI have no changeable values in the Mailbox Templates section and have been omitted from this document. |
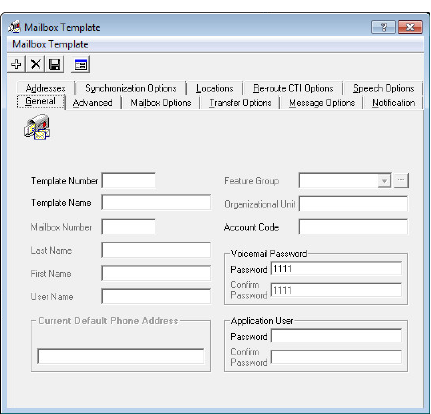
Template Number: Enter the template number. This number will be used for sorting the templates.
Template Name: Enter the template name for your reference.
Account Code: Enter the account number. This is used to pass account number information for toll charge billing back to an individual user.
Voicemail Password
Password: Enter the user’s password. This password has to be numeric.
Confirm Password: Confirm the password.
Application User
Password: Enter the user’s application user password. This password has to be alphanumeric.
Confirm Password: Confirm the password.
|
Note: The voicemail password is used when accessing the system through a telephone keypad. The application user password is used with all other access methods (i.e. Avaya iLink Pro, Web Access). |
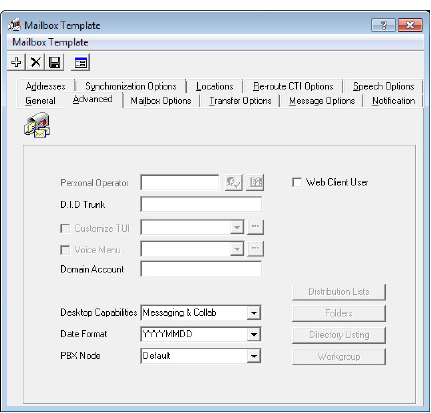
D.I.D Trunk: Enter the trunk number that the system will use to access the voicemail of this Mailbox. This field is normally used by Norstar Systems.
Domain Account: Enter the Windows domain and account name for this mailbox user (e.g. DOMAIN\USER_NAME). If this is configured alongside Auto Discovery, users will be able to log into their iLink Pro Desktop based on their domain credentials without having to configure or enter any information in iLink Pro Desktop. This single sign on feature is only available when the user is on the same network as the Avaya Messaging server.
Desktop Capabilities: From the dropdown menu, select the type of functionality that this user will have (i.e. Collaboration, Messaging).
Date Format: From the dropdown menu, select the date format which will determine the way in which the date is expressed in Web Access and/or the telephone.
Web Client User: Enable this checkbox to give the Mailbox Web Access capability.
Speech Server User: Enable this checkbox to allow the Mailbox Speech Server capability.
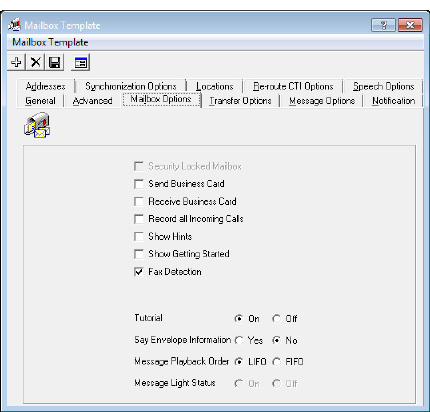
Send Business Card: Enable this checkbox to allow the user to send personal contact "signature" information with all messages.
Receive Business Card: Enable this checkbox to allow the user to receive personal contact "signature" information with all messages.
Record all Inbound Calls: Enable this checkbox to have all inbound calls to the current Mailbox recorded.
Show Hints: Enable this checkbox to have Hints help documentation displayed by default throughout the Web Access windows. The Hints, shown in yellow strips at the top of each screen, will display in Web Access until the user turns it off.
Show Getting Started: Enable this checkbox to have the Getting Started page displayed by default in Web Access for the user. The Getting Started page will display until the user turns it off.
Fax Detection: Enable this checkbox to allow incoming faxes to deliver their message to the user’s inbox if the call is unanswered. With this box unchecked, the phone set will ring but a fax call will be dropped if it is not answered.
Tutorial: Select On from the radio buttons if you want the user to be prompted with a tutorial when accessing his/her Mailbox through telephone.
You can select a full or simple tutorial through UC Admin > Voice Server > Advanced > Simple Tutorial (here).
Say Envelope Information: Select Yes from the radio buttons if you want the user to listen to the envelope information when listening to a message. The type of envelope information that will be played is defined from the TUI associated with the current Mailbox.
Message Playback Order: Select one of the radio buttons. This allows the users to listen to their messages by either FIFO (plays the oldest message first, newest message last) or LIFO (plays the newest message first).
Web Tutorial: Select On from the radio buttons to have the user work through the welcome tutorial when accessing Web Access. This tutorial takes the user through the personalization of their mailbox and the recording of greetings.
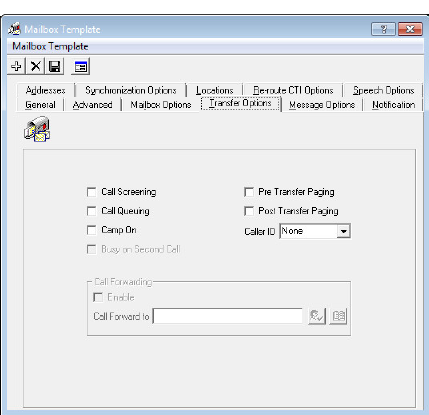
Call Screening: Enable this checkbox to instruct callers who wish to transfer to an extension to state their name at the tone.
|
Note: Call screening requires the call to be supervised and the user must be in his or her group. |
Before the call is transferred, the user hears the caller's name and will then be prompted by the system: to accept the call press <1>, to send to another extension press <2>, to accept and record conversation press <3>, to send to your Mailbox press <#>.
Call Queuing: Enable this checkbox to place incoming calls in a queue when an extension is busy. Callers are informed of their position in the hold queue and are given opportunities to either continue to hold or leave a voice message.
|
Warning: Call queuing is available only on telephone systems that provide a busy tone. Most telephone sets with multiple extension appearances do not produce a busy tone. |
Camp On: Enable this checkbox to notify the caller that the intended target of the call is now available, assuming that the dialed number was originally busy.
Busy on Second Call: With this option enabled, incoming calls will be immediately routed to voicemail if the user is already on the phone. If disabled, incoming calls will keep trying to reach the user at that extension until the line is free.
Pre Transfer Paging: Enable this checkbox to page users before a call is transferred.
When a caller requests an extension, the caller is put on hold and the UC system pages the user. The system then waits for the specified period of time (the timer is defined on the Advanced tab and has a default of 5 seconds) and then transfers the caller to the desired extension.
Post Transfer Paging: Enable this checkbox to page users after the call is transferred.
When a caller transfers to an extension that is busy or is not answered, the caller is forwarded to the user's Mailbox. In the user's personal greeting, the caller can be given the option to page the user over the telephone intercom system (for example, "Press 4 to have me paged"). Callers must be informed of the paging feature in the user's personal greeting. The system does not have a pre-recorded prompt.
Caller ID: From the dropdown menu, select the desired option to configure the Caller ID.
|
Note: This option is required for desktop screen pops using iLink Pro Desktop. The iPD settings must also be configured to accept screen pops. |
|
Note: If a blank Caller ID is sent to iPD, there will be no pop-ups. |
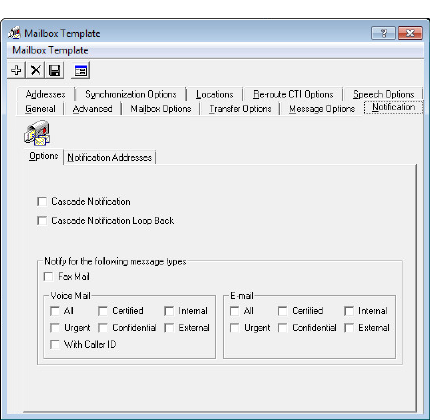
Cascade Notification: Enable this checkbox to instruct the system to send notifications in consecutive order to a list or defined notification schedule.
Cascade Notification Loop Back: Enable checkbox to allow cascade notification loop back, which is like cascade notification except that it will not stop notifications after all retries are complete. It will instead start again from the beginning.
Fax Mail: Enable this checkbox to send a notification when fax mail is sent.
Voice Mail
Select one or more options from the following choices to activate notification for voice mail messages.
All - Notifies user of all voice mail messages that are received
Urgent - Notifies user only if an urgent voice mail message is received
With Caller ID - Notifies user only if voice mail message is accompanied with Caller ID
Read Receipt - Notifies user if a sent voice message has been received
Confidential - Notifies user only if voice mail message is of a private status
Internal - Notifies user only if voice mail message is from an internal user
External - Notifies user only if voice mail message is from an external user
Select one or more options from the following choices to activate notification for email messages.
All - Notifies user of all email messages that are received
Urgent - Notifies users only if an urgent email message is received
Read Receipt - Notifies user if a sent email message has been received
Confidential - Notifies user only if email message is of a private status
Internal - Notifies user only if email is from an internal user address
External - Notifies user only email is from an external user address
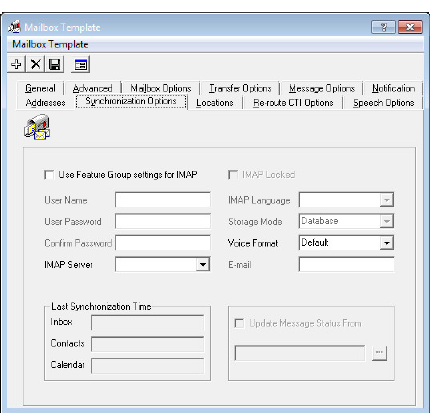
Use Feature Group settings for IMAP: Enable this checkbox to use the IMAP settings of the Feature Group. This is used when you are using a superuser account to connect to the Exchange server for the IMAP CSE feature.
User Name: Enter the IMAP account user name which the UC server will use to synchronize the data. Follow the domainname/username/alias format for this field.
User Password: Enter the IMAP account password.
Confirm Password: Re-Enter the IMAP account password.
IMAP Server: From the dropdown menu, select the corresponding IMAP server.
IMAP Locked: This checkbox is enabled if the user’s Mailbox becomes locked. The lock occurs when the account fails authentication numerous times during the IMAP CSE synchronization activity. Disable this box to unlock the Mailbox.
IMAP Language: From the dropdown menu, select the primary language of the IMAP account.
Storage Mode: From the dropdown list, select IMAP to store messages in the IMAP store, or Database to store messages in the UC database.
|
Note: This field indicates whether or not the Mailbox is IMAP-synchronized. Setting storage to Database indicates no IMAP synchronization. |
Voice Format: From the dropdown menu, select the voice compression format which is to be used when the user is sending a voice message outside of the UC server.
Last Synchronization Time
Inbox: This field displays the last time that the inbox of the mailbox was synchronized through the IMAP CSE server with the email server. This field cannot be modified and is for reference only.
Contacts: This field displays the last time that the contact entries of the mailbox were synchronized through the IMAP CSE server settings with the email server. This field cannot be modified and is for reference only.
Calendar: This field displays the last time that the calendar entries of the mailbox were synchronized through the IMAP CSE server settings with the email server. This field cannot be modified and is for reference only.
Update Message Status From: Enable this checkbox to synchronize the legacy IBM Domino and the UC server at a defined time. After enabling the checkbox click on the ellipsis button  to manually select the date.
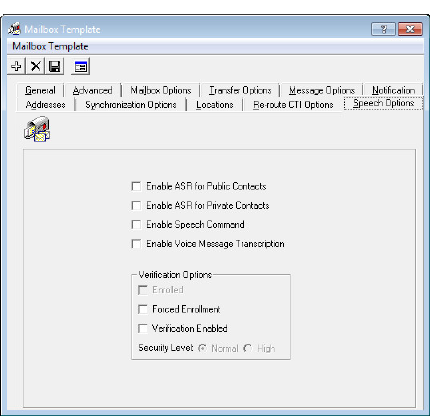
Enable ASR for Public Contacts: Enable this checkbox to allow the user of the current mailbox to access their public contacts through ASR along with the traditional DTMF method.
Enable ASR for Private Contacts: Enable this checkbox to allow the user of the current mailbox to access their private contacts through ASR along with the traditional DTMF method.
Enable Speech Command: Enable this checkbox to allow the user of the current mailbox to navigate the TUI through speech commands along with the traditional DTMF method.
Enable Voice Message Transcription: Enable this option to provide ASR transcription service to users of this template. Use of this feature requires additional licensing.
Voice Verification Options
Enrolled: This checkbox becomes enabled when the user successfully finishes the voice verification configuration during their tutorial or manually through the TUI.
Forced Enrollment: Enable this checkbox to force the user to configure the voice verification feature. The users will not be able to skip the tutorial when this option is enabled.
You can select a full or simple tutorial through UC Admin > Voice Server > Advanced > Simple Tutorial (here).
Voice Verification Enabled: Enable his check to allow this user to use the Voice Verification feature.
Security Levels
Normal: Select this radio button to use Normal as the voice verification security setting. The security settings are configured under Company properties.
High: Select this radio button to use High as the voice verification security setting. The security settings are configured under Company properties.