Voice Menu
Introduction
Voice Menus are used to allow callers to interact with the voice server. Voice Menus contain actions that can be performed when a specific key on the telephone is pressed. These actions are defined during the creation of the Voice Menu and are deployed in a variety of places (e.g. Company Greeting, Mailbox Greeting, Message Sending, Outcalling, etc.) and can be modified at any given time. Schedules can be applied to these menus, allowing a greater degree of flexibility in controlling the caller's capabilities.
Voice Menu Buttons
|
Button
|
Description
|
|

|
Add a new Voice Menu.
|
|

|
Open a Voice Menu.
|
|

|
Delete current Voice Menu.
|
|

|
Save current Voice Menu.
|
|

|
Open current Voice Menu schedule.
|
|

|
Print Voice menu.
|
|

|
Add a new Sub Menu.
|
|

|
Delete current Sub Menu.
|
|

|
Move to first Sub Menu.
|
|

|
Move to previous Sub Menu.
|
|

|
Move to next Sub Menu.
|
|

|
Move to last Sub Menu.
|
|

|
Find a Sub Menu.
|
|

|
Verify entered Mailbox number.
|
|

|
Open Mailbox directory.
|
Adding/Editing a Voice Menu
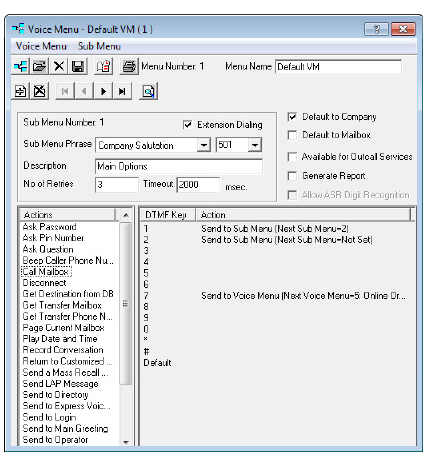
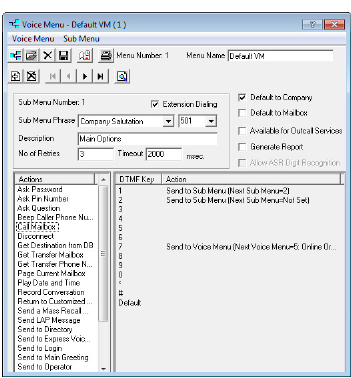
Menu Number: This field is automatically generated when you add a new Voice Menu and cannot be changed.
Menu Name: Enter the name of the Voice Menu. This is for your reference and has no impact on performance.
|
Note: Each voice menu file can have unlimited sub menus. You must begin the administration of Voice Menus in sub menu 1. If there is no schedule applied, the UC system starts all Voice Menus with sub menu number 1.
|
Web Access Access: Enter a Mailbox number to assign the current Voice Menu as the Mailbox user's personal Voice Menu.
Default to Company: Enable this checkbox to make this Voice Menu the default Voice Menu for the company. The company will use this menu by default even if there are no Voice Menus assigned manually from the company properties.
Default to Mailbox: Enable this checkbox to make this Voice Menu the default Voice Menu for all Mailboxes. Configuring a Voice Menu at the mailbox will override this setting (Mailbox > Advanced tab).
Available for Outcall Service: Enable this checkbox to have this Voice Menu usable for Outcall Jobs.
Generate Report: Enable this checkbox to have the system log the statistics of the Voice Menu on how many times a particular action is chosen.
|
Note: Even if Generate Report is disabled, the table will appear in the logs but it will not be populated.
|
Allow ASR Digit Recognition: Enable this checkbox to allow callers to say the key they want in addition to pressing it.
Sub Menu
Please refer to Sub Menu on page 213 for more information.
Actions & DTMF Key Assignment
Please refer to Voice Menu Actions on page 201 for more information on this section.
The Voice Menu must have an action assigned to the DTMF keys to function. The actions are added to a DTMF key by clicking and dragging the desired action from the left pane to the specific DTMF key in the right pane.
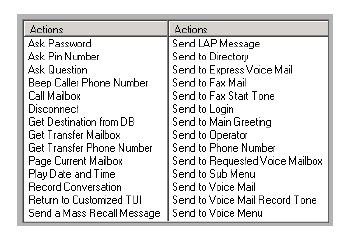
Voice Menu Actions
This section details the function of the Voice Menu actions.
|
Note: The Description field in most of the actions are for report/logging purposes, as is the Question Label field which appears in some of the outcall related actions. You should fill these fields to make reports and logs easier to understand.
|
|
Important: When transferring a call to another mailbox, the destination mailbox user must have an Advanced Desktop Capabilities (Avaya Mainstream) account. A Basic Desktop Capabilities (Avaya Basic) account alone is insufficient.
|
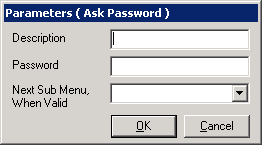
Ask Password
This action prompts the caller for a pre-defined password before granting access to the sub menu. The password must be numeric.
Password: Enter the password the caller must enter before granting access to the selected sub menu.
Next Sub Menu, When Valid: From the dropdown menu, select the sub menu in the current Voice Menu to send the caller to when the entered password is correct.
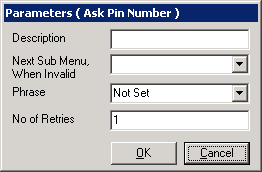
Ask Pin Number
This action prompts the caller to enter their Pin Number. The system will verify the number against the Pin Number Routing Table and route the call accordingly. If the number is incorrect, the caller will be brought to the defined invalid Sub Menu.
Next Sub Menu, When Invalid: From the dropdown menu, select the sub menu in the current Voice Menu to send the caller to when the entered Pin Number does not exist in the Routing Table.
Phrase: From the dropdown menu, select the phrase to prompt the caller for their Pin Number.
|
Note: This is a custom prompt and needs to be recorded manually.
|
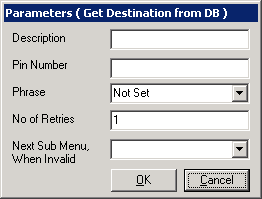
No. of Retries: Enter the number of times a caller may fail to provide a valid Pin Number before being disconnected.
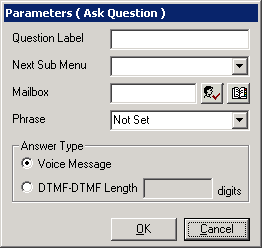
Ask Question
This action is used for a Question & Answer script. It enables the system to ask the caller a question and record their response. The results of the Q & A session will be sent to the defined Mailbox.
After answering the question, the caller will be brought to the defined next Sub Menu. In this way, you are able to link several questions together and have the results sent to the defined mailbox in one results page instead of several.
Next Sub Menu: From the dropdown menu, select the Sub Menu to bring the caller to after they have answered the question(s).
Mailbox: Enter the mailbox where the answers of the callers will be stored.
Phrase: From the dropdown menu, select the phrase to play to ask the caller a question.
|
Note: This is a custom prompt and needs to be recorded manually.
|
Voice Message: Select this radio button to have the caller answer the question vocally.
DTMF: Select this radio button to have the caller answer the question with DTMF keys. The length of the answer is defined in the adjacent field.
Beep Caller Phone Number
This action behaves like Send Beeper Message, an action that is available in all Mailboxes. A caller selecting this option is prompted to enter his/her phone number using the telephone keypad. The DTMF digits that are entered are then sent to the user's alphanumeric pager.
|
Note: The user must have an alphanumeric pager that is configured in the Notification section of the user's Mailbox.
|
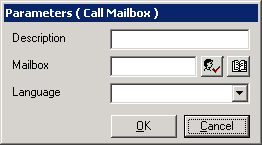
Call Mailbox
This action allows you to transfer a caller to a specific Mailbox.
Mailbox: Enter the Mailbox to which the caller will be sent.
Language: From the dropdown menu, select the language you want the system to play when greeting the caller.
Disconnect
This action disconnects the caller from the system.
Get Destination from DB
This action is associated with the desktop call control Active X. It asks the caller for their Pin Number and sends the call information to the Active X that has pre-defined actions and an integration setup.
Pin Number: Enter the Pin Number the caller must enter in order to continue.
Phrase: From the dropdown menu, select the phrase to play to ask the caller for their Pin Number.
|
Note: This is a custom prompt and needs to be recorded manually.
|
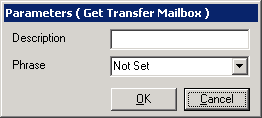
Get Transfer Mailbox
This action allows callers to transfer directly from within the voice menu to a desired extension. When a caller selects this action from a Voice Menu, they will hear the selected prompt, and then they can enter the mailbox number they want to transfer to.
Phrase: From the dropdown menu, select the phrase to play to ask the caller to enter the mailbox user they want to transfer to.
|
Note: This is a custom prompt and needs to be recorded manually.
|
Get Transfer Phone Number
This action allows the caller to transfer to a phone number that is off site. When the key for this action is pressed, the caller will hear the dial tone. They can then enter the phone number and the system will execute the transfer.
Prefix: Enter the number that is required to access an external line.
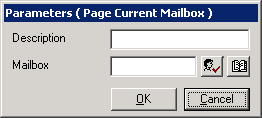
Page Current Mailbox
This action allows the caller to page a specific Mailbox user.
Mailbox: Enter the mailbox user to be paged.
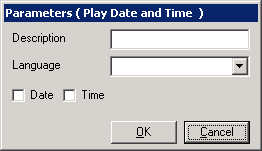
Play Date and Time
This action is used to play the current date and/or time in the selected language.
Language: From the dropdown menu, select the language to play back the date and/or time in.
Date: Enable this checkbox to have the system play back the date.
Time: Enable this checkbox to have the system play back the time.
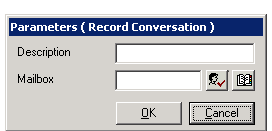
Record Conversation
This action is used to initiate and record a conversation with a specific mailbox user.
Mailbox: Enter the mailbox user to initiate and record a conversation with.
Return to Customized TUI
This action allows a mailbox user to be brought back to their Customized TUI. The Voice Menu needs to be bound to a mailbox user. At the mailbox greeting, press the key for this action and the caller will be brought to the mailbox user's TUI.
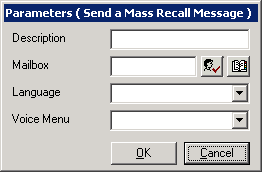
Send a Mass Recall Message
This action allows callers to use the Mass Recall feature. The chosen mailbox must have the necessary Distribution Lists configured so that the message is sent to the right people.
Mailbox: Enter the mailbox user to have the Mass Recall message sent to. This mailbox must have the proper Distribution Lists set up.
Language: From the dropdown menu, select the language to service the caller in.
Voice Menu: From the dropdown menu, select a Voice Menu to attach to the message. After the recipients listen to this message, they will be brought to the selected Voice Menu instead of the default.
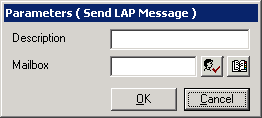
Send LAP Message
This action allows callers to send a message to a local area pager (LAP).
Mailbox: Enter the mailbox user to have the LAP message sent to.
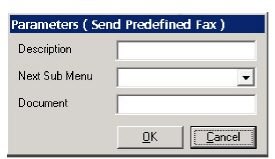
Send Predefined Fax
This action will send a fax to the recipient. The fax must have already been saved to the UC\Faxout folder on the voice server hard drive; PDF or TIFF format only. Name the file with a document number (e.g. 1001.pdf, 1002.tiff).
When this item is selected from the voice menus, the caller will be prompted to enter their fax number and the file will be sent.
Next Sub Menu: From the dropdown menu, select the Sub Menu to bring the caller to after they have selected their fax.
Document: Enter the document number for the fax that will be sent (e.g. 1001). Do not include the file extension (i.e. pdf or tiff).
|
Note: This option will not be visible unless the Fax on Demand feature is enabled through Avaya Messaging Admin. In Admin, this is found under Configuration > Fax Settings, and should be set to True.
|
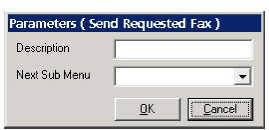
Send Requested Fax
This action will send a fax to the recipient. The fax file must have already been saved to the UC\Faxout folder on the voice server hard drive. Name the file with a document number (e.g. 1001.pdf, 1002.tiff).
When this item is selected from the voice menus, the caller will be prompted to enter the number of the document they want to receive (e.g. 1002), and their fax number. The selected file will then be sent.
Next Sub Menu: From the dropdown menu, select the Sub Menu to bring the caller to after they have selected their fax.
|
Note: This option will not be visible unless the Fax on Demand feature is enabled through Avaya Messaging Admin. In Admin, this is found under Configuration > Fax Settings, and should be set to True.
|
Send to Directory
This action sends the caller to the company directory.
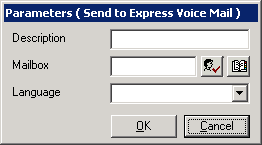
Send to Express Voice Mail
This action brings the caller directly to the mailbox user's voice mail. Instead of hearing the full mailbox greeting, the caller will hear the mailbox user's name and the record tone.
Mailbox: Enter the mailbox user to which the express message is sent to.
Language: From the dropdown menu, select the language to service the caller in.
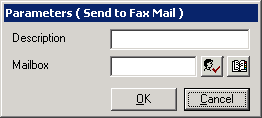
Send to Fax Mail
This action causes a fax message received at the number to be sent to a mailbox.
Mailbox: Specify the mailbox to route the incoming fax message to. If no mailbox is entered, and incoming fax will create a desktop prompt for the destination.
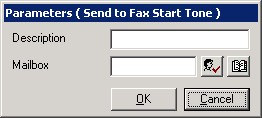
Send Fax Start Tone
This action allows incoming callers to tell the system that they want to transmit a fax to the recipient. Selecting this option will ready the system to receive the fax.
Mailbox: Enter the mailbox number that is to receive the fax when this menu item is selected.
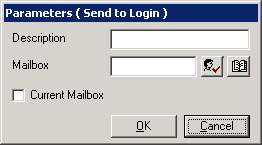
Send to Login
This action allows the caller to log in to a mailbox. The system will first prompt them for the mailbox number and password.
Mailbox: Enter the mailbox user to which the caller will attempt to log in to.
|
Note: If nothing is defined in this field, the system will prompt for both mailbox number and password. Else, the system will prompt just for the password.
|
Send to Main Greeting
This action sends the call to the main company greeting.
Send to Operator
This action transfers the caller to the system defined operator. If the action was performed with a Voice Menu bound to a mailbox, the caller will be transferred to their Personal Operator if they have one defined.
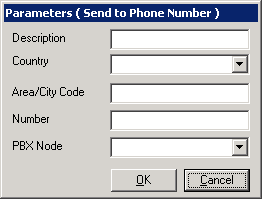
Send to Phone Number
This action allows a caller to be sent to a specific phone number.
Country: From the dropdown menu, select the country to which the call is to be made.
Area/City Code: Enter the Area/City code of the phone number to transfer to.
Number: Enter the number to transfer to.
PBX Node: From the dropdown menu, select the node which the call is to be directed through.
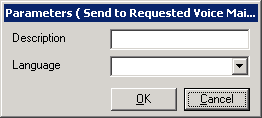
Send to Requested Voice Mailbox
This action brings the caller directly to the requested mailbox user's voice mail.
When the key for this action is pressed, the caller will be prompted to enter the mailbox number. After they enter the number, the caller will be brought to the mailbox user's voice mail."
Language: From the dropdown menu, select the language in which the prompt will be played.
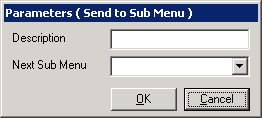
Send to Sub Menu
This action brings the caller to the specified sub menu for further processing.
Next Sub Menu: From the dropdown menu, select the sub menu to send the caller to.
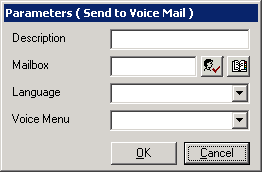
Send to Voice Mail
This action brings the caller directly to the mailbox user's voice mail greeting.
Mailbox: Enter the mailbox user to which the voice message is sent.
Language: From the dropdown menu, select the language which the greeting will be played in.
Voice Menu: From the dropdown menu, select the Voice Menu to attach to the voice message. After the mailbox user listens to the message, they will be sent to the selected Voice Menu instead of the default.
Send to Voice Mail Record Tone
This action brings the caller directly to the mailbox user's voice mail. The caller will not hear any record prompts, but will just hear the record tone.
|
Note: This action is only available if the Voice Menu is bound to a mailbox.
|
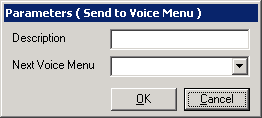
Send to Voice Menu
This action sends the caller to a different Voice menu for further processing. By default, the system will send the caller to the first sub menu of the selected Voice Menu.
Next Voice Menu: From the dropdown menu, select the Voice Menu to sent the caller to.
Sub Menu
Sub menus are used to create multiple actions for a Voice Menu. For example: a Q&A script, an account code verification, or an IVR with password verification. All such applications would be created in a voice menu with multiple layered sub menus to process the caller selection.
|
Note: While there are no hard limits on the number of sub menus you can create, having too many sub menus can have an impact on the system's performance.
|
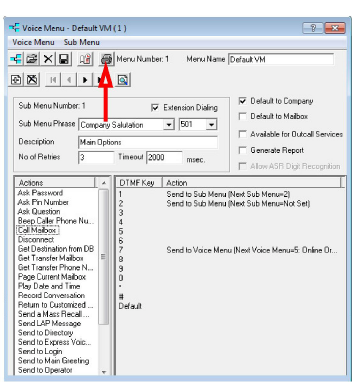
Sub Menu Number: This number is generated automatically when you add a new sub menu.
Extension Dialing: Enable this checkbox to allow callers in the current Voice Menu to be transferred directly to a Mailbox. The extension must be entered before the Timeout value is reached.
Sub Menu Phrase: From the dropdown menu, select the phrase you want played at this particular level. There are several options:
|
Salutation
|
Function
|
|
Nothing
|
No greeting is played.
|
|
Company Active Greeting
|
Plays the active greeting of the automated attendant that the voice menu is associated with.
|
|
Company Salutation
|
Plays a selected prerecorded company greeting.
|
|
Mailbox Active Greeting
|
Plays the active greeting for the Mailbox that the Voice Menu is associated with.
|
|
Mailbox Customized Greeting
|
Plays a selected customized greeting.
|
Description: Enter a description for the current sub menu. This is for reference only and has no affect on performance.
No. of Retries: Enter the number of incorrect attempts a caller can make before they are disconnected.
Timeout: Enter the amount of time (in msec) that the system will wait before processing the caller's input. If the caller did not enter anything, the system will perform the default action.
|
Note: The default value is 2000. A value of 0 is not permitted. However, if you want the default action to take effect immediately, you can enter a value of 30 or 1.
|
Schedule
Creating a menu schedule allows you to define when the UC server is to activate a certain sub menu. You can define unique caller actions for weekdays and weekends, so that weekend actions are activated automatically Friday evening and weekday actions are reactivated on Monday morning.
Voice Menu Schedule Buttons
|
Button
|
Description
|
|

|
Delete Voice Menu Schedule..
|
|

|
Save Voice Menu Schedule.
|
|

|
View a list of all Voice Menu Schedules.
|
|

|
Create a new Schedule.
|
|

|
Delete the current Schedule.
|
|

|
Move to first Schedule.
|
|

|
Move to previous Schedule.
|
|

|
Move to next Schedule.
|
|

|
Move to last Schedule.
|
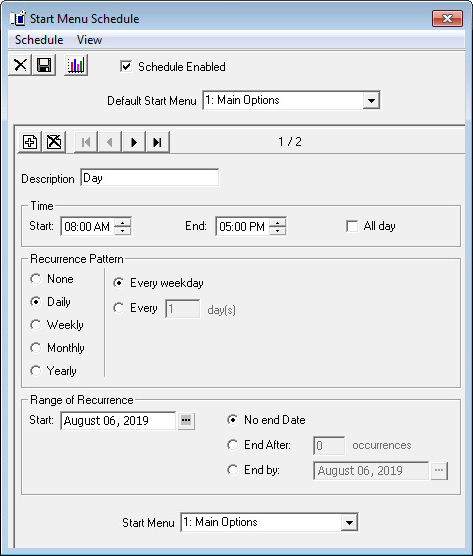
Configuring Voice Menu Schedule
Schedule Enabled: Enable this checkbox to activate the current sub menu. Enabling one sub menu disables all other sub menus.
Default Start Menu: From the dropdown menu, select the sub menu that will be active during default hours. When all schedules expire, the system will use this sub menu.
Description: Enter a brief title/description of the sub menu for reference.
Time Start and End: Select when the sub menu will become active and when it will cease to be active. Enabling the All day checkbox will make the sub menu active for 24hrs.
Recurrence Pattern:
None: Select this radio button to have the sub menu occur only for the period of time once with no recurrence.
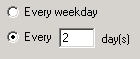
Daily: Select this radio button to indicate that the sub menu will be active on a day-by-day basis. Afterwards, you will have (2) options:
Every weekday: Select this radio button if you want the sub menu to be active every weekday.
Every X day(s): Select this radio button to specify an interval of activity for the sub menu (every second day by entering 2 in the field, for example).
|
Hint: If you wish to define the settings as Every weekday, you can instead choose the Weekly settings where you can specify which days of the week you wish to be notified.
|
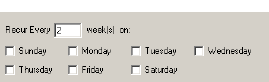
Weekly: Select this radio button to indicate that the sub menu will be active on a weekly basis. Then, in the Recur Every X week(s) on field, enter an interval of activity for the sub menu (i.e. enter 3 for every third week). Finally, check the boxes of the days of the week you want the sub menu to be in effect. If you wanted a sub menu to be active every second Monday, Wednesday and Thursday, you would enter 2 in the field and select the Monday, Wednesday and Thursday checkboxes.
Monthly: Select this radio button if you want the sub menu to be active on a monthly basis.
You have two (2) options:
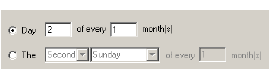
Select the Day radio button and indicate which day of the month you want the sub menu to be active.
Select the The radio button and indicate which day of a month you want the sub menu to be active. For example, if you want the sub menu to be active on the second Monday of every second month, you would select the The radio button, select Second and Monday, and enter 2.
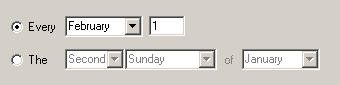
Yearly: Select this radio button if you want the sub menu to be active on a specific day of the year. You have two (2) options:
Select the Every radio button and indicate the day of the year on which you want the sub menu to be active.
Select the The radio button and indicate a specific day of a specific month of the year on which you want the sub menu to be active. For example, if you want the sub menu to be active on the second Thursday of every March, you would select the radio button and select Second, Thursday and March from the dropdown menu.
Range of Recurrence
Start: Select the date in which the first occurrence of the sub menu is to take effect.
|
Note: The sub menu must have a recurrence pattern defined.
|
No end Date: Select this radio button if you want the sub menu to occur indefinitely
End After: Select this radio button if you want to disable the sub menu after it occurs the defined number of times.
End by: Select this radio button if you want to disable the sub menu by the defined date.
Printing a Voice Menu 
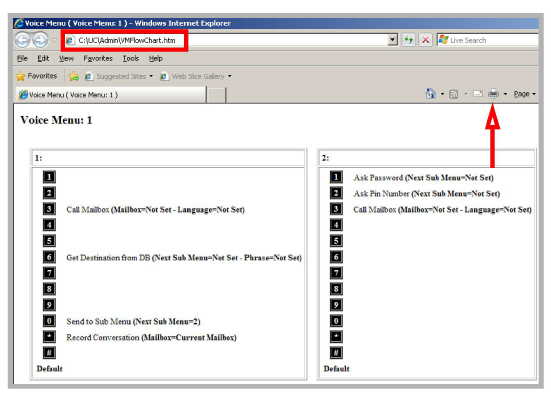
Voice menus can become quite complex, and are often customized to meet a company’s needs. Use the Print Menu icon to generate an printable version of the current setup.
This button creates the file VMFlowChart.htm which is displayed in a web browser. Each of the menus is tagged with its Voice menu or Sub Menu number. It includes all of the keys available, and what action, if any, has been bound to each.
This file can be sent to a printer for distribution where necessary. Use the Print button in the browser window.