
Web Access is a web-based application that gives each user on the system the ability to maintain all aspects of communication and personal schedules. No software is installed on the local computer. Connect to Web Access using any computer with a web browser and Internet access.
|
Important: All functions are available only to accounts with Messaging and Collaboration (Avaya Mainstream) Desktop Capabilities. An account with Messaging (Avaya Basic) alone will not have access to the messages or notifications tabs through Web Access. Desktop Capabilities are configured in OL Admin on the Advanced tab for each mailbox. |
|
Warning: It is necessary to setup your web browser to allow pop-ups for the company server site (user.yourcompany.com). |
In a web browser, enter the remotely accessible address of the Officelinx server. This is normally of the form
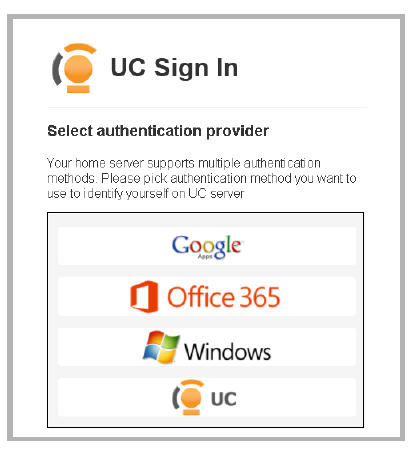
user.your_company.com. Select Web Access to reach the login page.
These links provide 4 authentication methods to open Web Access: Google needs a Google account setup, Office 365 needs a Microsoft account, Windows will use your computer or network login details, and UC requires your UC Server credentials.
Click one and enter the required credentials to login.
The first time you connect to Web Access from a computer you will need to install some supporting software.
Go to the Software Downloads page. Download and run both the Java plugin (IE only) and the Grant Permission (all browsers) programs to setup your computer for the web client. These programs must be used on each workstation before the Web Access will be fully operational.
For example, you will not be able to use a PC microphone to record greetings unless the utilities have been installed.

Web Access supports Single Sign-On, the same mechanism used with the iLink client apps: logging in to any of these programs seamlessly provides access to the others without another login.
Select one of the authentication methods to login to Web Access.
|
Note: For security purposes, after a reasonable period of inactivity, users will be automatically logged out of Web Access and returned to the login screen. |
|
Note: Enable the Stay signed in checkbox at the bottom of the sign-in screen to have the browser remember your credentials. The browser will keep your details until you explicitly log out of the application. Leave this box unchecked to be prompted for your authentication method and login credentials each time the program is launched. |

To use Google Authentication, you must have a Google Apps account. Contact your administrator for your account details. To create a new account, click the Sign Up button in the upper right corner and proceed through the wizard before returning here.
Enter the required details in the spaces provided:
Email: Enter the email address associated with the Google Apps account.
Password: Type in the password for the Google Apps account.
Click the Sign in button at the bottom of the window to launch the application.
To use Office 365 Authentication, you must have a Microsoft account. Contact your administrator for your account details. To create a new account, click the Sign Up button in the upper right corner and proceed through the wizard before returning here.
Enter the required details in the spaces provided:
Email: Enter the email address associated with the Google Apps account. Click Next.

Password: Type in your password for Office 365, then click the Sign in button at the bottom of the window to launch the application.


Windows Authentication uses your computer or network login credentials to provide access to the application.
Enter the required details in the spaces provided:
User name: Enter the domain and username for the corporate network separated by a backslash
(i.e. domain_name\user_name).
Password: Type in the password for this account.
Click the Sign in button at the bottom of the window to launch the application.

Click the UC icon. Enter a company number, mailbox and password to login to the system.
Enter the required details in the spaces provided:
Company: Enter the company number that you belong to. This will usually be 1, unless there are multiple companies managed from the same Voice Server.
Mailbox: Enter your Application User name.
Password: Type in your password.
Click the Sign in button at the bottom of the window to launch the application.
Both Google and Windows login require additional preparation by the Officelinx administrator before they can be used.
|
Warning: The Google and Windows login routines cannot be used together. Each user account can be setup to use either procedure, but NOT both at the same time. The UC login is always available to all users. |
1.On the Officelinx voice server, go to UC Admin > Company > Mailbox Structure.
Double-click the user’s mailbox to open the setup window.
2.Go to the Advanced tab. Do one of the following.
3a.To use the Google login: in the Domain Account Name field, enter the email address associated with the user’s Google Apps account (i.e. [email protected]).
Click the Save  icon in the toolbar at the top of the window.

3b.To use the Windows login: in the Domain Account Name field, enter the company domain name, followed by a backslash \ and the person’s Windows username (i.e. domain\username).
Click the Save  icon in the toolbar at the top of the window.

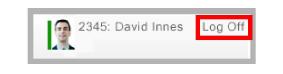
When finished with a Web Access session, always log off to keep your data secure.
Click the Log Off button in the upper right-hand corner of the main screen.
Click OK when prompted to log out of Web Access, or Cancel to return to the program.

The main screen of Web Access consists of five blocks of related options: Messaging, Location, People, Notification and Settings. Each block is divided into the main features available for that group.

Please refer to the corresponding sections of this document for complete details.
The Web Tutorial button under Settings will guide you through setting up your mailbox for use through Web Access. Although your administrator has likely done this for you, this wizard will help familiarize you with the options available on the system. You will be able to make the necessary modifications to the system through this wizard. It is recommended that you run the wizard once before proceeding.
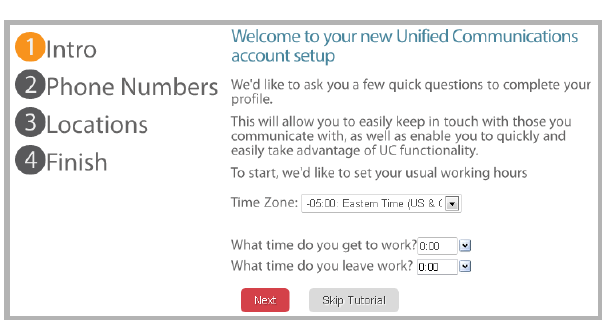
1.Intro: Select the time zone where you are located most often. Enter the time that you start and end each day. Click the Next button to continue.
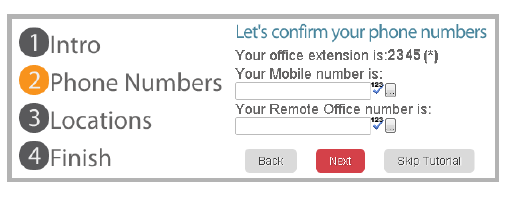
2.Phone Numbers: This window allows you to enter the numbers where you can be reached.
For each number, enter the extension(s), internal or external telephone numbers where you can be reached. Enter the complete number, including country and area codes where applicable, then click the Next button to continue.
3.Locations: Specify the telephone number or extension that the system should try first for incoming calls when your location is set to “In Office”. Also specify what action the system will take if there is no answer at that number.
Incoming calls will ring: Enter the primary extension where you can be reached during office hours.
If there is no answer: From the dropdown list, choose what action the system should take (e.g. “Take a Message”, call a different number) if there is no answer at your primary number. If you entered other phone numbers in step 2, those numbers will be available in the list. Click Add+ to add another entry.

Tell the system whether or not it should contact you when you are at home. If you select Yes, enter the necessary contact numbers in the spaces provided. Click the Finish at the bottom of the window to complete the wizard.

The Messaging block allows you manage all aspects of your email and fax communications. You can create new messages, read incoming messages, and listen to voice messages left on the system. No additional email client or software is required.
Your telephone greetings are also created and maintained in this section.
This block includes sections for Send a Message, Send a Fax, Messages, Fax Jobs, Greetings and Message Forwarding.
These icons are used to display information about each message:
|
Icon |
Name |
Function |
|
|
New Voice |
Indicates that the message has an audio component (voice message or attachment) |
|
|
Unread Email |
Indicates an email that you have not read |
|
|
Read Email |
Indicates an email that you have read |
|
|
Fax |
Indicates that the message is a fax |
|
|
Urgent |
This message is marked Urgent by the sender |
|
|
Confidential |
This message is marked Confidential by the sender |
|
|
Attachment |
Indicates that this message includes an attachment |
To create a new email message, click the Send a Message button.
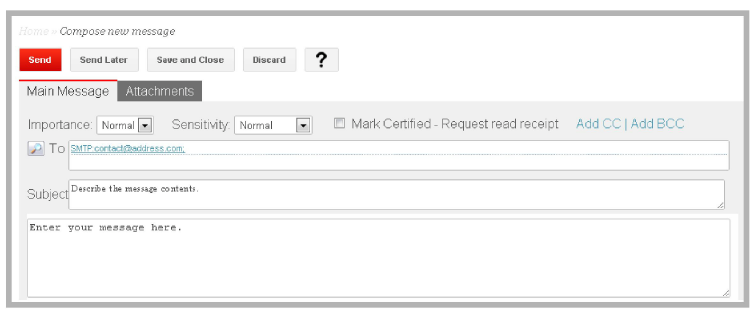
Composing a message is the same as with other email clients. Define the recipient(s), then enter the subject and body of the message. If required, attach a file using the Attachments tab.
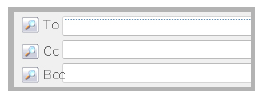
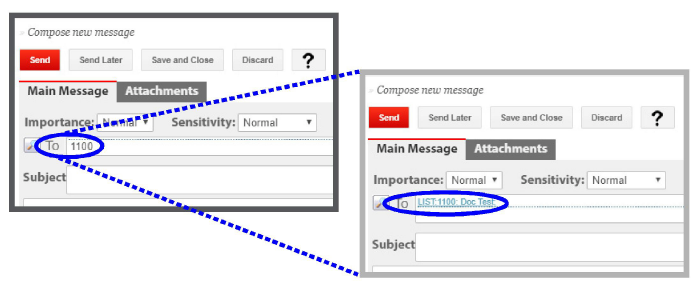
TO: Enter the email address for the recipient in the TO field. Alternatively, use the search icon  to open your contact list and select the contacts to include. Multiple addresses can be entered when separated by a comma
(e.g. [email protected],[email protected]).
Click the Add CC or Add BCC links to “carbon copy” or “blind copy” additional recipients of the message. These will open new address bars for each category. Enter the addresses in the spaces provided, or use search to select from your contacts list.
Subject: Type a brief description of the message contents so the recipients will know what it is about.
Enter the body of the message in the space provided.
Select additional options for the message from the dropdown menus above the message window:
Importance - Choose between Normal and Urgent. Urgent shows the recipient that the message should be opened immediately.
Sensitivity - Select either Normal or Confidential to tell recipients that the message contains sensitive information.
Mark Certified - Enable this checkbox to request that the recipients send you an alert when they read the message.
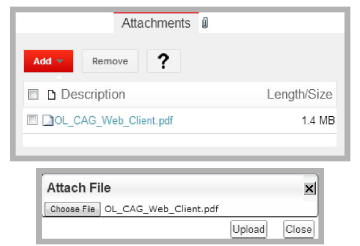
The Attachments tab in the New Message window is used to include additional items with an outgoing message. Use the Add button in the upper left to include a File, New Text or New Voice attachment with the message.
File - Selecting this option opens a window where you can choose a file to add to the message. Only one file can be added at a time, but multiple files can be added individually. Once the file has been chosen, click Upload to copy the file into the message.
New Text - Choose this to open a window to enter additional text. Click Save to attach the message as a text file.
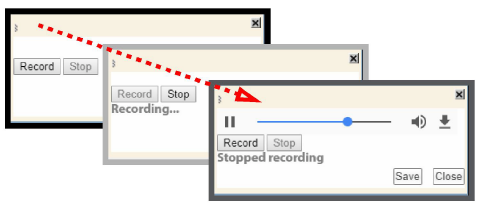
New Voice - If you have a microphone attached to the computer, or you have an integrated telephone, you will be able to include voice messages from the Web Access the interface using the recording tool.
•To start recording, click the Record record button. When finished, click the Stop button. The voice recording will be added to the message as a WAV audio file attachment. When you are satisfied with the message, click Save.
When the message is ready, click the appropriate button to continue.
|
Button |
Description |
|---|---|
|
Send |
Click this button to transmit the message immediately. |
|
Send Later |
Select a time when the message will be sent. 
|
|
Save and Close |
Use this button to save the message to the drafts folder and return to the inbox. The message can be recalled, modified, and sent at any time. |
|
Discard |
Delete the message and return to the inbox. |
|
Note: This feature is only available if you have a fax board installed on the server to handle fax routing. Otherwise, faxes can be sent using the messaging client by setting the outgoing address to FAX: followed by the fax number (e.g. fax:9057079700). |
All features for sending a fax are the same as for Send a Message. Enter the fax number in the TO field. Include all required digits, such as long distance and area codes, and any characters needed to access an outside line. Any attachments to the fax must be in the PDF or TIFF formats unless the voice server has been specifically setup to support other file types.
|
Note: This item is only available to accounts with Messaging and Collaboration (Avaya Mainstream) Desktop Capabilities. An account with Messaging (Avaya Basic) alone will not have access to this feature. |
To read the messages, clicking the Messages button will open your inbox.
Read  messages appear in normal text, while Unread
  messages are in bold.
To open an message, click the contact’s name in the From column.

The message will open in a new window.
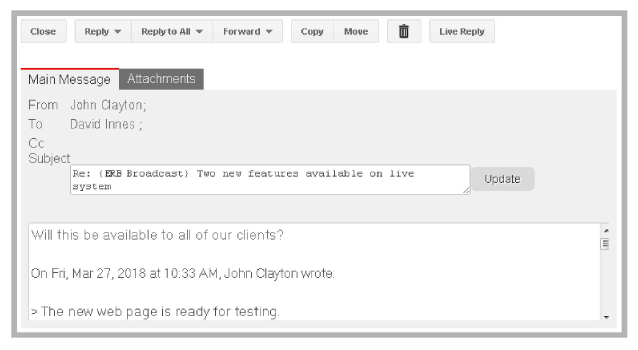
The following controls are available:
|
Buttons |
Description |
|---|---|
|
Close |
Close the message and return to the Inbox. |
|
Reply Reply to All Forward |
Reply - Send a response only to the sender of the message. 
Reply to All - Send a response to the sender and all recipients of the message.
Forward - Pass the message along to another contact. 
Mouse over each button to display additional options (Text*, Voice, Fax, Add Comment†, No Comment†). |
|
Copy / Move |
Duplicate / relocate the selected messages to another folder. You will be prompted to select the folder where the messages will be moved/copied to. |
|
|
Send the selected messages to the deleted items folder. |
|
Live Reply |
Start a telephone call with the sender of the message. See description on this page. |
* - Choosing Text will send an email reply. Select Voice to record and send a voice message with the response.
Pick Fax to send the reply as a fax.
† - Adding a Comment gives you the option to add or record a preface to the message before sending it to the new contact. Choose No Comment to send the message as it with no additions.
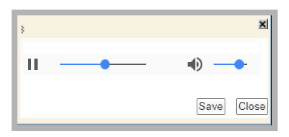
Web Access can play voice messages. When you open a voice message (an email with a voice file attachment), Web Access will automatically play the message. To replay the message, go to the Attachments tab and open the audio attachment.
|
Note: If there is more than one attachment, click the Attachments tab and select the voice message you want to hear from the list. |
When you receive a fax message, you can open the fax attachments within Web Access using the default Microsoft Windows Fax viewer. You may choose to either save the file to your local computer and then open it, or open it on the fly.
|
Note: If there is more than one attachment, click on the Attachments tab and select the fax message that you want to view from the list of attachments. |
Adding Attachments to a Message
Aside from the attachments that are generated for you (e.g. fax and voice messages), you can also attach other files to a message through the Attachment tab. To attach a file, click the Add button. You have three choices:
File: Click on Browse button to select a file you wish to attach. Click on the Upload button once you have made your selection to attach the file to your message.
New Text: A simple text editor will appear. Compose the text then click save. The text file will be created and will be automatically included with your message.
New Voice: The recording tool appears. Click Record and say your message into the microphone. When finished, click the Stop button and the voice file will be automatically attached to the message as a WAV audio file.
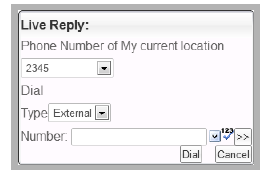
Web Access allows you to initiate a call from within a message, connecting you through your currently selected phone device. When you click Live Reply, the popup screen shows these options:
Phone Number of My current location: Select the phone number you wish to use to connect with your contact. The voice server will first call you at this device, and then place a call to the contact once you have answered, seamlessly connecting both parties.
Type: From the dropdown menu, select the type of phone number of your contact, Internal or External.
Number: Enter the telephone or extension number of the contact to be dialed, or click one of the icons:
 - Open a dropdown list of numbers previously called. Click one to place the call.
 - Search for the number through your contacts list. Click one to place the call.
 - Expand the display to include area and country codes in addition to the number.
Dial: Click this button to place the call. Your current device will ring and the call will be placed once you pick up.
Cancel: Click this button to close the Live Reply window without placing the call.
If you wish to perform an action on a message without viewing the content, enable the checkboxes to the left of the message list, then select the desired action button, such as Move  or Delete
  .
.
|
Note: To change the order in which the messages are displayed, change the Sort Order from the main page under Call > Telephony Options (see this page). The default is LIFO (newest first). |
Additional controls are available through the buttons.
* - Choosing Text will send an email reply.
|
Buttons |
Description |
|---|---|
|
New |

Create a new message. Hover the mouse over this button to view the available message types*. Select one to create a new message of that type. |
|
Copy/Move |
Duplicate or relocate the selected messages to another folder. You will be prompted for the folder where the messages will be moved or copied. |
|
|
Update/refresh the message list. |
|
|
Send the selected messages to the deleted items folder. |
|
|
Click this button to access the online help system. |
|
Views |
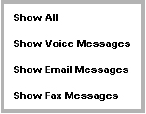
The Views button allows you to filter the messages that are displayed. The default is Show All messages. |
|
|
Use the arrows to move to the next / previous page of messages. |
* - Select Voice to record and send a voice message with the response. Pick Fax to send the reply as a fax. Mobile Text sends the message as an SMS text message. The Contact option opens a window where you can add the person to your personal directory. Fill in the necessary details (name, contact numbers, employer, etc.) and click Save and Close when finished.
Any deleted messages and folders are moved into the Deleted Items folder. This allows you to recover the items as long as the Deleted Items folder has not been emptied.
To recover an item, move a message or folder back to its original location, or to any other location outside of the Deleted Items folder.
Emptying the Deleted Items Folder
Deleted messages and folders are moved to the Deleted Items folder. To permanently remove these items, select the Empty Deleted Items Folder option from the folder menu.
|
Warning: Once you empty the Deleted Items folder, you cannot recover the deleted items. |
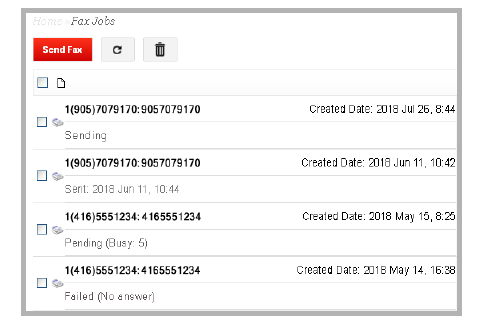
This section shows all sent, received, and pending fax messages. The time, date and number for each fax are listed.
Faxes that are still being processed by the system are also shown, with their current status (e.g. Dialing, Sending).
Any fax that has failed to send is listed with the reason for the failure (e.g. Busy, No Answer). If there are any problems making the connection, Web Access will automatically redial the number several times before stopping.
|
Note: This feature is only available if you have a fax board installed on the server to handle fax routing. Otherwise, faxes can be sent using the regular messaging client by setting the outgoing address to FAX: followed by the fax number |
The number of times the system will redial the number is controlled through the Officelinx Admin program.
Go to the Company > Integrated Fax tab.
Set the value in the Number of retries for printing file if no response field to control the number of times the system will attempt to send the fax. The default value is 5.

Click Send Fax to create a new fax message.

It is important to fully customize your personal greetings so that you can easily convey your location and availability to callers. Unless there is a specific greeting defined, all callers will hear the default greetings for your availability setting, and where the call is coming from (internal or external).
Review and record all of the greetings associated with this account.
Add Greeting - Click here to create a new greeting in the chosen category.
Add greeting in different language - For entries that already have a greeting, this link lets you create a new one. Select a different language from the list and record the new greeting. This will be played when a caller chooses that language from the auto attendant.
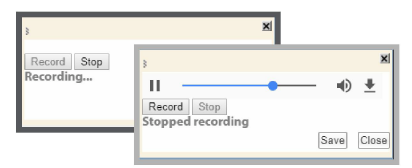
Record - Select this link to open the record menu. When recording a greeting, choose the language for the greeting from the list. All languages available on your system will be listed. This greeting will play when a caller selects the specified language at the prompt.
Click Record when ready. Speak into the microphone/handset to record the greeting.
Click Stop to end recording.
Click Play/Pause  to review what you have recorded.
Click Save when finished to save the greeting on the system.
Play - Choose this to review the current greeting for any item.
Delete - Click the  icon to remove the associated greeting from the system.
|
Note: To choose the device used to record greetings, refer to Webclient Options on page 108 for more details. |
|
Hint: It is best to use the desktop telephone to record greetings. Always record your greetings from any device in quiet surroundings to avoid distracting or embarrassing background noises appearing during playback. |
On this tab, review or record your name, and the standard internal and external busy greetings that callers hear.
Name Greeting
Say your name. By default, this greeting is generated by the system using the TTS (text-to-speech) engine. The TTS engine has limited pronunciation, so record your name greeting yourself for best results.
Internal Personal Greeting
The Internal Personal Greeting is played when an Internal number calls you and you do not answer the call.
External Personal Greeting
The External Personal Greeting is played when an External number calls you and you do not answer the call.
Internal Busy Greeting
The Internal Personal Greeting is played when an Internal number calls you and you are already on the phone.
External Busy Greeting
The External Personal Greeting is played when an External number calls you and you are already on the phone.
Internal Unavailable Greeting
The Internal Unavailable Greeting is played when an Internal number calls you and your availability is set to unavailable.
External Unavailable Greeting
The External Unavailable Greeting is played when an External number calls you and your availability is set to unavailable.
Review and record greetings to be played when you are at each specific location. (At Lunch, In Meeting, Vacation, etc.).
Create custom greetings for specific contacts. When the system identifies and incoming caller through Caller ID, it will play the greeting assigned to that caller’s number.
|
Note: You will require a functional microphone on the computer that you are connecting to Web Access from in order to record a greeting from the Web Access interface. Alternatively, you may record using an integrated telephone if you are at your work station by configuring Playback / Record. |
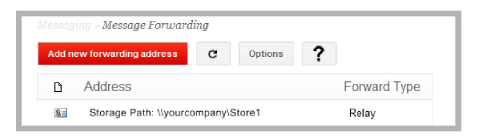
If you have another email address that you use, or simply wish to backup your messages to another account, you can forward your messages from Web Access to any email address. You can configure multiple forwarding addresses, but only one can be active at a time.
Add new / Modify a forwarding address
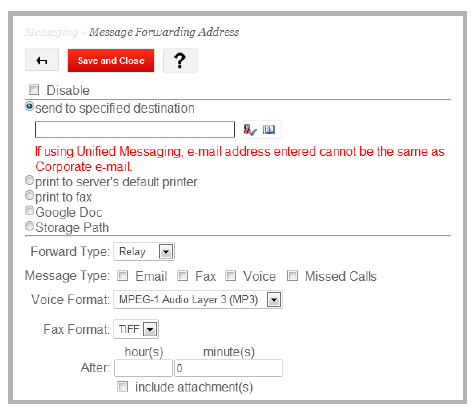
To add or modify an existing Forwarding Address, refer to the below fields:
Disable: Enable this checkbox to stop forwarding messages.
Select one of these destinations for forwarding using the radio buttons.
Send to specified destination: Select this radio button and enter the address to which you would like the messages forwarded.
Print to server's default printer: Sends the message to the default printer setup on the Officelinx Server.
Print to fax: Forward the message to the specified fax number.
Google Doc: Forward the message to a Google Docs collection. Enter the name of an existing collection to send the messages to. The path must be between forward slashes / (e.g. /collectionName/ ).
Storage Path: Forward the messages to a custom location. Enter the path where the messages will be sent
(e.g. C:\Users\PersonName).
|
Note: A Google Docs site must be setup on your system before you can use this option. Leaving the Collection Name field blank will cause all of the selected message types to be sent to the root of the user’s Google Docs site. |
Select any additional forwarding rules using the radio buttons.
Forward Type: From the dropdown menu, select the transfer type. Forward will keep a copy of the message in the original account mailbox, while Relay will remove the message from the original account after processing.
Message Type: Select the type of messages that will be forwarded by enabling the desired checkbox(es): Email, Fax, Voice, Missed Calls.
Voice Format: Select the audio encoding format from the dropdown menu that will be used to encode any voice messages.
Fax Format: Select the file format that will be used to forward fax messages. Only TIFF and PDF are available by default. Other formats may be available if the appropriate programs have been installed on the server.
After: The selected messages will be forwarded after a predetermined delay. To add a delay to your forwarded messages, enter the desired time in hours and minutes. Entering 0 minutes and hours will instantly forward the message the moment it is received.
Include Attachment(s): Enable this checkbox to include any attachments with forwarded messages.

Locations are the central element of Officelinx. Your current status is defined by your location. All calls, messages and other communication interactions are enhanced by the custom rules configured for each location. A wide range of common locations is provided with the program, and you can create custom locations as required. All locations, both pre-defined and custom, can be modified through Web Access to suit your needs.
Web Access provides a means to manage your presence by creating and modifying locations, contact numbers and availability.
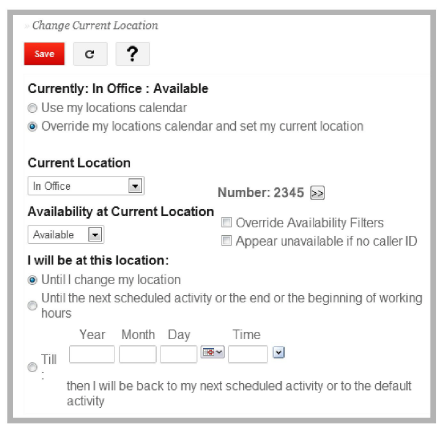
Your current location, contact number and availability are displayed on the dashboard button.
To change your location, click the Change Current Location button on the dashboard.
Enable Use my locations calendar to have your location automatically follow your calendar.
Select the Override my locations calendar and set my current location radio button to manually change your location. Configure the remaining fields as necessary then click Save.
These additional fields will only appear once the Override option is selected.
Current Location: From the dropdown menu, select the location you wish to use (In Office, At Lunch, Meeting, etc.).
Availability at Current Location: From the dropdown menu, set your availability status (Available, Unavailable).
Number: The current number where you can be reached is displayed. Click the arrows  to enter a different number. Select the correct Type (Internal or External) and enter the full Number including country & area code where necessary. You may also choose from the numbers associated with that location
  .
.
|
Note: Availability at Current Location and Number will automatically change to your current location's defaults once you have chosen one. Make the needed changes after selecting a location. |
Availability at Current Location
Choose either Available or Unavailable from the dropdown list. When Available, your current telephone will ring and the call will be transferred to voicemail or another number if there is no answer. If you are Unavailable, incoming calls will be immediately routed to your voicemail or to another number.
Override Availability Filters: Enable this checkbox to override the Availability Filters configured for this location. Availability Filters are configured under the Locations button. With this option enabled, any exceptions made for this location by the filters will be ignored.
Appear unavailable if no caller ID: Enable this checkbox to be unavailable if there is no caller ID with a call.
Select one of the radio buttons to define how long you will appear at this location.
Until I change my location: Continue at this location until it is manually changed again.
Until the next scheduled activity or the end or the beginning of working hours: This location will be used until the next event in your calendar is reached, the current workday is over, or the next workday begins. Your location will then be changed based upon your calendar settings.
Till: Enable this radio button to use this location until the specified time. Your location will then revert to your calendar defined schedule thereafter. Enter the year, month, day and time to stop using the current location and return to your calendar schedule.
Make any changes necessary, then click Save and return to the dashboard.

Use this dashboard button to create and manage your locations. Click an existing location to edit its details, or select Add Location to create a new one. Click X to delete that location.
|
Note: Predefined locations cannot be deleted or renamed, but they can be edited. |
There are 5 tabs to edit for each location.
General: Assign, edit and prioritize  the numbers used with this location, and the default availability associated with each. Enable the checkbox beside one or more numbers configured for your account. When you receive an incoming call, each number will be called according to the rules set down on the Find Me Rules tab.
Location Greeting: Choose a greeting to use for this location, and configure the rules for callers.
Availability Filters: Create a customized availability rule for this location. Specify which numbers (internal/corporate or external) and contacts see you as available or unavailable.
Find Me Rules: If you have more than one number selected for a location, you can define the rules that the system will follow when connecting incoming callers to your phone or mailbox. If only one number is selected for this location, this tab will not appear.
Assign Calls: Automatically transfer incoming calls to another number depending on who is calling. Define the exact conditions of transfer to a single or group of callers.
Each predefined location, and any custom location, has its own settings. You can specify exactly how you appear (available or unavailable) and to whom, and how you can be reached at each location independently of the others.
In Office, for example, usually means that you are available to everyone, and can be reached at your desktop extension. At Lunch may show you as unavailable to all callers from outside the company, but available to internal calls. Remote Office could set you up as available to all, but route calls to your remote/home telephone, whereas Mobile will pass your calls to a cellphone. A Temporary Location could have you available, but reach you at a different extension within the company. Extended Absence or Vacation can play a custom greeting before transferring the call to a co-worker. For all locations, you can choose to allow or deny calls from specific contacts, so even if you are at lunch, that important call from a client will still reach you.

The General tab determines which number(s) will receive an incoming call when this location is active. Choose one or more numbers from those already connected to your account, or Add a new one.
Name: Enter or edit a name for this location. The names of pre-defined locations cannot be changed.
Local location (within same time zone): Enable this checkbox if this location is in the same time zone as the company offices.
Default availability: From the dropdown menu, select the status (available/unavailable) that will be automatically applied when you select this location.
Assign numbers for this location
Enable the checkbox on the left-hand side ofeach number that is to be used with this location. Use the arrows  to move the numbers up or down the list. The system will contact each number in order when receiving a call (see Find me rules here).
|
Note: You can have more than one number associated with a location. For example, while in the office you may have access to a desktop telephone, a softphone, and a cell phone. All three can be enabled for this location. |
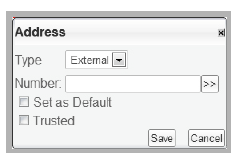
Click Add to create new telephone addresses, or Edit beside a number to modify an existing one. Specify the type of number (Internal, External), whether it should be the default number, and decide if it should be a trusted device or not.
When ready, click Save.
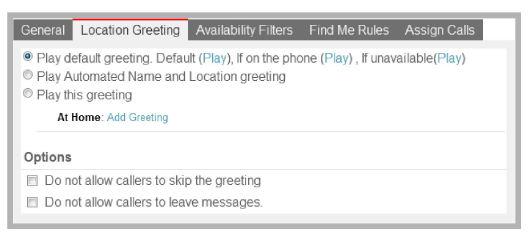
The Location Greeting tab is used to determine which of your greetings are used with each location. Only one of these items can be selected at one time for this locaton.
Play default greeting: Select this radio button to play your default greetings for each situation (Default, On the phone, Unavailable). Click Play to listen to each greeting.
Play Automated Name and Location greeting: Enable this option to have a standard location and name greeting played.
Play this greeting: Select this radio button to record a custom greeting for this location. Clicking Add Greeting will open a window where you can record and save a new greeting.
Click all that apply.
Do not allow callers to skip the greeting: Enable this checkbox to force the callers to listen to the entire greeting.
Do not allow callers to leave messages: Enable this checkbox if you do not want callers to be sent to voicemail after the greeting. Callers can instead be sent to the auto attendant voice menu, or the system will hang up.

This tab allows you to customize the rules for giving callers access to your voicemail. These changes made here will override any other settings for this location.
When I am available at the current location
By default, all incoming calls are routed in the same way. However, you can create a list of contacts for whom you will appear unavailable regardless. Their calls will be processed according to the rules configured for when you are unavailable (i.e. go straight to voicemail). Select the custom rule you wish to apply.
Appear available to everyone: Select this radio button to appear available to all callers. This is the default.
Appear unavailable to: Select this radio button to appear unavailable to one or more of; in-office calls (Internal calls), out-of-office calls (External calls) and calls from members of your contacts list (All calls from my contacts). Select all that apply. You can create exceptions for each of these rules so that some people will see you as available even if they belong to the groups specified.
Appear unavailable only to this list: Select this radio button to appear unavailable only to members of a list that you create. Click None (the default) and create your exceptions list. This list is unique to this location. People on the list will see you as unavailable, while all others will see you as available. Incoming calls will be routed accordingly.
When I am unavailable at the current location
By default, when you are Unavailable, all incoming calls are routed in the same way. However, you can create a list of contacts for whom you will appear as available regardless. Their calls will be processed according to the rules you configure for your available status (i.e. ring your desktop telephone). Select the custom rule you wish to apply.
Appear unavailable to everyone: Select this radio button to appear unavailable to all callers. This is the default.
Appear available to: Select this radio button to appear available to one or more of; in-office calls (Internal calls), out-of-office calls (External calls) and calls from members of your contacts list (All calls from my contacts). Select all that apply. You may also create exceptions for each of these rules so that some people will see you as unavailable even if they belong in the groups specified.
Appear available only to this list: Select this radio button to appear available only to members of a list that you create. Clicking None (the default) and create your exceptions list. This list will be unique to this location. People on the list will see you as available, while all others will see you as unavailable. Incoming calls will be processed accordingly.
The Find me rules tab will only appear when more than one contact number or device is selected under the General tab. From here you configure how the system will pass incoming calls through the multiple numbers selected.

Enable one of the following:
Only call me at the first number assigned to this location: Select this radio button to have the system call you only at the first number assigned to this location on the General tab.
Call me at each of the numbers assigned to this location sequentially: Select this radio button to have the system call you on each of the numbers assigned to this location in sequence, from top to bottom as they appear on the General tab. You may also configure additional settings when you choose this option. Refer to the Find Me Options and Exceptions List sections below.
Call me at all the numbers assigned to this location at the same time: Select this radio button to have the system call all of the numbers assigned to the location simultaneously. You may also configure additional settings when you choose this option. Refer to the Find Me Options and Exceptions sections below.
|
Note: Call queuing will be automatically disabled on locations where find me rules are active. |
If you selected an option to have the caller find you, you can specify additional options. Select one of the following:
Automatically find me: Select this radio button to have the system automatically try to find you (call your numbers as determined above) when a call comes arrives.
Ask the caller to find me: Select this radio button to have the system ask the caller if they want to find you.

Exceptions are only available if you have selected Call me at each of the numbers assigned to this location sequentially or Call me at all the numbers assigned to this location at the same time.
Instead of using the same Find Me Rules for everyone, you can specify how different contacts will function. You can turn off the follow me options for some, and assign different behavior for others. To add an exception click the New Rule button.
Give the rule a name and select the specific behavior for this rule. As above, select if the system should ring only the first number, all of the numbers in sequence, or all of the numbers at the same time. Add the contacts that are included in the rule by adding them to the Who Will Find Me list. Click None to build the list of contacts.

This tab allows you to route your incoming calls to another extension or agent. An assigned call will not be processed by your own mailbox or rules, but will be passed to the selected alternate destination.
Assign my calls to: Enable this checkbox to have your calls routed to another number or user account. Enter the number/account to which you want your calls sent.
|
Note: Click on the Address Book button to select the user from a list. Click on the Check Names button to have the system check what you entered and, if recognized, express it in the proper format. |
Play a greeting before assigning the calls: Enable this checkbox if you want the system to play a greeting before transferring the call. This enables two options:
Play my Name followed by the name of the person the call is assigned to - If you enable this radio button, the pre-assignment greeting will be your name followed by the name of the person to whom the call is being passed.
Play this greeting - If you select this option, you can have a specific greeting play before calls are assigned. Select your greeting and the language of the greeting from the accompanying dropdown menus.
New Rule: Click this link to create Exception Rules. When a new window appears, name and configure the exception, then Save. For detailed information, refer to Find Me Options - Exceptions.
Your Calendar is a schedule that displays exactly where you are at any given time. If you have recurring events or a set schedule, a location calendar will be convenient since you will not have to manually change your location every time. Your status will be automatically updated according to the schedule.
A user's calendar details are synchronized with a Microsoft Outlook, Exchange or Google Apps account.
Call routing is based upon the location and availability specified in the calendar.
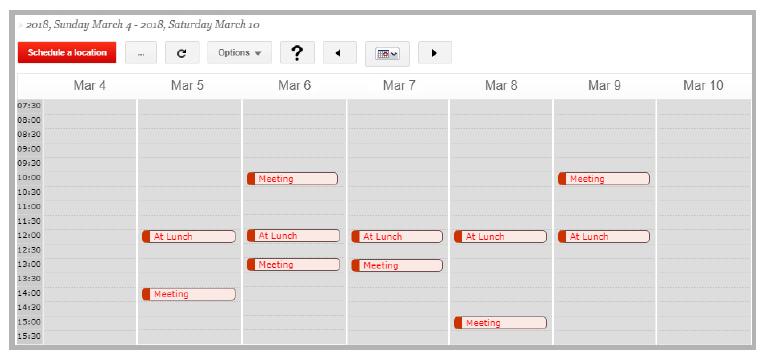
 - Use the arrows to move forward and backward through the calendar. Each click shows the next or previous week’s events.
 - This icon can be used to jump to the desired date. Open this calendar and click on the date to be displayed.

Click the Schedule a Location button to add an event to the schedule. Add the following details:
Location: From the dropdown menu, select at which location you will appear at during the event. Incoming calls will be routed according to the settings made for that location.
Availability: From the dropdown menu, select your availability for this event. Incoming calls will be routed accordingly.
Schedule description: Enter a description or name for the event you are creating.
Start /End: Specify the start and end times for the event. You may enable the All day (24h) checkbox to have the event last for the entire work day.
Click on the calendar icon  to select the date for the event.
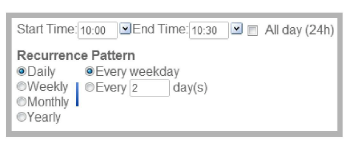
The Enable Recurrence button allows you to set events to repeat at regular intervals. You can create an event that lasts for several days, and define the exact time frame that it will be valid for during those days. You can also choose the days of the week separately, so that you can configure a repeating schedule that covers the entire working week.
Click the Enable Recurrence button to create a repeating event and enter the start and the end times. The main menu items are on the left, while the submenus for each appear to the right when selected. Enable one of the following radio buttons:
Daily: When selected, you must choose Every weekday or Every X days. For example, entering 1 will make the event occur everyday while entering a 2 will have it occur every other day.

Weekly: Enable Weekly, then specify the day(s) of the week on which the event will occur. Define the pattern of Every X weeks. For example, entering 1 will schedule the event for every week while 2 will schedule the event for every other week.

Monthly: Enable this option, and set the day of the month for the event. When using the first radio button, define the day itself (e.g. 1st or 15th of the month) by entering only the number, then X months. Entering 1 as the X will make the schedule occur every month while 2 will make the schedule occur every other month. For example, Day 7 of every 2 months.
The second option will allow you to be more dynamic in your choices. For example, Third Friday of every 1 month.

Yearly: With Yearly selected, specify a single day of the year by choosing the month and the day for the event, such as Every June 6).
You can also select a generic time for the event. For example, First Friday of March.

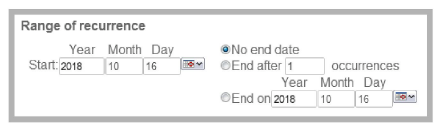
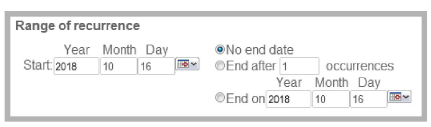
The Range of recurrence defines the period over which the event will continue to repeat. The event will appear in your calendar until the range of recurrence has passed. Select one of the following radio buttons and define additional fields where necessary.
|
Note: No matter which radio button you choose, you must always first select a start date. By default, today’s date will be entered automatically. |
Start: Provide the date when the event will begin repeating. Enter the year, month and day.
No end date: Select this radio button to have the event repeat indefinitely beginning at the start date.
End after X occurrences: Select this radio button to have the schedule expire after it has occurred X times.
End on: Select this radio button to define an exact end date of the recurrence.
Adding/Modifying a Location Calendar
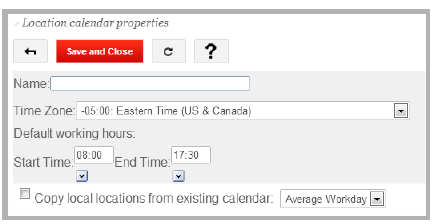
To create a new calendar, or to modify an existing one, click the Change Calendar button at the top of the calendar display window, then select New location calendar. To modify an existing calendar, choose Edit beside the chosen calendar.
Name: Enter a name to help you identify the calendar’s function.
Time Zone: From the dropdown menu, select a time zone to use with this calendar.
Default working hours: Define your working day by setting the Start Time and the End Time. Type the times in the spaces provided, or click the arrow beneath each field to open a dropdown list where you can select the time.
Copy local locations from existing calendar: Enable this checkbox and select an existing calendar from the dropdown menu. The location information from the selected calendar will be copied to the current one.
Click Save and Close when finished.
Changing Your Active Locations Calendar

Officelinx allows you to maintain multiple calendars, but only one may be active at a time. To designate a calendar as active, click the  icon from the calendar display window and select the radio button that is located beside the calendar that you wish to use.

Move the mouse over the Options button to access additional calendar settings: Change Time Zone, Change working hours, Hide local locations, Show all hours.

If you are traveling, or have relocated to another time zone, you should change the time zone of the calendar so that your calendar is properly aligned with local time.
Select the desired time zone from the dropdown menu then click OK. The current calendar will synchronize to the new time zone.
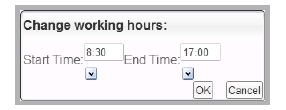
If you have a set work schedule, you can setup your calendar so that you are only available during the hours you are working. This will make it easier to manage your calendar since the schedule will be more compact; only the hours you have selected will appear in the calendar display rather than the full 24 hour day.
Select the Start Time and the End Time for your working day, or use the arrows and select the times from a list. Your current calendar will be adjusted to reflect the new schedule.
Select Hide local locations to have the calendar display only events at locations outside the current time zone. Choose Show local locations to display all events in the calendar regardless of the time zone.
|
Note: Each location has a checkbox to specify if it is considered a Local location. Start from the dashboard, then go to Locations and set this option on the General tab. |

Show all hours / Only show working hours
This item will toggle the display between showing all hours in the day and only the hours in the work day. This provides access to times outside of office hours when necessary, while still allowing the display to be compact most of the time.
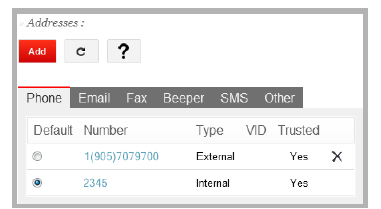
The Addresses button on the dashboard allows you to add and manage the phone numbers and email addresses where you can be reached. These addresses will be associated with your locations.
There are various types of addresses that can be created: Phone, Email, Fax, Beeper, SMS and Other. To create a number of any type, click the tab for the type of the desired number and then click Add.
To modify an existing address, click the address.

A Phone address may either be an internal (such as an extension) or an external number (like a cellphone).
Open the Phone tab, then click Add to create a new address. To modify an existing address, click the address.
|
Hint: To quickly change your default address, select the radio button to the left of the address entry to flag it as the default. You may only have one default for each type of address. |

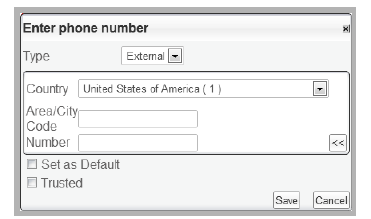
To define an internal number, click Add then enter an extension in the Number field. You may also choose to configure the following items.
Set as Default: Enable this checkbox to use this number as the default phone address.
Trusted: Enable this checkbox to flag this as a trusted number. Trusted numbers may be required by some voice verification features which allow you to log into the system using your voice instead of entering your password on the keypad.
Click Save to add the number to your addresses.

When defining an external number, it is best to include as much information as possible. Click the expand button  to access additional information (country, area and city codes). Provide the complete details for the number. You may also choose to configure the following items.
Set as Default: Enable this checkbox to use this number as the default phone address.
Trusted: Enable this checkbox to flag this number as a trusted number. Trusted numbers may be required by some voice verification features which allow you to log into the system using your voice instead of entering your password on the keypad.
|
Note: When you enter a full string of numbers including both country and area code (e.g. 14163332222) in the simplified interface, Web Access will automatically parse the data and distinguish the country and area code within the number. |
Click Save to add the number to your addresses.

Configure your email addresses here. The address defined here will also be used by Officelinx to send notifications unless you specify a different location.
Open the Email tab, then click Add to create a new address. To modify an existing address, click the address.
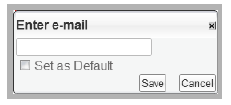
Type an email address into the space provided. You may also choose to configure the following item.
Set as Default: Enable this checkbox to use this email as the default email address.
|
Hint: To quickly change your default address, select the radio button beside the address entry to flag it as the default. You may only have one default for each type of address. |
Click Save to add the email address to your list.

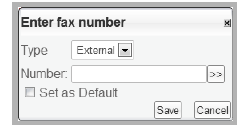
If you have a fax machine, you can opt to receive fax messages through your machine instead of through email. When a fax is sent to your mailbox, the system will automatically convert the fax message into an email address and deliver it to your account. However, if you have a fax address defined that is currently available, the system will attempt to forward the fax to the machine first before delivering the message as an email. A Fax address may be an internal or external number.
|
Hint: To quickly change your default address, select the radio button beside the fax entry to flag it as the default. You may only have one default for each type of address. |
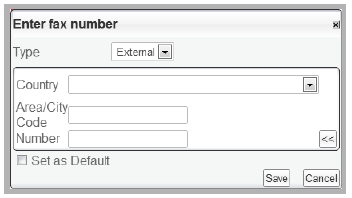
Open the Fax tab, then click Add to create a new address. To modify an existing address, click the number.

To define a new fax number, click Add then enter the extension in the Number field. You may also choose to configure the following items.
Set as Default: Enable this checkbox to use this number as the default fax address.
Click Save to add an internal number to your address.
When defining an external number, it is best to include as much information as possible. Click the expand button  to access additional information (country, area and city codes). Provide the complete details for the fax number. You may also choose to configure the following item.
Set as Default: Enable this checkbox to use this number as the default fax address.
|
Note: When you enter a full string of numbers including both country and area code (e.g. 14163332222) in the simplified interface, Web Access will automatically parse the data and distinguish the country and area code within the number. |
Click Save to add the number to your addresses.
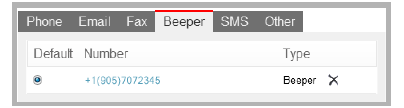
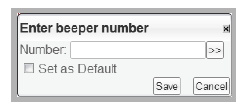
Enter the external pager number that the system will call. The beeper address defined here will be used by the system for notification and for other paging purposes, such as pre-transfer paging.
Open the Beeper tab, then click Add to create a new address. To modify an existing address, click the address.
|
Hint: To quickly change your default address, select the radio button beside the beeper entry to flag it as the default. You may only have one default for each type of address. |
When defining an external number, it is best to include as much information as possible. Click the expand button  to access additional information (country, area and city codes). You may also choose to configure the following items.

Set as Default: Enable to use this number as the default beeper address.
|
Note: When you enter a full string of numbers including both country and area code (e.g. 14163332222) in the simplified interface, Web Access will automatically parse the data and distinguish the country and area code within the number. |
Click Save to add the beeper number to your list.
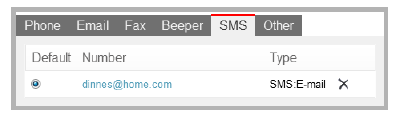
The SMS address will aso be used for notification and text messaging, which includes messaging from the Chat functions in iLink Pro. You may define an email address or an SMS capable telephone number (e.g. cell phone) as an SMS address.
Open the SMS tab, then click Add to create a new address. To modify an existing address, click the address.
|
Hint: To quickly change your default address, select the radio button beside the SMS entry to flag it as the default. You may only have one default for each type of address. |
From the dropdown menu, select either Email or Phone as the SMS address.

To add an SMS email address, pick Email from the dropdown menu. Type the entire address into the space provided. You may also choose to configure the following item.
Set as Default: Enable this checkbox to use this email address as the default SMS address.
Click Save to add the email address to your list.
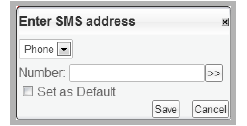
To add an SMS telephone address, pick Phone from the dropdown menu. Type the entire telephone number into the space provided. When defining an external number, it is best to include as much information as possible. Click the expand button  to access additional information (country, area and city codes).
You may also choose to configure the following item.
Set as Default: Enable this checkbox to use this number as the default SMS address.

|
Note: When you enter a full string of numbers including both country and area code (e.g. 14163332222) in the simplified interface, Web Access will automatically parse the data and distinguish the country and area code within the number. |
Click Save to add the SMS number to your list.
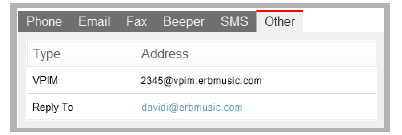
On the Other tab, you can specify any VPIM or Reply To addresses. Unlike other addresses, you may have both a VPIM and a Reply To address active at the same time.
A VPIM address is automatically assigned by the server and cannot be modified. It will usually be in the format of [email protected]. This is the address that the system uses to receive your messages. If you have any type of message synchronization configured (e.g. IMAPTSE synchronization with Microsoft Exchange), this will be the account that synchronizes with the other email server.
The Reply To address can be any email address that you use. This address will be the default address that the messages will be sent From, and is the address that contacts will use when they "Reply To" your email messages.

To change your reply to address, click the email address. Enter in the desired email address, then click Save.
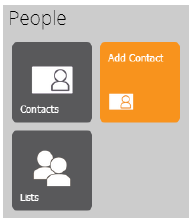
From the People section of the dashboard, you can add or import as many contacts as desired. These are the contacts that appear in your personal directory. You can also create distribution lists to send a message to multiple contacts.

Use the Contacts button on the dashboard to view all of the people currently in your personal directory. Contacts can also be modified and deleted from this window.
In most cases, a user's details are synchronized with a Microsoft Outlook, Exchange or Google calendar to be available through any channel. Changes to one program will appear in the other program.
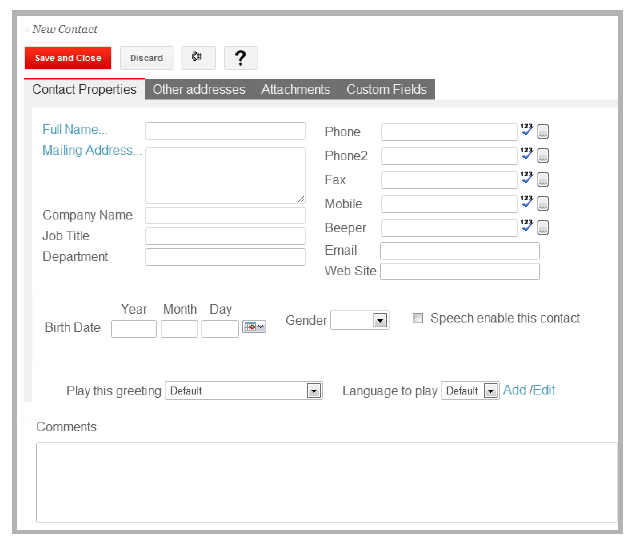
Web Access lets you create an unlimited number of personal contacts. To add someone to your list, click the Add Contact button on the dashboard. There are 4 tabs for each contact: Contact Properties, Other addresses, Attachments, and Custom Fields.
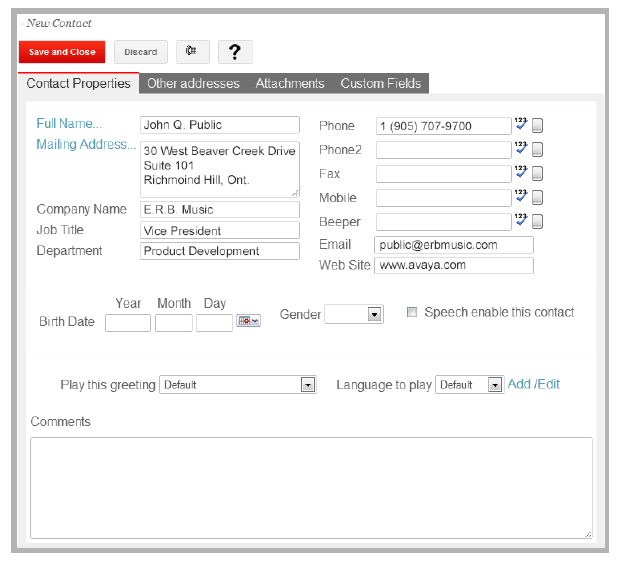
Use the Contact Properties tab to enter the contact’s details. Add their full name and titles, the company name and address, phone numbers, and any other details you need.
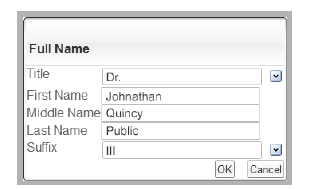
Full Name: Enter the contact’s name in the space provided. Click the Full Name... label to open a popup window where you can include their personal title (Dr., Mr., Sir, etc.), first name, middle name, last name and suffix (I, PhD, Jr, etc.).
For example, to add Dr. Johnathan Quincy Public III, click Full Name... and specify his title (Dr.), first name (Johnathan), middle name (Quincy), last name (Public) and suffix (III). The Title and Suffix can be entered manually or chosen from a dropdown list.
Click OK when finished.
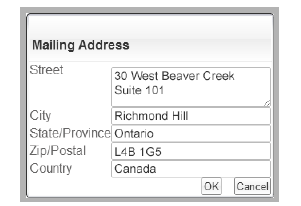
Mailing Address: Enter the contact’s mailing address in the space provided. Click Mailing Address... to specify the street, city, state/province, zip/postal code and/or country.
Click OK when finished.
Company Name: Enter the name of the contact’s company.
Job Title: Enter the person’s corporate job title (President, Sales Manager, CFO, etc.).
Department: Enter your contact's department.
Phone/Phone2/Fax/Mobile/Beeper/Email/Web Site: Enter the details to reach the contact.
|
Note: Click the |
|
Note: Click the 
|
Birth Date: Enter the contact's birth date, or select the date using the calendar button.
Gender: Select their gender from the dropdown menu.
Speech enable this contact: Enable this checkbox to turn on the feature to dial this contact by speaking their name.
Play this greeting: From the dropdown menu, select the greeting that will play whenever this contact calls your mailbox. This can be a personalized message specifically for this person.
Language to play: From the dropdown menu, select the language of the greeting (if applicable).
Comments: Enter any comments you may have regarding your contact for your reference.
|
Note: Not all of these fields are required. |
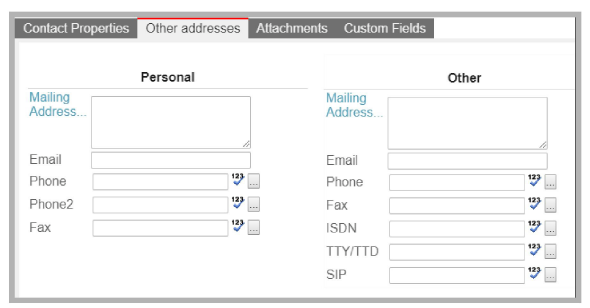
Use this tab to configure any alternate means to contact this person. Enter their Personal or Other contact information in the spaces provided. A contact’s Personal information covers their home address and phone number. Other information includes an alternate mailing address, email, phone or fax numbers, and ISDN / TTY / SIP details.
This tab allows you to associate documents, pictures and other items with the contact.
|
Hint: Affixing attachments to a contact allows you to organize all materials you maintain in your inbox, in folders and at your workstation. By attaching items such as photos, resumes/CVs and other assorted documents (emails, faxes, call transcripts, etc.), you can create a single resource for all information associated with a contact. |

Hover the mouse over the Add button to see a list of the types of object you can attach to the contact. These are: File, New Text, and New Voice.
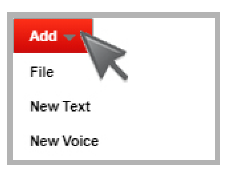
File: Select this option, locate a file to attach to the contact, and upload it into Officelinx.
New Text: Choose this option to open a text entry window where you can type additional notes.
New Voice: Click to open a window where you can record a voice file to attach to the contact’s details.
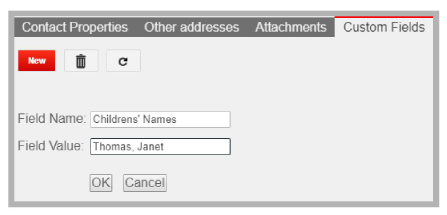
Use this tab to add extra information about your contact. Create your own fields and populate them as appropriate. Click New, give the new field a name, then enter the value it should contain. Click OK when finished.

If you have many contacts, it can be difficult to find an individual by looking through the entire directory. Instead, use the search function to find the contact you want.
Click the search button  at the top of the contact window, and enter the first or last name of the contact. Click the Search button to find all matches in your personal directory.
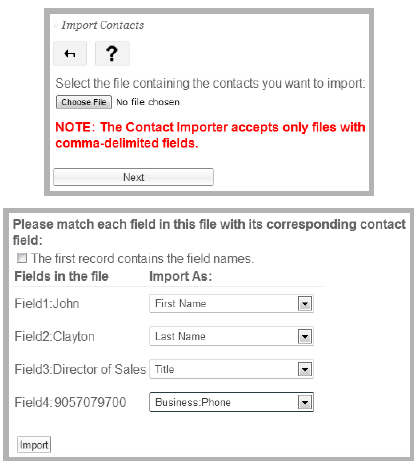
If you have a list of contacts on another platform, such as Microsoft Outlook, you will be able to import their data instead of manually typing it again. Click the Import button at the top of the contact window to begin.
The information must be exported from the original application to a comma-delimited (CSV) file. Using Web Access, Choose the exported data file and click Next. Tell the system which item in the data file corresponds to each field on the contact list. This allows the imported data to be copied to the correct fields in the Officelinx database.
After verifying that all fields are properly linked, click the Import button to add the contact data to your directory.

You can specify that a contact should be “Speech Enabled” so that you can speak the contact's name to select that person when connected to Officelinx over a phone line.
Click the Speech Enable Contacts button at the top of the contacts window, and select the appropriate directory from the Select from popup menu.
Search through the list to find the contacts to speech enable. Place a checkmark in the box to the left of each name.
When finished, click the Add button. The selected contacts appear in the Selected items pane at the bottom of the window.
When the list is complete, enable the Enable Speech radio button at the top of the window and click the Apply to Selected Contacts button.
|
Note: The number of contacts you can speech enable is limited. Consult with your system administrator for more information. |

To place a call to a contact, click the person’s name in the Contacts list, then click the Call icon  .
.
Their number will appear in the Number to dial field. This number can also be entered manually. Click the expand button  to access additional information (country, area and city codes) if required. The number from which you will place the call appears at the top of the window. Change this number if necessary using the dropdown menu.
Click Dial when ready to place the call. Your selected device will ring and Officelinx will complete the call to the contact.
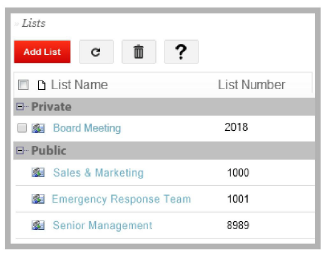
The Distribution list button on the dashboard provides you with an easy way to send messages to a group of contacts. For example, if you frequently send voicemail to the Sales department, you can create a distribution list called “Sales” containing the names of everyone in the department.
The lists you create here are your Private lists and are not available to other users.
Public distribution lists are created by the System Administrator.
Add / Modify a distribution list
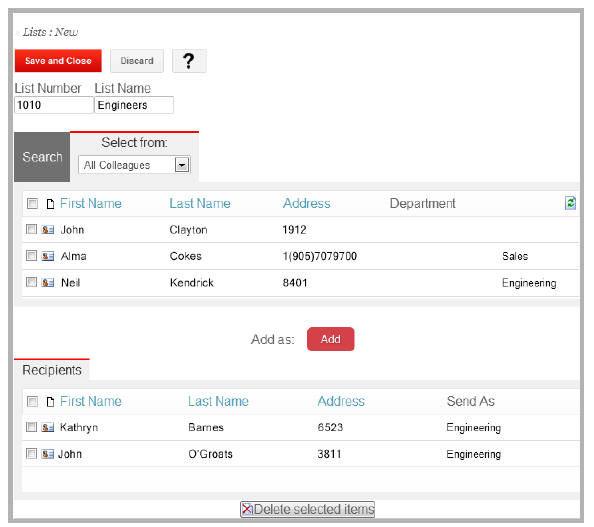
Create a new distribution list by clicking the Add List button in the upper left corner of the window. To edit an existing list, click the name of the list.
Save and Close: When you have finished creating or editing the list, click this button to save the changes and return to the Lists window.
Discard: This button will return the list to its original state, ignoring any changes made.
List Number: Give the list a number. This allows access to the list through the telephone keypad.
List Name: Enter a name for the distribution list.
The Search pane displays contacts based upon the parameters you enter into the space provided. Find a contact and enable the checkbox to the left of their name to add them to the Recipients pane.
Search: Instead of browsing the categories, you may also search the entire database for a contact. Type in the information then click on the Search button to find all the matching contacts.
Add: Click this button to copy the selected contacts to the Recipients box at the bottom of the window.
Delete selected items: Click this button below the Recipients pane to delete the selected contacts from the list of recipients. Place a check in the box beside each name to be removed, then click this button. Contacts are removed from the distribution list but not from the system.
The Select from pane allows you to search specific directories for contacts to add to the distribution list. Select a directory to view from the dropdown list and enable the checkbox to the left of their name to add them to Recipients.
Select from: From the dropdown menu, select the directory that contains the contacts that you want to add to the distribution list.
All colleagues: Select anyone within your company.
All private contacts: Select from your private directory.
All public contacts: Select from the corporate list of public contacts.
Department: Select someone in the specified company department.
Email: Manually enter an email address for the recipient.
Remote Sites: Type an email address, then use the dropdown menu to choose from the domains that are pre-configured from the remote sites on the server.
Phone Numbers: Manually enter an phone number of the recipient.
Fax Number: Manually enter the fax number.
SMS:Email: Manually enter an SMS enabled email address.
SMS:Phone: Manually enter a SMS capable phone number.
When finished, click the Save and Close button at the top of the window.
Sending a message to a Distribution List
Once a private or public distribution list has been setup, it can be accessed when sending a message by adding the list number or the list name in the TO field, then press Enter.
|
Note: Distribution Lists created in Web Access are only available when sending messages from Web Access. |
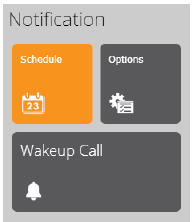
When you are away from your desk or out of the office, you may not know if you have received an important message. The Notification section of the Web Access dashboard can be configured to notify you upon receiving messages.
For example, if you receive a voice message in your office inbox, Web Access can be instructed to email you, or it can call your cell or home phone number to notify you of the message’s arrival.
|
Note: Notification is only available to accounts with Messaging and Collaboration (Avaya Mainstream) Desktop Capabilities. An account with Messaging (Avaya Basic) alone will not have access to this feature. |
|
Note: Alerts are sent immediately when a message arrives as long as it is within the hours setup in the schedule. You will not be notified for any messages that are received outside of the scheduled times. |
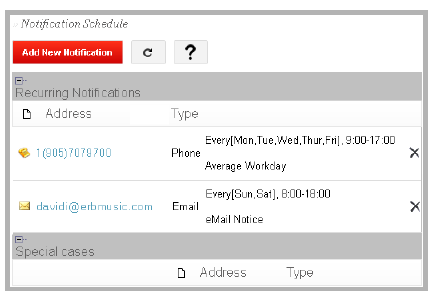
The Schedule button on the dashboard of Web Access allows you to specify phone and email addresses that will be used to contact you when you have a message. After specifying your contact methods, you can assign a schedule to a notification address. Alerts created without a schedule become Special Cases.
|
Note: Since getting notified for every message can be overwhelming, you can configure the timing and conditions for notifications from Options. |
To create a new alert, click Add New Notification, or click the address of an existing alert to modify it.
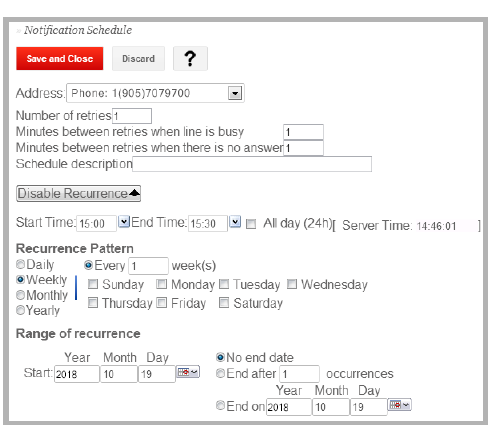
Address: From the dropdown menu, select the address you want the notifications to be sent to. This can be an internal or external phone number or an email address. The entries in the list are configured under Addresses .
Number of retries: Enter the number of times that the system will attempt to notify you. This option is only used for phones or pagers. Notifications through email and SMS are always sent only once.
Minutes between retries when line is busy: Enter the number of minutes that the system will wait between notification attempts when the telephone number is busy (only for phones or pagers).
Minutes between retries when there is no answer: Enter the number of minutes that the system will wait between notification attempts when the telephone number is not answered (only for phones or pagers).
Schedule description: Enter a name or description for the current notification schedule for your reference.
Enable / Disable Recurrence: By default, the notification schedule will have recurrence enabled. If you decide to disable recurrence, the notification will always be on during the defined time. For example, if the Range of recurrence and the Start Time is set to January 01, 2018, 0:00 and the End Time is set to December 31, 2018, 23:30, you will be notified for the entire year. Te All day (24hr) option will have no effect since the schedule already covers the a full 24 hours. Disable Recurrence to create a Special Case.
Recurrence saves you the trouble of setting up a notification repetitively. You can create a notification schedule that spans multiple days and defines the time frame that it will be valid for during those days. You can also choose the days of the week separately, so that you can configure a schedule for your entire working week. Recurrence is enabled by default.
Start Time and End Time: From the dropdown list, specify a time range for the notification schedule. For example, if you want this schedule to be in effect from 9 AM to 5 PM, select 9:00 from the Start Time dropdown menu and 17:00 from the End Time dropdown menu. Notifications will only be sent between these two limits.
All day (24hr): Enable this checkbox to have notifications sent out regardless of the time of day they are received. Start and End times are disabled while this option is selected.
Enable one of the following radio buttons and specify any additional details.
Daily: Decide if the schedule is to be active Every weekday, or Every X day(s). Entering 1 will have provide notifications daily, while entering a 2 will make it every other day.
Weekly: Choose the day(s) of the week on which notifications will be sent, and define the pattern of every X weeks. Entering 1 will have notifications sent every week while 2 will send them every other week.

Monthly: Specify the Day of every X month(s). For Day, enter only the day number. For example, selecting Day 12 of every 2 months will send alerts on the 12th day of every other month.
The second option provides a different set of choices. For example, you can choose to be notified on the Last Friday of every 1 month, or the Third weekday of every 3 months.

Yearly: Pick a single day of the year by selecting the month and the day. You can also be more specific. For example, you can choose the First Friday of January, or the Fourth weekend day of July.

Range of recurrence defines the period over which the notifications will continue to occur. Select one of the following radio buttons and define additional fields where necessary.
|
Note: No matter which radio button you choose, you must always first select a start date. |
No end date: Select this radio button to have the notifications continue indefinitely beginning at the start date.
End after X occurrences: Select this radio button to have the schedule expire after it has occurred X number of times.
End on: Select this radio button to define an exact end date of the recurrence.
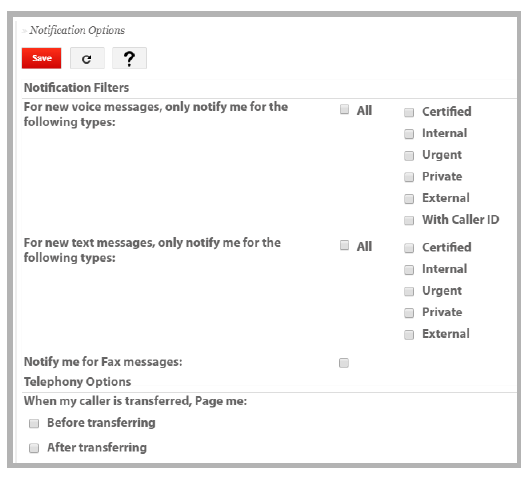
Being notified for every single message can be overwhelming. Configure the types of messages that will trigger a notification from the Options button.
When the options have been configured, click Save.
Use these options to determine what type of messages, and from where they come, will generate a notification.
For new voice/text/fax messages, only notify me for the following types:
Select the type of message that will create a notification. Choose all that apply.
All: Generate a notice for all messages.
OR
Certified: Generate a notice for certified messages.
Internal: Notify for messages arriving from inside the company.
Urgent: Send an alert for messages marked ’Urgent’ or ’High importance’ by the sender.
Private: Notify for messages flagged as ’Private’ or ’Confidential’.
External: An alert will be generated for messages that arrive from outside the company.
With Caller ID: Only messages that include a caller ID will generate notifications.
An alert can be sent whenever the system transfers a call for you to another extension. The message goes out through the intraoffice paging system (telephone speakers, PA system, etc.) and takes the form “There is a call for John Smith.”
Configure when the page is announced when a caller is transferred.
Before transferring: Enable this checkbox to have the system page you before transferring a call.
After transferring: Enable this checkbox to have the system page you after transferring a call.

You can use Web Access as a personal alarm clock by creating a wake-up call. Click the Wakeup Call button on the dashboard and fill out the following information.
Only one Wakeup call can be active at one time.
Number: Enter the number where you wish to receive the wake-up call. Alternatively, select a number from the dropdown menu which includes all of the phone numbers created for your account under People.
Date: Enter the date on which the wake-up call will be placed, or click the calendar button to select a date.
Time (hour) / (min): Enter the time to place the wake-up call.
|
Note: The time you specify must be in 24-hour format. To set a 9:45 PM flight to New York and you need 1 hour to get to the airport. If you wanted to set a wakeup call for 8:15 PM on Sunday, August 12, 2018, you select “2018”, “August” and “12” from the Date dropdown menus, then type in “20” and “15” in the Time fields. |
|
Note: You may also configure a wakeup call through the TUI (Telephone User Interface) after logging into your mailbox. The wakeup call entry is shared between Web Access and the TUI. |
When ready, click Save. Officelinx will call you on the specified device at the chosen date and time.

The Settings section of the dashboard allows you to customize both your Web Access experience. You may also delve into automated features such as forwarding or notification from here. Please refer to these topics for more information.
The Web Tutorial button on the dashboard will guide you through setting up your mailbox for use in Web Access. Although your administrator has likely done this for you, this wizard will help you to become familiar with the options available on the system. You will be able to make modifications to the system through this wizard. It is recommended that you run the wizard once before exploring the program more fully. See this page for details on the tutorial.
The administrator may require that you run the tutorial once before using Web Access. You will receive an email message with a link to launch the wizard where you can enter your details.

Change your account settings and passwords from the Account button on the dashboard.
This section manages your credentials for logging in to Officelinx.
User Name: This is your login account name, and is usually your email address.
Password / Confirm Password: Use this field to change your account password. Enter and verify a new password for your mailbox. This password can contain both letters and numbers.
|
Note: You must click the Save button at the top of the window in order for the changes to be applied. This password is for both Web Access and iLink Pro. |
This section allows you to manage your password for logging into your telephone devices to listen to voicemail messages.
Password / Confirm Password: Enter and verify a new password for your voice mailbox. This password must only contain numbers as it will be entered from a telephone keypad.
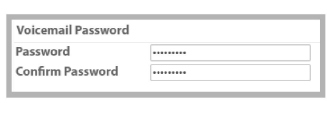
This is a display of your domain account name which is managed by the network administrator.
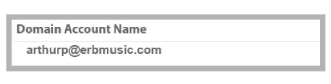
This section allows your voicemail account to access a third party email provider, such as Gmail, Outlook or Exchange. The same information is copied to both accounts so that you can use your favorite program to manage your messages.
Locked: This checkbox is enabled when IMAP credentials are refused by the server when performing IMAPTSE synchronization. When enabled, obtain the correct IMAP credentials, enter the information, then disable the checkbox to continue the synch.
User Name: Enter the user name for your IMAP email account. This will usually be your email address.
|
Note: Passwords may not be required in some situations. For example, if your company is using a Super User authentication with synchronization, you will only need to enter the user name. |
Voice Format: From the dropdown menu, select the type of compression which will be used on your outbound voice messages. You should ensure that the voice format chosen here is compatible with the destination. It is recommended that you leave this field at its default value unless you are specifically instructed to change it.
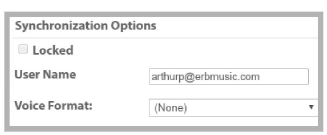
This displays the last time your Inbox, Contacts and Calendar were synchronized with an external server such as Gmail or Outlook.
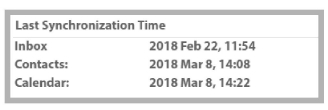
This section lets you specify the date format, toggle the use of speech recognition when dialing, and view hints on the many screens within Web Access.
Date Format: From the dropdown menu, specify the date format that will be used for your account. Choose between yyyy/mm/dd, dd/mm/yyyy, and mm/dd/yyyy.
Include all my private contacts when I initiate a voice search for a contact: Enable this checkbox to include all private contacts in a voice search.
Include my company's public contacts when I initiate a voice search for a contact: Enable this checkbox to include the company's public contacts directory in a voice search.
Automatically include my signature or attach an electronic business card to outgoing messages: Enable this checkbox to send your signature or an e-business card with all outgoing messages.

Show Hints: Enable this checkbox to display summarized help. The hints appear on each screen with a yellow background.

When you have finished editing your account, click the Save button at the top of the screen to make the changes permanent.
Configure the settings for your integrated telephone from the Call button on the dashboard.
Use this section to assign transfer options and toggle call forwarding.
Caller ID: From the dropdown menu, select the way in which you will be notified when you receive a call in the iLink Pro. Choose from the following options on the dropdown list:
None: Do not ask an incoming caller for his/her phone number if they are not recognized by the system. Also do not display it in a screen popup.
Ask: Prompt an unidentified caller to enter his/her phone number using a touch tone keypad.
Pop: Display an incoming caller's phone number.
Ask & Pop: Ask an unrecognized caller to enter his/her phone number and to display that number in a screen popup.
Personal Operator: Select the personal operator that you want the call to be transferred to. When you define a personal operator, it will override the default operator for your mailbox.
Enter phone number: Enable this checkbox to enter a the telephone number of the person who will act as your personal operator. With this checkbox disabled, you must enter the address for that person’s mailbox.
Resolve Entry: Search within the company directory to find the name and extension of the person entered in the field (e.g. entering “John” may find “1234:John Smith”).
Address Book: Opens the company directory so you can select your personal operator.
Voice Menu default greeting: From the dropdown menu, select the default greeting for the personal voice menu that you are currently using.
Long distance access code: Enter the long distance access code used by your company (where applicable).
Camp On: When someone calls your extension but the line is busy, enabling this checkbox will give the caller the option to be notified when your line is free.
Call Screening: Enable this checkbox to force the callers to provide their name.
Call Queuing: Enable this checkbox to place callers in a queue when your line is busy. If queued, callers will be informed of their position in the hold queue and asked to either continue holding or leave a voice message.
|
Warning: Call Screening and Call Queuing are available only on telephone systems that provide a busy tone. Most telephone sets with multiple extension appearances do not produce busy tones. |
|
Note: Call Screening and Call Queuing are mutually exclusive. You may choose one or the other, but not both together. |
Record all incoming calls: Enable this checkbox to record all incoming calls. The recorded calls are sent to your inbox as a voice message.
Fax Detection: Enable this checkbox to allow incoming faxes to deliver their message to your inbox if the call is unanswered. With this box unchecked, the phone set will ring but the call will be dropped if it is not answered and the system identifies the call as a fax.
Call Forwarding Enable: Enable the checkbox to forward incoming calls to the number defined in the field. You may only forward your calls to an internal number (e.g. another mailbox). Enter the number to forward to in the space provided.
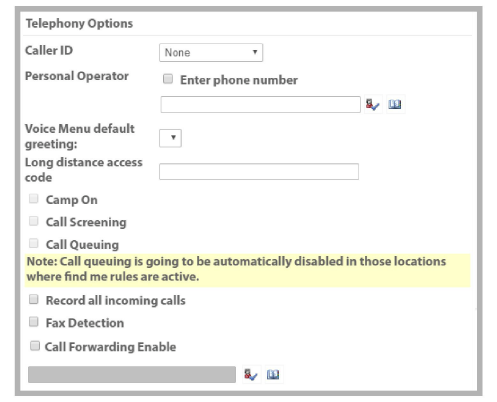
Re-route Options for CTI Integrations
If you have a telephone system that supports CTI integration, you can configure it so that the system will automatically change the settings depending on your phone's status.
Select the action that will occur when you receive an incoming call and your phone is set to Do Not Disturb. Only one option can be active at one time. Incoming calls will be routed accordingly.
Nothing: Select this radio button to do nothing when you receive a call and the phone's DND button is on.
Change my availability to Unavailable: Select this radio button to appear Unavailable when DND is switched on.
Set my location to: Select this radio button and choose your Location and Availability from the dropdown lists. Your location and availability will be changed when you push the DND button on your phone.
When Forward to Voice Mail Group
Select the action that will occur when you receive an incoming call and your phone is set to forward to another extension.
Nothing: Select this radio button to do nothing when you receive a call and the phone is set to forward calls.
Change my availability to Unavailable: Select this radio button to appear Unavailable when your phone is configured to forward calls.
Set my location to: Select this radio button and choose your Location and Availability from the dropdown lists. Your location and availability will be changed while you are forwarding your calls.
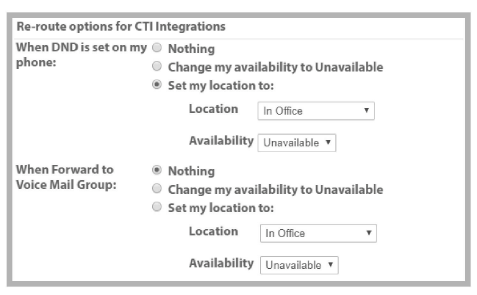
LIFO (Last In, First Out): Select this radio button to play the newest message first, oldest message last. When viewing messages through Web Access, the newest messages will be at the top of the list.
FIFO (First In, First Out): Select this radio button to play the oldest message first, newest message last. When viewing messages through Web Access, the newest messages will be at bottom of the list.
|
Note: Changing Sort Order will affect the order in which all messages (email, voice, fax) are displayed under My Messages. |
Say Envelope Information: Enable this checkbox to always hear the envelope information (e.g. sender's name, date received, etc.) for each voicemail message.

Play Back Device: From the dropdown menu, select the device (e.g. PC Sound Card, Phone) that will be used to play messages and greetings.
Record Device: From the dropdown menu, select the device (e.g. PC Sound Card, Phone) that will be used to record messages and greetings.

|
Note: When you choose Phone as your device for play back or recording, keep in mind that you must have access to your integrated phone to play or record messages. This means that if you're using Web Access from a remote location, you will not be able to listen to or record messages unless you change the Device to PC. PC settings will use the devices which are attached to the current computer. |
This button on the dashboard is used to access the online help file for Web Access.


 to pick the day.


 icon to have the system apply proper formatting to the numbers entered in these fields.
 button to enter additional telephone information in a new popup window. From this window, you can add the person’s country, area or city code, and their telephone number.
