iLink Pro Desktop (iPD) is an all-in-one messaging and communication tool designed to aid the users with all aspects of communication. From eMail to phone calls, from text messaging to presence management, iLink Pro Desktop provides a one-stop solution where all methods of business communication can be conducted through a single, simple interface.
iLink Pro Desktop also offers seamless integration to vital business applications, such as Microsoft Outlook and Google Apps. Furthermore, iLink Pro Desktop for mobile devices is supported by most major mobile platforms (Google Android, Apple iPhone and iPad, and RIM Blackberry).
You can access your personal and company contacts, find anyone within the same company/organization, and initiate conversation with any of them through any means supported by iLink Pro Desktop.
Minimum Requirements
|
Hardware and Software Requirements |
|
|---|---|
|
PC |
Intel Pentium 4 (2.0GHz) 512 MB of RAM + 256MB RAM for Outlook |
|
Operating System |
Windows 7, Windows 8, Windows 10 |
Installing .Net Framework from Microsoft
Before you install iLink Pro Desktop, make sure that the .Net Framework installed on your computer is 2.0 SP1 or higher. The iLink Pro Desktop may crash if the version of .Net Framework is older than this, or if it is not installed on the computer.
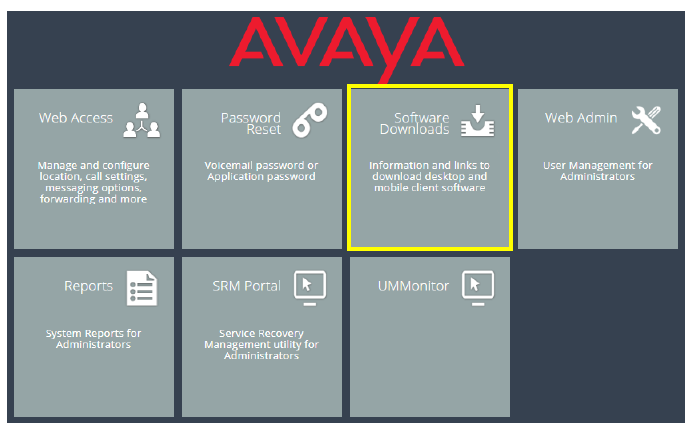
1.In a Web Browser, go to the web addressable location for your UC Server (e.g. user.yourcompany.com).
Select Software Downloads.
2..
3.Click iLink Pro Desktop.
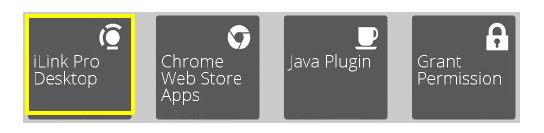
4.Determine the location where the downloaded file will be saved. When ready, click Save.
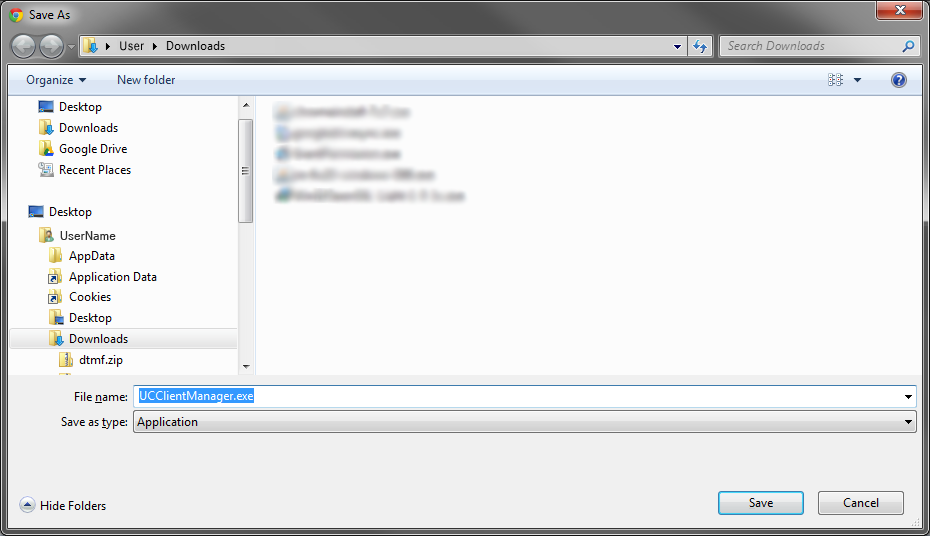
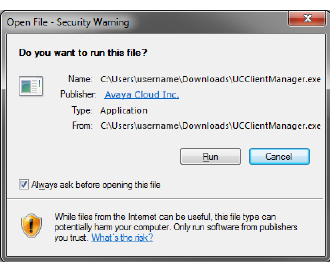
5.When the download is complete, double-click the file to launch the installation program. When asked to confirm the running of the file, click Run.
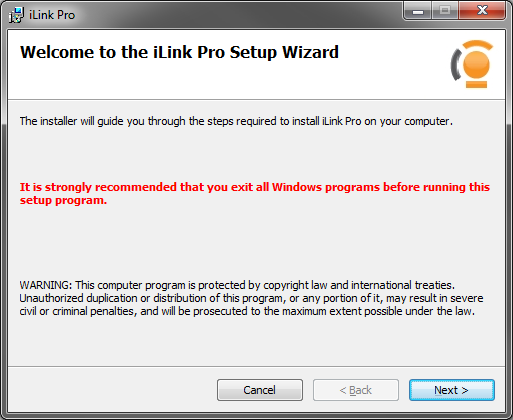
6.The installation wizard will start. Click Next to continue.
|
Note: If you have other programs running (e.g. Microsoft Outlook, IBM Notes, etc.), shut them down before continuing with the installation. |
7.The installer will ask you to select the install folder.
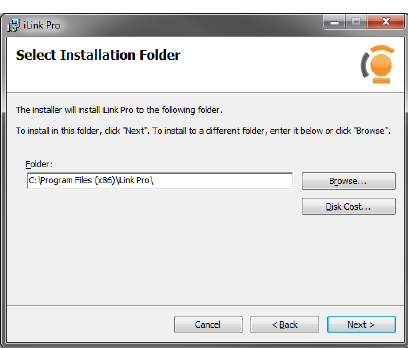
You may leave the value at its default, or click the Browse button to find the location.
Click Next to continue.
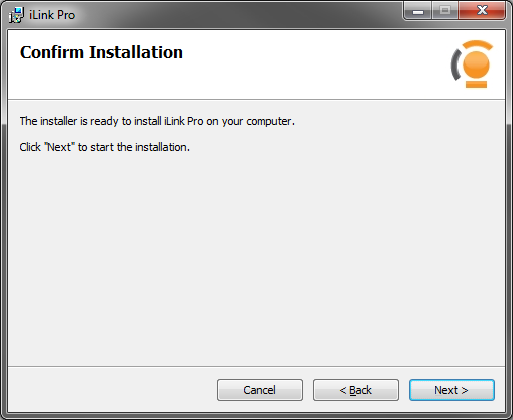
8.At the confirmation screen, click Next to begin the installation.
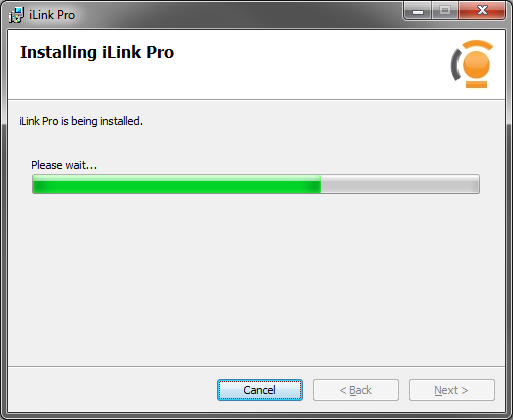
9.The necessary files will be copied to the installation directory.
10.When the installation is complete, click Close.
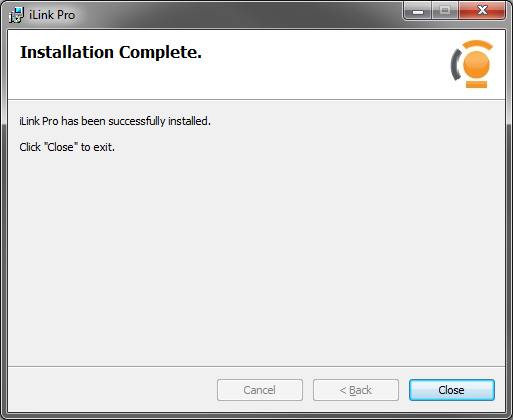
iLink Pro Desktop is now installed on the computer.
Simplified Interface
Authentication

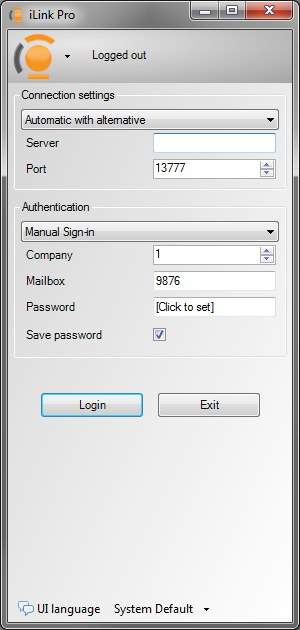
There are several choices when it comes to connecting iLink Pro Desktop to the IX Messaging server. From the dropdown menu, select from the following options:
Automatic Sign-in: This setting will pull the Company, Mailbox and Password information from the Windows login credentials.
Automatic with alt credentials: This setting is similar to the one above, but allows for the customization of the fields in the Authentication section. If the Windows credentials fail, iLink Pro Desktop will use the alternate values.
Manual Sign-in: This setting is used to manually enter the login information. Windows login credentials cannot be used with Manual Configuration.
Single sign-on: Select this option to login using Google Apps credentials (a Google account is required) or the Windows login details. Both require additional configuration in IX Messaging. See page 34 for more details.
Login: Click on this button to log into iLink Pro Desktop.
Exit: Click on this button to exit the iLink Pro Desktop program.
If Manual Sign-in or Automatic with alt credentials was chosen, additional information is required before the program can login.
Company: Enter the company number as appropriate. This will usually be 1 unless the phone system is servicing multiple corporations.
Mailbox: Enter your Application User Name.
Password: Enter the password for the mailbox.
|
Hint: Enable Save password so that the program will use the same credentials with each login. |
Connection Settings
If you cannot log into iLink Pro Desktop, some additional settings may need to be changed through More options.
Server: Enter the IX Messaging server address. This address may be a URL (e.g. user.server.com) or an IP address (e.g. 123.123.123.123).
Port: Enter the port number used by the IX Messaging server for client application communications.
|
Note: If you cannot configure these fields properly, contact your system administrator for the correct values. |
Login Failure
If a failure occurs during Automatic Sign-in, you will be returned to the login screen to specify additional parameters. You can change to use Manual Sign-In and enter the credentials yourself, or choose Credentials Discovery.
Credentials Discovery
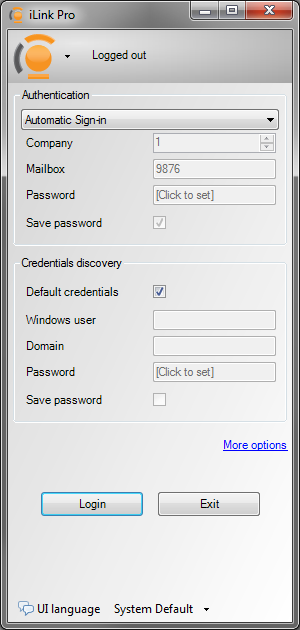
This field allows you to use your Windows login information to directly log into the UC server. Your Windows login user ID can be tied to your UC mailbox so that you can log into the UC server using the same credentials. This feature is only be available if it has been setup by the system administrator.
Default credentials: Enable this checkbox to use the current Windows login information (the credentials used when logging into the current Windows session) to log into IX Messaging.
Windows user: Enter the Windows login user name associated with the IX Messaging mailbox.
Domain: Enter the domain that the user belongs to.
Password: Enter the password for the user.
Enable Save password to have the system remember these credentials with every log in.
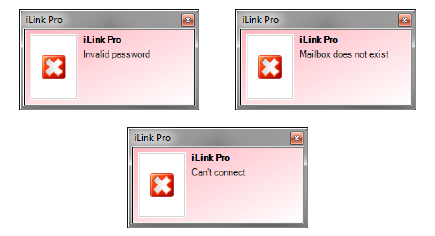
Errors
When logging in to iPD, the system can respond with several error messages. Use this information to make corrections to the listed login credentials.
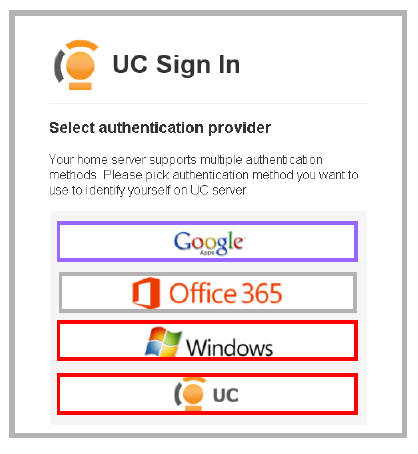
iLink Pro Desktop supports Single Sign-On. The same mechanism is used with Web Access and the Gmail sidebar gadget.
Select one of the 3 authentication methods to login to iLink Pro Desktop.
|
Hint: Enable the Stay signed in checkbox to have the browser remember your credentials. The browser will retain your details until you explicitly log out of the application. Leave this box unchecked to be prompted for your authentication method and login credentials each time the program is launched. |
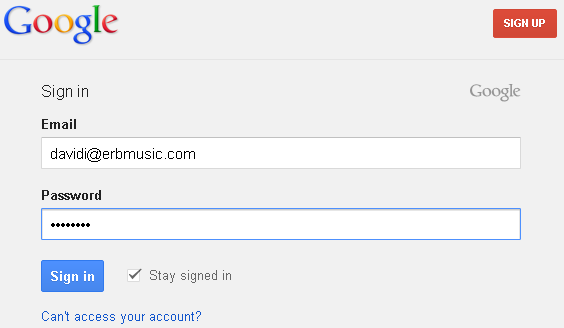
To use Google Authentication, you must have a Google Apps account. Contact your administrator for your account details.
Fill in the following fields:
Email: Enter the email address associated with the Google Apps account.
Password: Type in the password for the Google Apps account.
Click Sign in to launch the application.
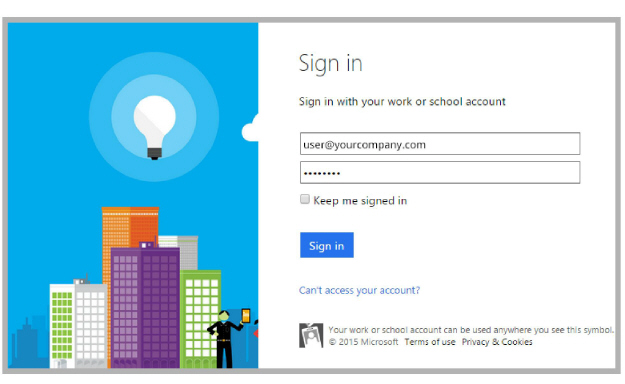
To use Office 365 Authentication, you must have a Microsoft Office 365 account. Contact your administrator for your account details.
Fill in the following fields:
Enter the email address associated with the Office 365 account.
Type in the password for the Office 365 account.
Click Sign in to launch the application.
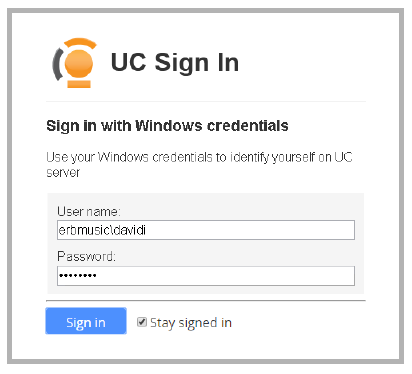
Windows Authentication uses the computer or network login credentials to provide access to the application.
Fill in the following fields:
User name: Enter the domain and username for the corporate network separated by a backslash (i.e. domainname\username).
Password: Type in the password for this account.
Click Sign in to launch the application.
|
Warning: The Google and Windows login routines cannot be used together. Each user account can be setup to use either procedure, but NOT both at the same time. The UC login is always available to all users. |
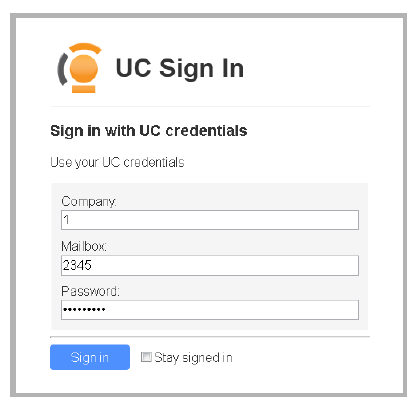
Click the icon to select UC Authentication. Enter a company number, mailbox and password to login to the system.
Fill in the following fields:
Company: Enter the company number that you belong to. This will usually be 1, unless there are multiple companies managed from the same UC Server.
Mailbox: Enter your mailbox number (must be numeric).
Password: Type in the mailbox password.
Click Sign in to launch the application.
IX Messaging Configuration
Both Google and Windows login require additional preparation by the IX Messaging administrator before they can be used.
|
Warning: The Google and Windows login routines cannot be used together. Each user account can be setup to use either procedure, but NOT both at the same time. The UC login is always available to all users. |
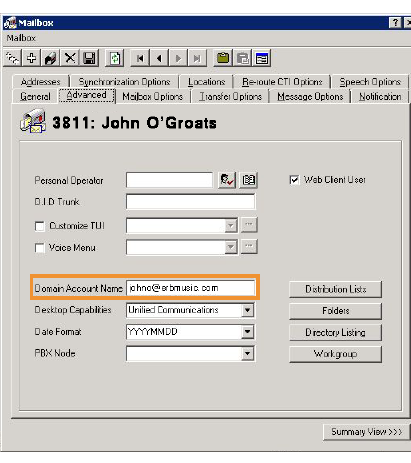
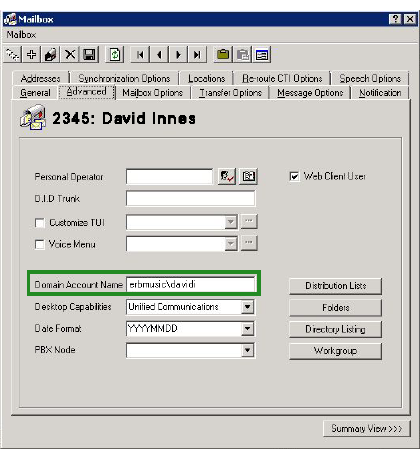
1.On the UC Server, go to IX Messaging Admin > Company > Mailbox Structure.
Double-click the user’s mailbox to open the setup window.
2.Go to the Advanced tab.
3a.To use the Google login: in the Domain Account Name field, enter the email address associated with the user’s Google Apps account (i.e. [email protected]).
Click Save  .
.
3b.To use the Windows login: in the Domain Account Name field, enter the company domain name, followed by a backslash \ and the Windows username (i.e. domain\username).
Click Save  .
.
From the main iLink Pro Desktop window, use Contacts, Groups, or the Search function to find a contact to connect with. Initiate a dialog with these contacts through any means common to both parties. Personal Presence settings can be managed from here as well.
For more information, refer to:
Presence Management on page 41

Locations
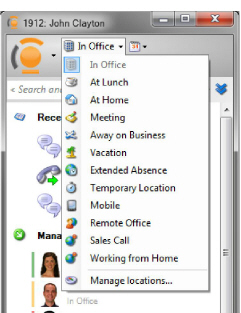
Locations allow you to easily change your presence settings. Presence encompasses your current location, numbers where you can be reached, and whether or not you will be available while at that location. iLink Pro Desktop comes with a set of typical locations pre-defined, but you can add and modify your locations through the Web Access interface by clicking on the Manage Locations option.
|
Note: The location may also be changed through the main menu Set Current Location option. |
Normally, location will be managed through the locations calendar. There will also be times when it is necessary to manually alter location information temporarily: taking lunch a little later than usual, or being called into a meeting on short notice. The locations menu of iLink Pro Desktop gives presence flexibility.
To change current location, select the desired location from the menu. The location defined here will be used until the next scheduled event in the calendar. For example, if you are currently In Office at 12:05 PM and manually change location to At Lunch, your previously schedule meeting at 12:30 PM will change your location to Meeting at that time.
There is also the option to manually define the time period through the schedule feature. Once you use the schedule feature along with your locations, the next manual locations change that you make will follow the previous schedule that you have selected for your convenience.
Schedule
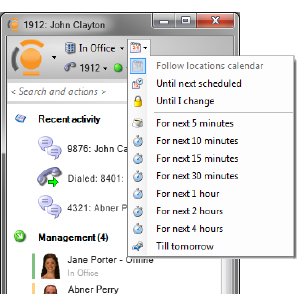
Schedule feature allows you to customize locations by modifying the time frame with the selected location. By default, the schedule will follow your locations calendar which can be configured through Web Access.
After selecting the desired location from the menu, select one of these options to define the time period for that location:
Follow locations calendar: Ignore the manually selected location and use the one defined in the calendar.
Until next scheduled: Keep the manually selected location setting until the next calendar event.
Until I change: The location will not change again until it is again manually changed.
For next 5 minutes: Stay at the current location for 5 minutes. The location will revert to the calendar afterwards.
For next 10 minutes: Stay at the current location for 10 minutes. The location will revert to the calendar afterwards.
For next 15 minutes: Stay at the current location for 15 minutes. The location will revert to the calendar afterwards.
For next 30 minutes: Stay at the current location for 30 minutes. The location will revert to the calendar afterwards.
For next 1 hour: Stay at the current location for 1 hour. The location will revert to the calendar afterwards.
For next 2 hour: Stay at the current location for 2 hours. The location will revert to the calendar afterwards.
For next 4 hour: Stay at the current location for 4 hours. The location will revert to the calendar afterwards.
Till tomorrow: Keep the selected location for the remainder of the current day (until 12:00 AM). The location will revert to the calendar afterwards.
Availability 
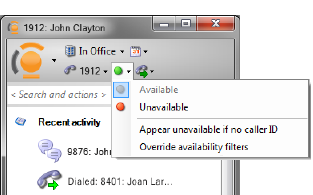
While availability is primarily controlled through locations, there is the option to define it manually. A manually chosen availability setting will override the settings associated with the current location.
Available: This option shows the user as available to everyone.
Unavailable: This option shows the user as unavailable to everyone.
Appear unavailable if no caller ID: Select this option to be shown as unavailable to callers that do not have Caller ID information (e.g. unknown or private numbers).
Override availability filters: Select this option to override any availability filters associated with the current location. When this option is on, the user will either be Available to everyone or Unavailable to everyone with no specific rules.
Extensions
If there are multiple extensions or phone numbers associated with a single location, the contact number can be selected from this menu. This will route callers through the selected number first, regardless of the preference configured in the location itself.
For example, if you have the Find Me/Follow Me configured, the UC server will try to locate you first through the selected number, then try other methods if there is no answer.
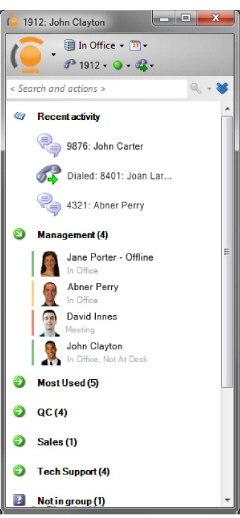
Recent Activity 
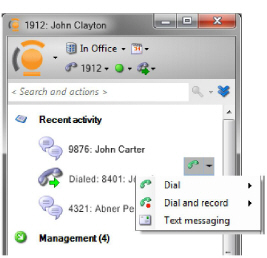
iLink Pro Desktop displays all recent communications activity in the top portion of the main window. All recent conversations conducted through iPD are shown, whether incoming or outgoing. The number of items displayed is set in the General Settings menu.
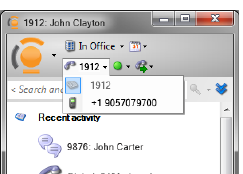
For all phone conversations, clicking to the right of the contact opens a window allowing you to place a call or send a text message to that number or extension.
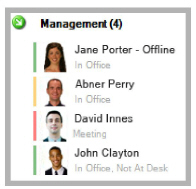
Contact Display 
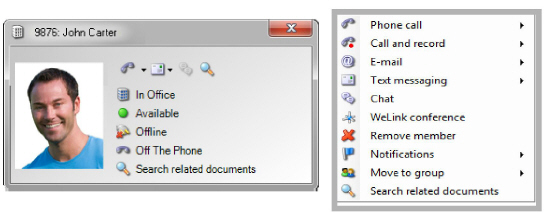
The screen shows the presence and location status for each contact. Their profile picture is also shown.
The color bar to the left of the picture indicates availability (available, unavailable, on the phone).
Online and Offline status appears beside the contact name. If there is no entry, that person is online.
The contact’s location (In Office, Meeting, etc.) is shown beneath the name.

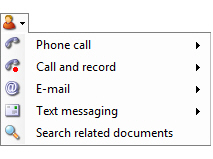
Interaction Menu
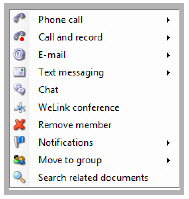
Right-click on a contact to open the Interaction menu. This will allow you to initiate a conversation through any available channel. The options may vary between contacts since each can have different addresses available. For example, if a contact only has an external phone number assigned, only Phone Call and Text Messaging will appear on the list.
Groups 
iLink Pro Desktop supports group organization, which is an easy and convenient tool for managing contacts. Create a group and add people from the company directory to keep track their presence and availability. For individuals that are contacted frequently, add them to a group so they can be reached through phone, email, text messaging and Chat with a click of the mouse.
|
Note: Groups are linked to each mailbox and do not affect anyone else. Add or remove people from the local directory without affecting other people's contacts or groups. |
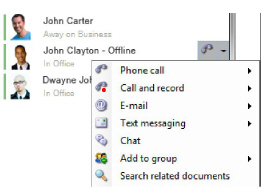
Initiate actions with a contact from a group in two ways.
The status panel pops up when the mouse pointer hovers over the contact (below on the left). This panel allows you to view the details of the contact's status before initiating an action through the buttons. For information regarding the actions available on the panel, click on the responding buttons below.
The second method is accessed by clicking on the arrow to the right of the a contact, or right-click on the contact. This opens a comprehensive menu, providing a range of actions for the chosen contact.
|
Note: Some of these actions are available for members of the organization even when they are not part of a group (e.g. through directory or search). |
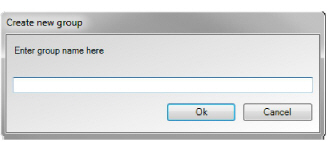
To create a group, click on the  button on the main menu, and enter the group name in the space provided.
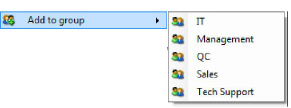
With the group created, search for contacts, either through the search function or in the company directory. Click on the contact icon to bring up the following menu, and select a group for that individual. A contact can belong to more than one group.
There are many ways to start a conversation with the contacts in a group. Some options have additional menu items available depending on that contact's configuration. Move the mouse over a contact and click the arrow to the right to access the extended menu. Some items provide an additional sub menu when moused over.
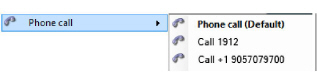
Phone Call 
From the Phone call menu, all of the numbers associated with the contact are listed (internal & external). Click on a number to initiate a telephone call to that person. Your desktop telephone will ring, and when answered, the call will be placed to the contact.
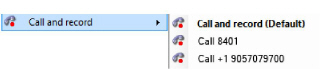
Call and Record 
To record a conversation, begin the call using the Call and record option. When the call is over, a voice message with the recording will be delivered to your inbox.
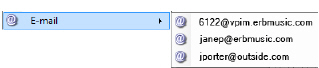
E-Mail 
From the E-Mail menu, compose and send email messages to any address associated with the contact. Once an address is selected, the default email program on the computer will open a new message window, pre-addressed to the contact.
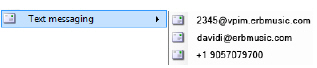
Text Messaging 
From the Text Messaging menu, compose and send text messages to any of the addresses or phone numbers associated with the contact. Once the target is selected, a text messaging window will open already aimed at the contact. Type a message and hit Enter to send.
Chat 
From the Chat menu, send instant text-only messages to the contact if they are online. Selecting this option will open a messaging window. Type a message and hit Enter to send. Any responses will appear in the same window.
|
Note: Text Messaging and Chat share a common interface. Select the appropriate contact/method at the top of the window. Enter outgoing messages in the bottom frame. Both sides of the conversation appear in the upper frame. |
WeLink Conference ![]()
Invite the contact to participate in a telephone conference call using the WeLink conference server. This option is only available if WeLink has been installed at the company site. Your telephone will ring, and you will be connected to the contact. Additional contacts can be added to the conference once the first call has been connected.
Remove Member 
To remove a contact from the group, select Remove Member. The contact will be removed from the group, but not from the system.
Notifications 
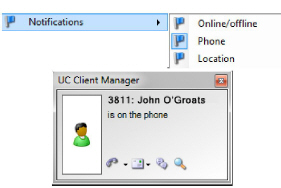
Rather than relying on iPD’s main window to track contact status, there are Notification flags. Any combination of flags can be selected for each contact in a group.
Online/Offline: A popup appears whenever the contact comes online / goes offline.
Phone: User will be notified when the contact goes on the phone / gets off the phone.
Location: This option sends a notification when the contact's location changes.
When the contact changes status in any of the flagged areas, the notification window will popup on the screen.
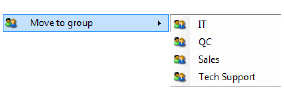
Move to Group 
From the Move to Group menu, you will be able to move the selected contact to another group. This option is only available if you have more than one groups. To move a contact, simply select the new group you wish to associate the contact with from the available list.
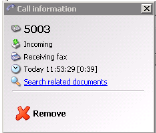
Search Related Documents 
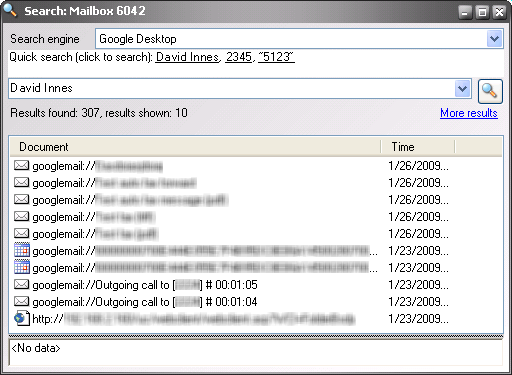
Search Related Documents allows you to check your documents (primarily e-mails) for entries that are relevant to the contact in question. It is only available if you have either Google Desktop or Windows Search installed on your computer. This option will be added to all interaction menus available throughout iLink Pro Desktop.
|
Note: In order for this integration to function properly, install Google Desktop or Windows Search before installing iLink Pro Desktop. If Google Desktop or Windows Search is installed afterwards, reinstall the iLink Pro. |
When chosen, iLink will use either program to search through your history to find entries that are related to that contact.
This may also be automated through Call Manager by enabling Auto Search. When active, iLink will automatically cross reference the incoming Caller ID with a contact, and then search for all related messages.
Search 
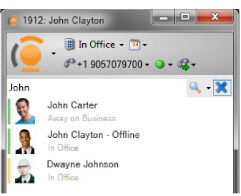
iLink Pro Desktop’s built in search engine allows the company directory, and a user’s personal and public contacts to be scanned for a specific individual. There are a few rules that you should keep in mind when searching for a contact:
|
Note: When searching for a name, type First_Name"space"Last_Name (e.g. John Carter) or Last_Name,First_Name (e.g. Carter,John). |
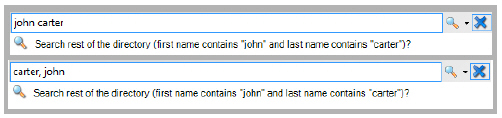
iLink Pro Desktop keeps a record of previous searches. While typing a search string, iPD will display recent matches, but the list may not display every hit in the database. For best results, press the Enter key after typing the search string.
You can initiate a conversation from the search results. Click on the icon located to the right of the search results to open up the interaction menu.
|
Note: The options will vary depending upon the information available for the contact. If the contact only has an email address specified in the system, only the email/text message selection will appear. |
|
Note: For details on each of the individual interactions, refer to Call Manager on page 53. |
Specifying Search Options
In larger databases, searching through all of the entries may take some time. Reduce the search time by specifying exactly where iLink Pro Desktop will look. However, since most contact information is stored on the server by default (including your private contacts on UC mailbox), it is best to leave this at Server-side search.
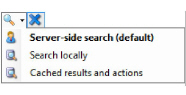
Server-side search: iLink Pro Desktop will search for the contact in the server’s contact and directory database.
Search locally: iLink Pro Desktop will search for the contact on desktop computer.
Cached results and actions: iLink Pro Desktop will search through stored results from previous searches and actions.
Dial-Out Extension 
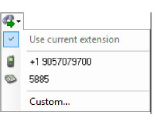
iLink Pro Desktop allows you to change the source of outgoing calls. The numbers available are derived from the numbers associated with the current mailbox.
Alternately, select Custom and manually enter the source Type and Number/Extension in the spaces provided.
When initiating a call using an external number as the source, IX Messaging will call the source number first. Once that call is answered, the server will dial the destination, and then link the two calls together.
This allows users to control calls with iLink Pro Desktop wherever they are located. In all cases, whichever external number is selected, the recipient will always see the number associated with the IX Messaging server, which will usually be the number of the office. This permits a high level of privacy regardless of a caller’s location.
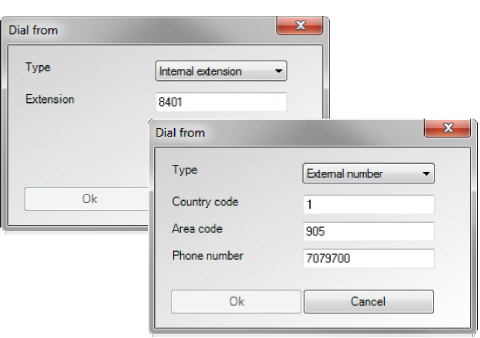
When making long distance calls, this may be a cost efficient solution as well. Since most companies have much more competitive rates for long distance pats than a typical cellphone or household, having the UC server dial both parties will take advantage of the company's dialing plans, preventing the external number from accumulating long distance minutes.
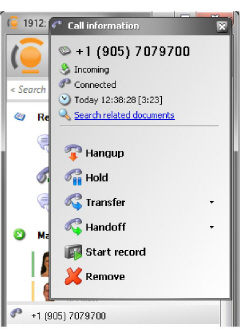
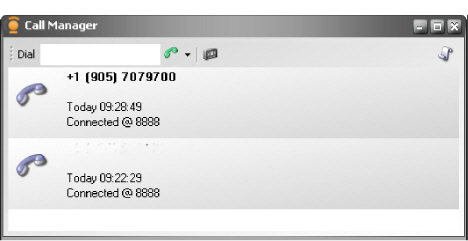
iLink Pro Desktop is able to control phone calls through the Call Manager interface on the desktop. When receiving a call through a device that is integrated with the UC server, there will be a section added to the bottom of iLink Pro Desktop’s Main Window. Whenever you hover the mouse over a call entry, additional call control actions will appear.
|
Note: The Call Manager may be accessed from a separate window. Refer to Settings on page 67 to configure the feature. |
|
Note: The Call Manager may be enabled for outbound calls. Refer to Settings to configure the feature. |
|
Note: You can control more than one phone call simultaneously via the Call Manager. |
|
Note: Actions available during call control will vary depending on your site’s settings. |
Through Call Manager, the following options are available before answering a call.
Answer: Pickup the call. Specify which device will be used to answer the call if more than one device is defined for the current location.
Answer and record: Select this option to answer the call and begin recording the conversation right away.
Take Message: Send the caller directly to voicemail.
Hold: Places the call on hold.
Transfer: Redirect the call to another extension.
Remove: Select this option to remove the selected call from the Call Manager. This does not affect the phone call itself.
Through Call Manager, the following options are available after answering or during a call.
Hang Up: End the current call.
Hold: Places the call on hold.
Transfer: Redirect the call to another extension.
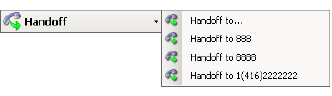
Call Handoff: Select this option to pass the call to another device.
|
Note: Call Handoff may not be available depending on mailbox configuration. Please consult your system administrator for more information. |
Start Record: Begin recording the current call.
Remove: Select this option to remove the selected call from the Call Manager. This does not affect the phone call itself.
|
Note: Upon receiving an incoming fax (iPD must answer the call to identify it as a fax), the pop-up will display different information. The call is now identified as a fax message, the receive status of the transmission is displayed, and the option to answer the call is removed. |
Buttons / Icons
|
Button |
Description |
|
|
Incoming Call: This icon represents an incoming call. |
|
|
Answered Call: An answered call that is currently ongoing. |
|
|
Finished Call: A completed call or a Hang up. |
|
|
Answer: Click this button to answer an incoming call. The device that answers the call can also be selected. |
|
|
Answer and Record: Click this button to answer the call and begin recording the conversation right away. The device that answers the call can also be selected. |
|
|
Take Message: Send the caller directly to voicemail. |
|
|
Hold: Places the call on hold. |
|
|
Remove: Click on this button to remove the selected call from the Call Manager. This does not affect the phone call itself. |
|
|
Start Record: Click on this button to begin recording a call already in progress. |
|
|
Pause Record: Click on this button to temporarily stop recording. Click again to resume. |
|
|
Stop Record: Click on this button to stop the recording. The recorded conversation will be arrive as a new voicemail. |
|
|
Transfer: Click on this button to redirect the call to another extension or device. |
|
|
Call Handoff: Click on this button to pass the call to another device seamlessly. |
|
|
Call Back: Click on this button to return the call. |
When receiving a call, or after answering a call, that call can be put on hold. When a call is on hold, there are the following options.
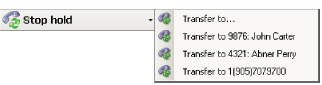
Stop Hold: Select this option to end the hold and re-initiate the conversation or let the call ring again.
Transfer to...: Select this option to transfer the call on hold to another location. Refer to Transfer on page 56 for more details.
Transfer to #: Select this option to transfer the call to one of the other numbers associated with your mailbox.
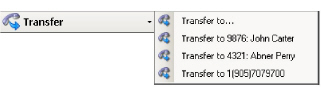
With the Call Manager, a call can be transferred to either a number predefined by the mailbox account, or a manually defined location.
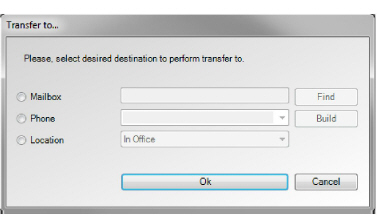
Transfer to...
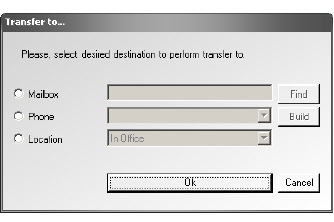
Transfer to... allows a call to be transferred to a user defined location. This location can be a Mailbox, Phone Number or a presence Location.
Mailbox
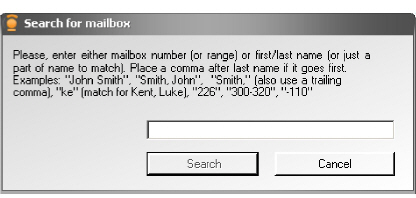
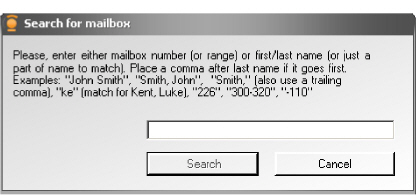
With the Mailbox option, browse for the destination mailbox by clicking on the Find button in the Transfer to... window. Search for the target by the name associated with the mailbox or the mailbox number.
Phone
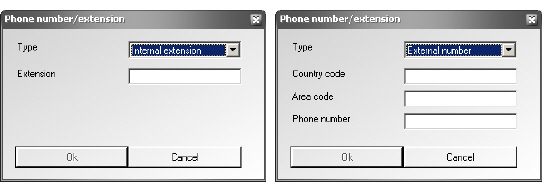
If choosing the Phone option, define the destination phone number by clicking on the Build button. After selecting the type of phone number (internal extension or an external number) fill in the boxes with the necessary information, then click OK.
Location
Specifying the Location option requires the user to select a pre-define location from the drop down menu. The call will be transferred to the default number associated with the chosen location.
When recording a call, the Call Manager menu changes. The user can pause and resume recording during the call. When recording is stopped, or when the call ends, the recorded conversation will be sent to the user’s mailbox as a voice message.
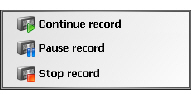
Continue Record: Resumes recording. This option is only available when recording is paused.
Pause Record: Pause recording. Click it again to Continue recording at any time.
Stop Record: Select this option to stop the recording. When this option is chosen, the recording will be sent to the user’s mailbox.
Call handoff permits the seamless transfer of a call to another device (e.g. from a desktop extension to cellphone). Unlike typical transfers, call handoff will not prompt the caller for any action. When a handoff is started, the target device will ring. When answered, the previous device will be disconnected and the call will be immediately routed to the new device. A call may be handed-off multiple times as long as Call Manager is available.
|
Note: Call Handoff may not be available depending on mailbox configuration. Consult the system administrator for more information. |
Transfer to...
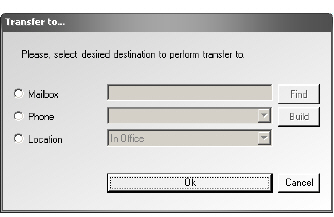
The Transfer to... option allows a call to be passed to a manually defined location. This location can be a Mailbox, Phone Number or from a presence Location.
Mailbox
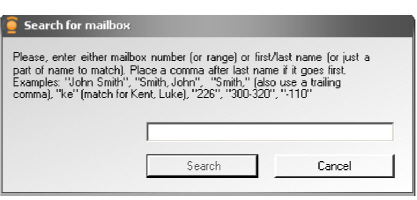
With the Mailbox option, browse for the destination mailbox by clicking on the Find button in the Transfer to... window. Search for the target by the name associated with the mailbox or the mailbox number.
Phone
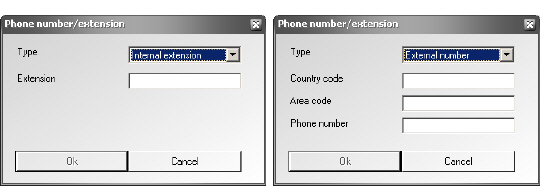
If choosing the Phone option, define the destination phone number by clicking on the Build button. After selecting the type of phone number (internal extension or an external number) fill in the boxes with the necessary information, then click OK.
Location
Specifying the Location option requires the user to select a pre-define location from the drop down menu. The call will be passed to the default number associated with the chosen location.
Separate Window
For users with a high volume of calls, the main window of iLink Pro Desktop may be inconvenient. In these situations, it is possible to open a separate Call Manager window so that all calls appear in a larger pane with oversized buttons for ease of operation. The behavior of the call controls is the same as in the integrated Call Manager window.
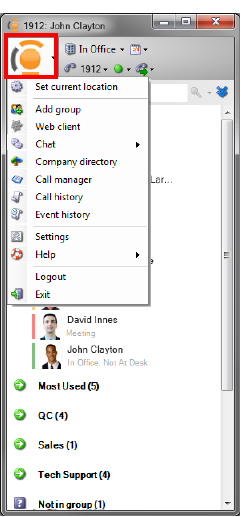
Access the main menu by clicking on the Avaya button.
|
Note: This menu is also accessible through a right-click of the Taskbar icon. |
All personal settings may be managed from this menu. Presence and core iLink Pro Desktop configurations are available from here.
Set current location: Change user location to one of the pre-defined options.
Add Group: Create a new personal group.
Web client: Launch Web Access in a browser and log-in automatically with the current credentials.
Chat: Open a chat window to corporate contacts or group members who are online.
Company directory: View the directory of the organization.
Call Manager: The Call Manger window provides viewing and call control options for current calls.
Call history: Displays the past call details for the mailbox.
Event history: Shows the events that have occurred at this mailbox.
Settings: Provides access to the settings menu where most of the configurations are done.
Help: Gives access to miscellaneous features and the help file.
Logout: Sign off of iLink Pro Desktop.
Exit: Select this option to log out and close iLink Pro Desktop.
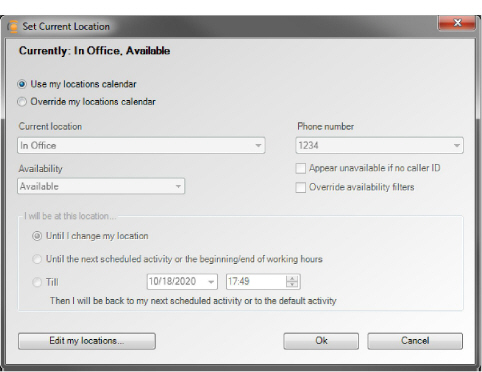
View and modify your current location details. Keep in mind that location can also be changed from the main iLink Pro Desktop window’s shortcut icons.
To use the location currently define on your calendar, enable the Use my locations calendar radio button. To manually define a custom location, enable Override my locations calendar, then configure the fields as required.
Current Location: Choose the current location from the dropdown menu.
Phone Number: From the drop down menu, select the phone number to use for this location. The list of available numbers depends on the location currently chosen.
Availability: From the dropdown menu, select availability for this location.
Appear unavailable if no caller ID: Enable this checkbox to appear unavailable if the system cannot detect a caller ID on an incoming call.
Override Availability Filters: Enable this checkbox to have the availability specified here override any filters pre-configured for this location.
I will be at this location
Define the duration that the current location will be active.
Until I change my location: The current location will be permanent until manually changed.
Until the next scheduled activity or the beginning/end of working hours: The currently location will remain active until an event in the calendar changes it, or until the end of the current working day. The location will revert to the calendar schedule after either of these conditions are met.
Till: Select this radio button to specify the exact time and date for the current location to expire. The location will revert to the calendar schedule at the selected time.
Edit my locations...: Click on this button to open Web Access to directly manage locations.
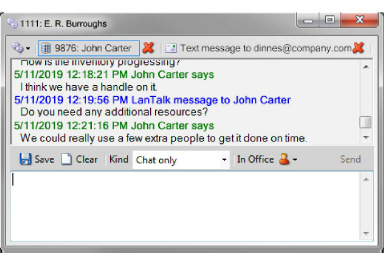
Chat creates an instant messaging session with anyone that is currently online in the same UC system (e.g. those who are in the same company). Chat is an easy to use alternative to phone conversation when you wish to leave a short message or get in contact with someone while they are already on the phone.
Enter the name or the mailbox extension of the person you wish to contact.
To communicate through Chat, type the desired message in the text field at the bottom, then press Enter, or click the Send button.

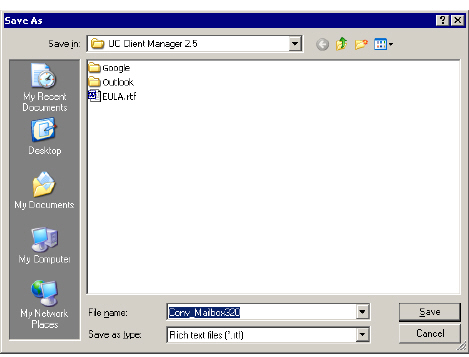
Save: Click to save the Chat conversation as a text file. The Save As window will open to specify the location and the name of the file that is to be saved.
Clear: This will clear the conversation history for the current Chat window.
Kind: If the recipient of the message has an SMS address defined on their mailbox, there will be the option in this dropdown menu to select Chat Only or Chat/SMS. The Chat/SMS option will send a Chat message and copy the same message to the recipient’s SMS address.
During a conversation, you can immediately place a telephone call, email or text message to the party.
Chat Broadcast 
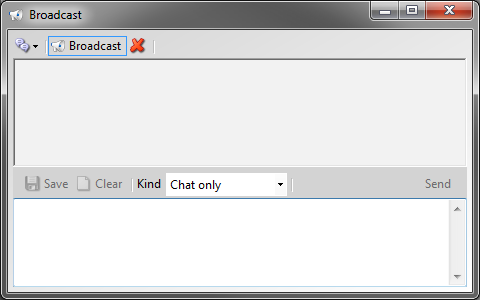
Chat Broadcast will send a Chat message to everyone within your company that is currently logged into iLink Pro Desktop.
If a user replies to a Chat Broadcast message, a new Chat window will open for that individual user. This means that if there is a large user base, and everyone who receives the message replies to it, there will be a significant number of Chat windows opening simultaneously.
|
Caution: Remember that Chat Broadcast messages are instantly delivered to everyone currently logged in to the system. Careless use of this feature will flood all users with a stream of message pop-up windows. |
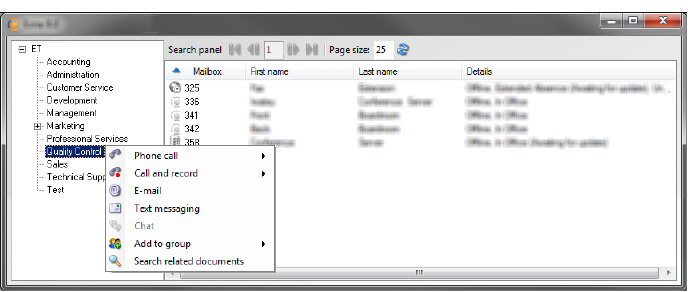
The Company directory shows the other mailbox accounts associated with the current Company.
The company directory will usually be divided into departments to make finding a particular individual easier. Right-click a mailbox account to open the menu shown here.
This menu provides the standard options to initiate contact with the person or add them to your personal group.
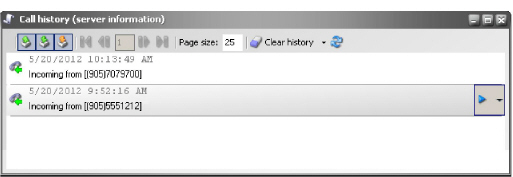
Call History
Call history keeps track of all incoming, outgoing and missed calls. Click the telephone icon beside an entry to see detailed information for that call.
Call Information
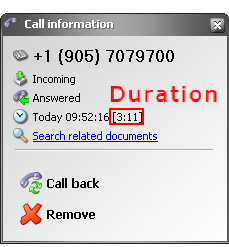
Clicking on the phone icon for a call history entry shows the details of that call. If the entry is not a missed call, there will also be an entry for the duration of the call.
|
Note: If the Missed Call History is not cleared, the user will receive a notification for the event when logging into iLink Pro Desktop. Only the Missed Call History will be cleared when clicking the Clear History button while viewing missed calls. |
Assuming that caller ID is available, the user will have the option to call back any contact in the call history.
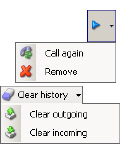
Click the arrow icon to open a menu with the option to call the contact, or remove them from the history list. To clear the entire call history, click Clear History at the top of the window. This provides the option to clearing all incoming or outgoing message from the history.
Event History 
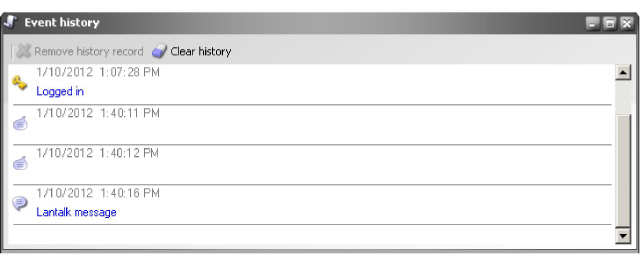
The Event History keeps track of most actions performed within the iLink Pro Desktop. Any log-in sessions, outgoing and incoming conversations, and message notifications are all recorded in the event history. To view the details of an event, Event History will prove to be a valuable tool.
You may also organize Event History periodically by using the buttons available at the top.
Remove history record: Delete the selected entry from the history.
Clear History: Click to delete all entries in the history.
Use Settings to configure the core details of iLink Pro Desktop. Refer to the appropriate section to learn more about what each setting does.
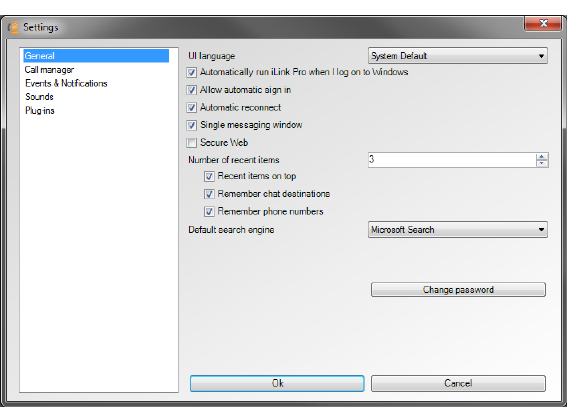
UI language: From the dropdown menu, select the language the program interface should use.
Automatically run iLink Pro when I log on to Windows: When enabled, this will automatically launch iLink Pro Desktop when Windows starts.
Allow Automatic sign in: Enable this checkbox to automatically log into the iLink Pro Desktop when the program is launched. Select Save password at the login screen in order for this feature to function.
Auto-reconnect: Enable to automatically reconnect to the iLink Pro Desktop when being logged out through means other than deliberately action.
Single messaging window: Combines all Chat windows into a single, tabbed window, instead of one open window per contact.
Secure Web: Web Access will use HTTPS protocols instead of HTTP for secure communications.
Number of recent items: Specify the number of recent conversations to display in the main window.
•Recent items on top - Show any recent activity at the top of the window. When disabled, recent activity will appear beneath the contacts and groups displayed.
•Remember Chat destinations - Include Chat conversations in the recent activity display.
•Remember phone numbers - Include telephone conversations in recent activity display.
Default search engine: Select the default engine used when searching for related documents.
Change Password: Click on this button to change the mailbox password.
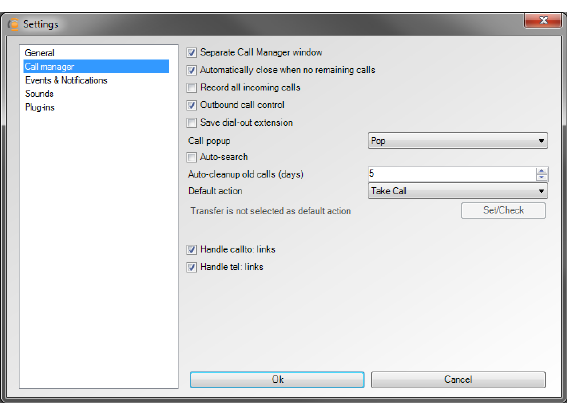
Separate Call Manager window: Enable this checkbox to allow call manager to be accessible through a separate window.
Automatically close when no remaining calls: Automatically close the separate call manager window when all calls are finished.
Record all incoming calls: Make a recording of all incoming calls.
Outbound call control: Make the Call Manager available during outbound calls.
Save dial-out extension: Save the last used custom dial-out extension. The setting is kept until it is changed.
Call popup: From the drop down menu, select the method of notification when receiving incoming calls.
Off: Do not ask an incoming caller for their ID (number) if it is unrecognized by the system. Do not display it in a screen popup.
Ask: Prompt an unidentified caller to enter their phone number on the telephone keypad.
Pop: Display an incoming caller's phone number.
Ask & Pop: Ask an unrecognized caller to enter their phone number and display that number in a screen popup.
Auto-search: Enable this checkbox to automatically search for all documents on the computer related to the caller based upon their name and phone number. This feature requires Google Desktop or Microsoft Search / Microsoft Desktop Search.
Auto-cleanup old calls (days): Enter the number of days that the call history will be kept.
Default action: From the dropdown menu, select the action that iLink Pro Desktop will automatically take when a call is received.
No Action: The iLink Pro Desktop will not perform any action when a call comes in.
Take Call: iPD will answer the call, regardless of the presence of the user.
Take message: Automatically sends the caller to voicemail.
Transfer: Forward the call to the destination defined in the Transfer To... window, accessed through the Set/Check button.
Transfer is not selected as default action: When Transfer is selected as the Default action, the Set/Check button will become active with additional choices available to specify the destination of the transfer.
Mailbox: Select this radio button to forward the caller to another mailbox in the system. Click Find to search for the contact.
Phone: Select this radio button to forward the caller to a specific phone number. Click Build to specify internal or external numbers and the necessary details (Country code, Area code, Phone number).
Location: This will forward the caller according to the location settings defined for the current location.
Handle callto: links: Enable this checkbox to allow calls to callto: links on the web.
Handle tel: links: Enable this checkbox to allow calls to tel: links on the web.
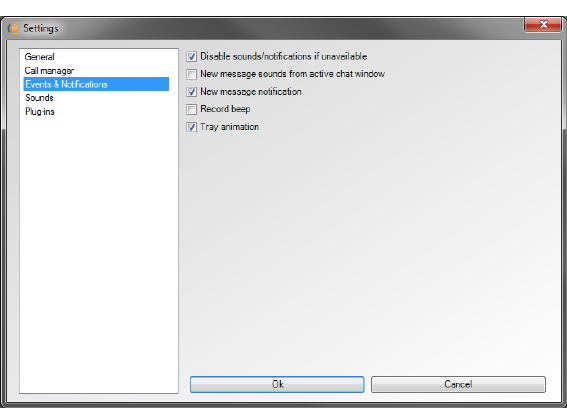
Disable sounds/notifications if unavailable: Disables all sounds and notifications messages if the availability is Not Available.
New message sounds from active chat window: Receive sound notification even when in an active Chat chat window.
New message notification: Receive a popup notification when a message (text, voice, fax) arrives in the mailbox.
Record beep: Plays the record beep when you barge-in. This feature notifies you when the barge-in is successful by playing the record beep file.
Tray animation: Enable this checkbox to turn on the animated icon on the Windows Taskbar whenever there is an unchecked event.
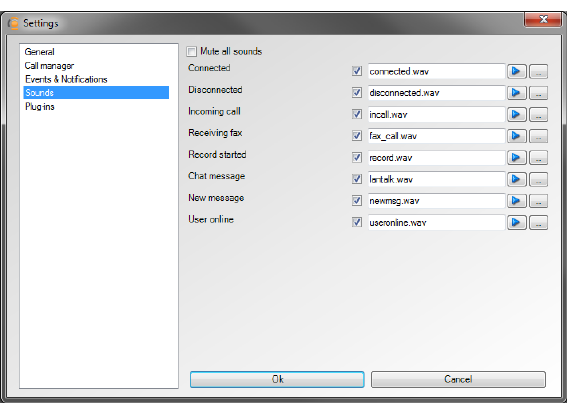
Turn sounds off: Enable this checkbox to disable all sounds within iLink Pro Desktop.
Connected: Define the sound that will be played when you log into iPD.
Disconnected: Define the sound that will be played when you disconnect from iLink Pro Desktop.
Incoming Call: Define the sound that will be played when you receive an incoming call.
Receiving fax: Define the sound that will be played when you receive an incoming fax.
Record Started: Define the sound that will be played when the call recording starts.
Chat Message: Define the sound that will be played when you receive a Chat message.
New Message: Define the sound that will be played when you receive a new message (text, voice, fax) in your mailbox.
User Online: Define the sound that will be played when a tracked user comes online.
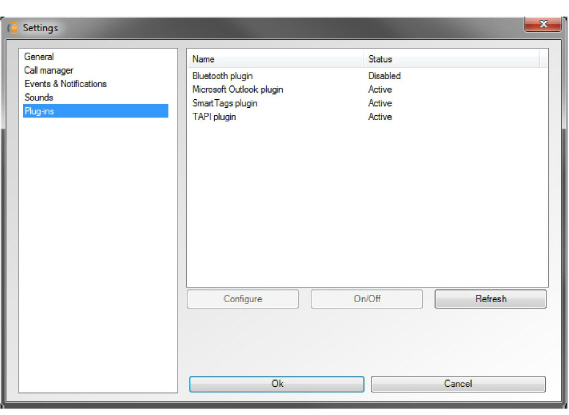
You may enable various iLink Pro Desktop plug-ins on this screen. Select a plug-in and click the buttons below.
Configure: Modify the settings for the selected plug-in.
On/Off: Use this button to activate/deactivate the selected plug-in. The status of the plug-in will change to reflect the status.
Refresh: Update the displayed status of all plug-ins.
For details regarding each plug-in, refer to
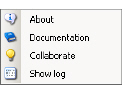
About: Select this option to view the version information regarding iLink Pro Desktop.
Documentation: Select this option to view the iLink Pro Desktop help file.
Collaborate: Select this option to start the collaborate service. This has to be configured by your system administrator in order to function properly. When configured, you will be automatically taken to the collaboration web site that your company uses.
Show Log: Select this option to display all activity logs for iLink Pro Desktop. This information is used for troubleshooting by the technicians.