Avaya iLink Pro allows users to take advantage of UC functionality within a web browser. It is installed on the local computer as an extension to Google’s Chrome browser.
It is designed to integrate with existing Google solutions, allowing you to easily access UC features on a already familiar platform.
Avaya iLink Pro provides access to your contact list and the company directory, so making telephone calls and Internet messaging is only a few clicks away. All voice and email messages are reachable through Avaya iLink Pro. Your location and availability can also be controlled, so contacts and colleagues always know how to reach you.
Avaya iLink Pro provides a complete mobile UC solution that meets your most demanding communication needs.
|
Note: By default, Chrome will block pop-ups while browsing. Avaya iLink Pro, when used as a plug-in with Salesforce, requires pop-ups to access advanced searches to identify incoming callers and access records. To ensure complete functionality, enable pop-ups when using the Salesforce plug-in. |
|
Warning: Running multiple editions of Avaya iLink (Avaya iLink Pro or iLink Pro Desktop) at the same time will cause conflicts between the programs. Disable all other editions except Avaya iLink Pro, if installed, to avoid problems. |
Avaya iLink Pro can be installed as an extension to Google’s Chrome web browser.
Installing to Google Chrome
The Avaya iLink Pro extension is installed from the Chrome Web Store.
|
Hint: The site administrator can setup user or company profiles to automatically install (push) and configure Avaya iLink Pro. Refer to Google’s documentation at the address below for further details: |
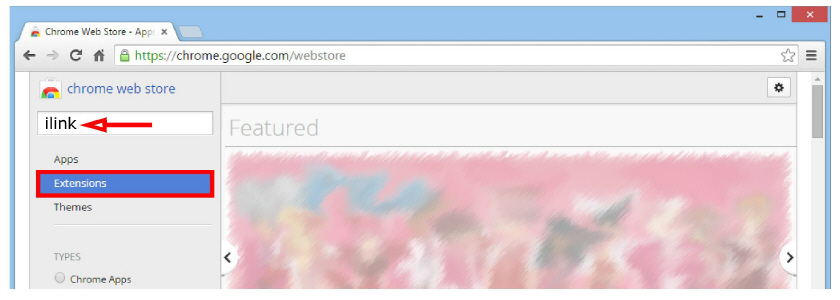
1.Open the Chrome web browser and go to the Chrome Web Store at https://chrome.google.com/webstore.
2.In Search the store, type iLink and hit enter. Click on Extensions.
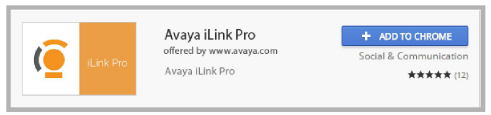
3.Click  beside Avaya iLink Pro to launch the installer.
4.When prompted, click Add Extension to confirm the installation.
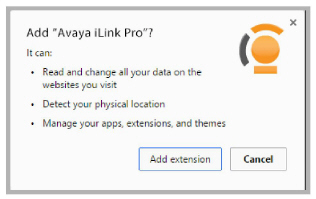
The installation is complete. You will be required to select the credentials to use to login to the extension.
Launching the Extension / Add-On
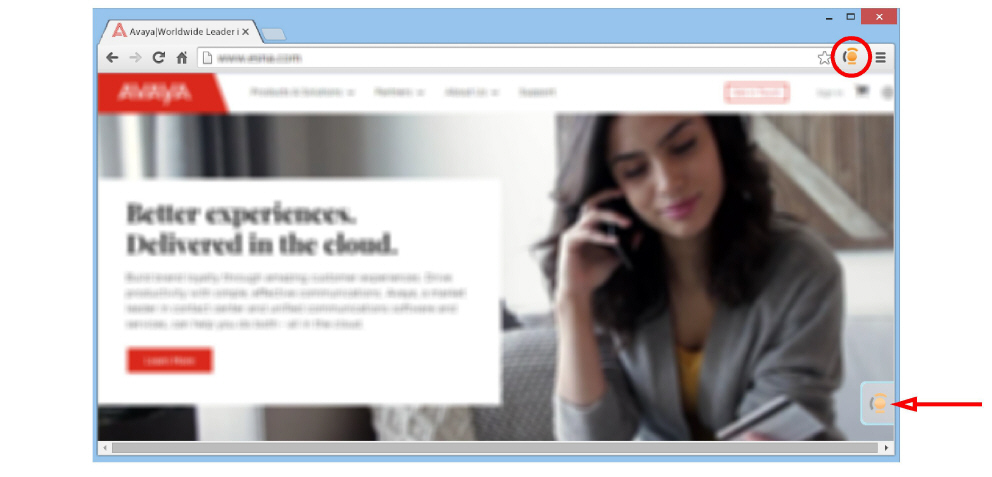
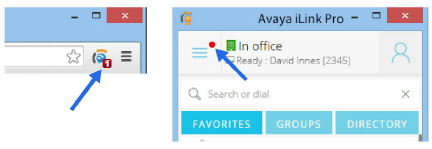
Start the application by clicking on the Avaya iLink Pro icon  .
.
If enabled, clicking on the slider will also start the program.
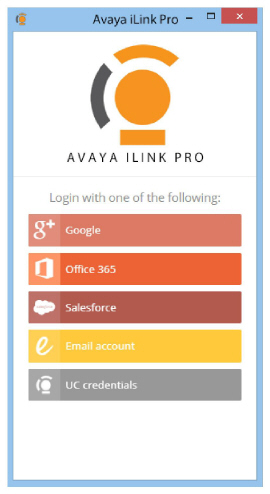
Logging In
If the extension does not start automatically, click the icon  or the slider.
1.At the login window, choose which credentials to login with from the dropdown menu.
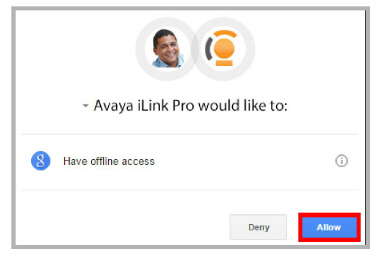
2a.![]() When selecting Google credentials, you will be asked which Google account to use to access the program with. Choose an account, or enter the details for another.
When selecting Google credentials, you will be asked which Google account to use to access the program with. Choose an account, or enter the details for another.

Click Allow to give the program the necessary permissions to your data.
2b.![]() Office 365 credentials, you will be taken to the login window where you must enter your credentials. When finished, click Sign in.
Office 365 credentials, you will be taken to the login window where you must enter your credentials. When finished, click Sign in.

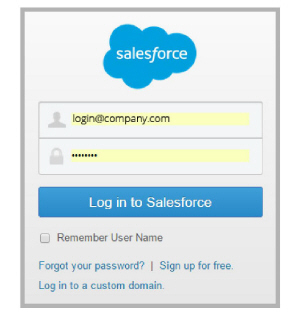
2c.![]() When selecting Salesforce credentials, a browser page will open to the Salesforce login screen.
When selecting Salesforce credentials, a browser page will open to the Salesforce login screen.
Enter your Salesforce username and password in the spaces provided.
Click Log in to Salesforce.
If prompted to grant Avaya iLink Pro the necessary permissions, click Allow.

|
Note: An active Salesforce account is required to use this option. |
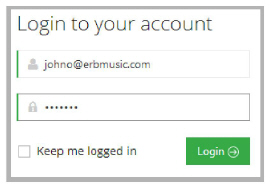
2d.![]() Use Email account provides a web-based authentication solution for sites where security profiles and other considerations make other login options impossible. A user account must be created before a login can proceed.
Use Email account provides a web-based authentication solution for sites where security profiles and other considerations make other login options impossible. A user account must be created before a login can proceed.
When prompted, enter your username and password. Click Login.
If prompted to grant Avaya iLink Pro permissions, click Allow.

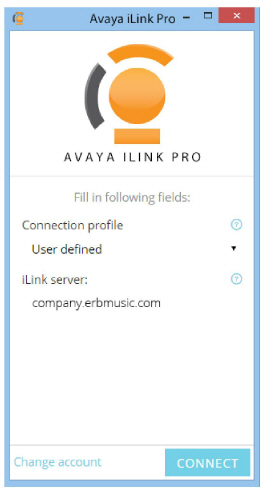
2e.![]() Choose UC credentials, then enter the voice server name. Login using your alphanumeric username and password from Avaya IX Messaging.
Choose UC credentials, then enter the voice server name. Login using your alphanumeric username and password from Avaya IX Messaging.
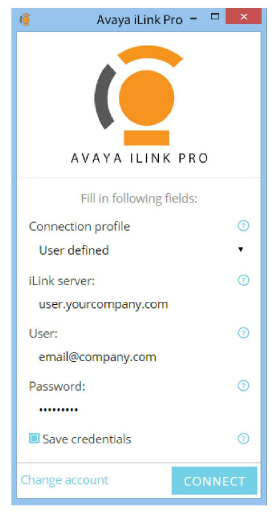
3.Click Connect when ready. To login with different credentials, click Change account.
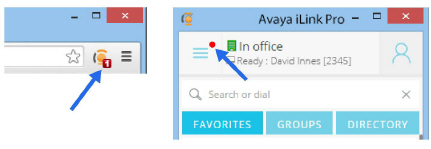
4.The application has been installed. The icon will be gray  when the program is not running, and it will be in color
  after log in.
5.Click the Avaya iLink Pro icon  or the slider to launch the program.
|
Note: The slider is an option that is enabled from the Settings > Options page. Enable the Embed to all opened pages item. The panel displayed when clicking on the slider is independent of the panel that is opened from the icon; each can be used to display different information. Once this setting has been changed, close and relaunch the browser. |
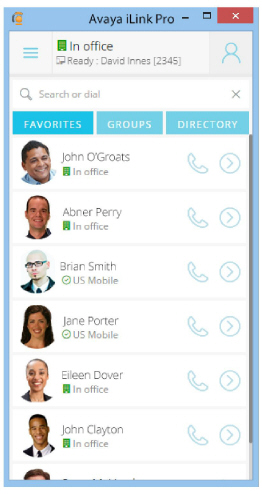
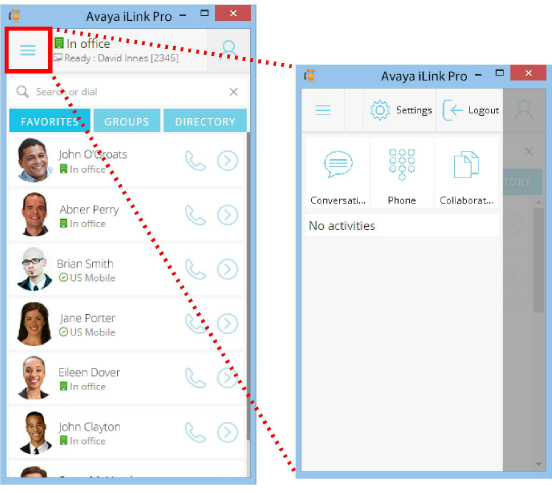
This is the starting point for all interactions within Avaya iLink Pro. Clicking on an area of the window will open up additional possibilities.
Click on a part of the image, or select an item from the following list.
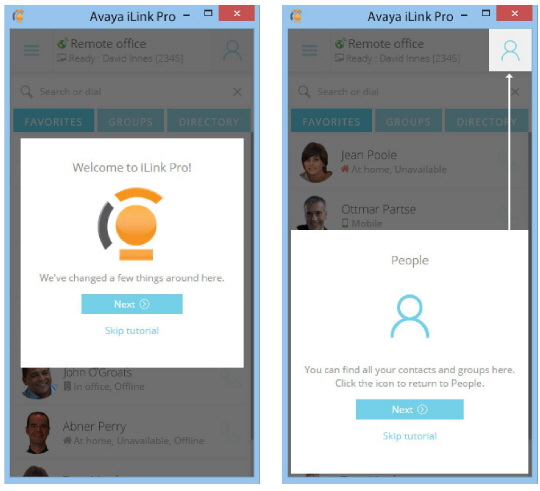
From any location within the program, clicking the ![]() icon (upper right corner) will return you to the main page.
icon (upper right corner) will return you to the main page.
Many pages include a Previous icon ![]() that will return you to the previously viewed page.
that will return you to the previously viewed page.

|
Note: The Main Screen displays all of the contacts that are currently assigned to the group Favorites. Create other groups, or use the Search bar to find the person you need. |
Incoming Notification
Whenever a message or telephone call has been received, a red light will flash in the menu bar to alert the user.
The search bar appears throughout the application just below the presence bar. Use this field to look through the contact database to find the person you want to connect with. The results of a search will displace the current screen.
To search your personal contacts list, the company directory, and your Google contacts, type the mailbox number, extension, email address, or the contact’s first or last name into the Search or dial field.
A search for john will find:
John Carter
Brian Johnson
it.guys@imjohn.com.
All contacts that match the entered parameters are displayed. Click on a contact to view their details.
Click ![]() to clear the search parameters and return to the previous page.
to clear the search parameters and return to the previous page.

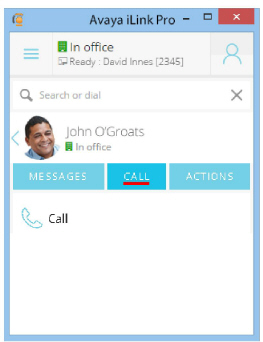
Call the Contact ![]()
Click the Call icon ![]() to place a telephone call to the contact. The number dialed is the number the contact has associated with their current location. For example, if their presence is set to “Out of Office,” their cell phone will be dialed, but if they are “In Office,” then their extension will be called instead.
to place a telephone call to the contact. The number dialed is the number the contact has associated with their current location. For example, if their presence is set to “Out of Office,” their cell phone will be dialed, but if they are “In Office,” then their extension will be called instead.
The device configured for your own current location will ring to place the call.
Click on the ![]() button beside a contact to view the Actions menu for the contact. Select the appropriate feature.
button beside a contact to view the Actions menu for the contact. Select the appropriate feature.
Refer to the section Action Items for details on all of these options.
The bar across the top throughout the application displays your current location, availability and default telephone device. Clicking on this area also allows you to modify your status. Share with everyone in your contacts list your location and whether or not you are free.
There are several programmed options for location, and you can create your own using the Web Client. Click Manage Locations to create and modify the settings on your locations.
Click in the presence bar at the top of any page.
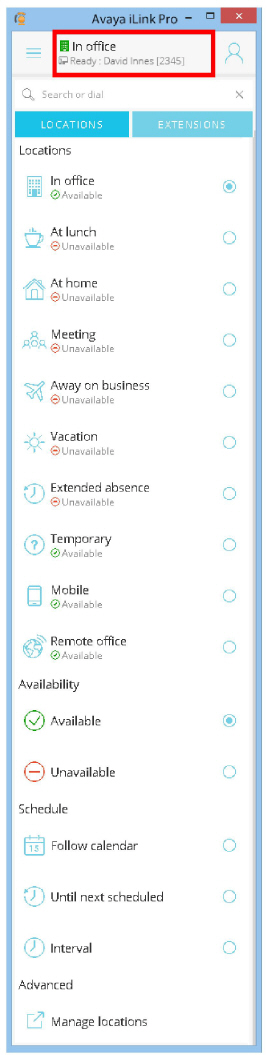
Locations
This tab shows your current location, availability status, and the number where you can be reached.
The locations, default availability, and the numbers where you can be reached at each location are automatically adjusted based upon the settings for each item established through Web Access. Your presence is also synchronized with your calendar and will be updated automatically.

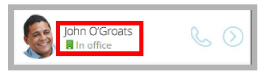
A similar display appears beside each contact.
Click on the pane to change these settings.
Locations
The most common locations have already been added to Avaya iLink Pro. Customized locations can be added, and the pre-programmed locations can be modified using the Web Access (click here for more details).
Location provides a quick description of where you are. The default availability configured for each location is also displayed here.
Click the location you want to use. This will override your calendar setting. The built-in locations are:
|
|
In office |
|
At lunch |
|
At home |
|
|
Meeting |
|
Away on Business |
|
Vacation |
|
|
Extended Absence |
|
Temporary |
|
Mobile |
|
|
|
|
Remote office |
|
|
|
Hint: Your presence is synchronized with your calendar. If you have a meeting scheduled for a specific time, Avaya iLink Pro will update your presence automatically. When the meeting is set to start, your location will be changed to Meeting and your availability will be set to Unavailable. When the meeting is scheduled to end, your presence will be returned to its default. |
Availability
![]() Available: Enabled by default, click this icon to show other users that you are able to take calls and join chat sessions. While available, your location icon will be green
Available: Enabled by default, click this icon to show other users that you are able to take calls and join chat sessions. While available, your location icon will be green ![]() .
.
![]() Unavailable: Enable this option to show others that you are not to be disturbed at the moment, and that they should try again later. Any incoming calls will be routed according to the rules defined using Web Access (e.g. transfer to voicemail or send to operator). When you are set to be unavailable, your location icon will be red
Unavailable: Enable this option to show others that you are not to be disturbed at the moment, and that they should try again later. Any incoming calls will be routed according to the rules defined using Web Access (e.g. transfer to voicemail or send to operator). When you are set to be unavailable, your location icon will be red ![]() .
.
On the phone: When you place a call or answer an incoming call, your availability icon will turn yellow ![]() to show others that you are On a call. Once the call has ended, your availability will return to its previous state.
to show others that you are On a call. Once the call has ended, your availability will return to its previous state.
People who are offline have their icon shaded gray ![]() . The location displayed is their last known location.
. The location displayed is their last known location.
Only one of these options can be enabled at one time.

Schedule
Whenever you manually change your presence, you can specify the duration that the changes are to be maintained. After the stated period, your presence will revert to its previous setting.
![]() Follow calendar: Set this item to have your presence synchronized with your calendar. This is the default setting.
Follow calendar: Set this item to have your presence synchronized with your calendar. This is the default setting.
![]() Until next scheduled: Enable this option to keep the current custom settings until the next event scheduled in the calendar. At that point, Presence will again follow the calendar.
Until next scheduled: Enable this option to keep the current custom settings until the next event scheduled in the calendar. At that point, Presence will again follow the calendar.
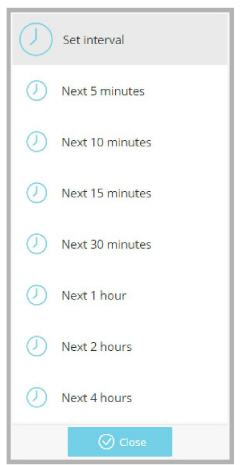
![]() Interval: Select this option to be prompted to enter the length of time to keep the custom settings. Once this duration has passed, Presence will again follow the calendar. Choose an item from the Set interval menu.
Interval: Select this option to be prompted to enter the length of time to keep the custom settings. Once this duration has passed, Presence will again follow the calendar. Choose an item from the Set interval menu.
Advanced
![]() Manage locations: Use this option to launch the Web Access program in a web browser. Web Access allows you to create custom locations, and to set the default telephone numbers for each one. You can also configure what happens to an incoming call when you are unavailable. Click here for more information on Web Access.
Manage locations: Use this option to launch the Web Access program in a web browser. Web Access allows you to create custom locations, and to set the default telephone numbers for each one. You can also configure what happens to an incoming call when you are unavailable. Click here for more information on Web Access.
This tab allows you to set the number where you can be reached. This setting will override your calendar. The available numbers are setup using Web Access.
Extensions ![]()
Any extensions configured for making calls are shown here. Select the extension to use to receive incoming calls. The chosen telephone set will ring when a call is received.
Dial using ![]()
When you place an outgoing telephone call, the number chosen here will be the one used to make the call. The telephone set may ring, and you will be connected once you answer.
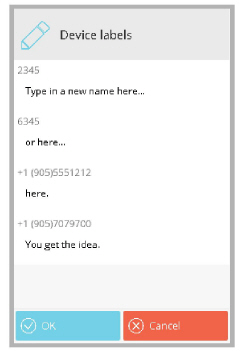
Manage labels ![]()
Use this menu item to give the device a descriptive name. For each telephone number and extension listed, you can enter a new name to use when displaying that set.
This screen is the starting point for all interactions within the application and shows all of the contacts in your Favorites group. Contacts can also appear in other groups, or use the Search field to look through the entire database.

Each contact record contains 3 tabs. Click on the appropriate portion of the window to open that tab.
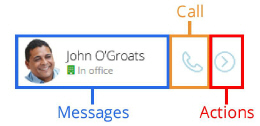
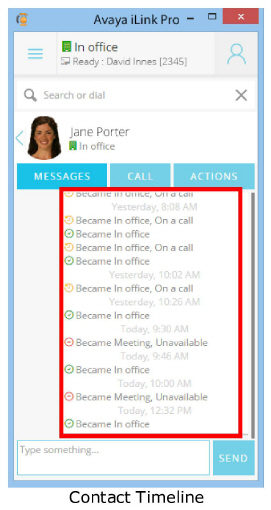
The Messages tab contains the Timeline for the person, which are events the related to the contact you have chosen to display. Text chat sessions are also displayed here, with the space to enter outgoing messages at the bottom of the window.
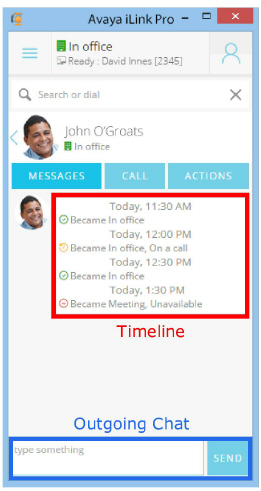
Timeline
The Timeline is the accumulation of all Alerts configured for contacts within the application. Only Alerts that apply to the selected contact are shown here.
A time stamp appears above the event.
Click here for more information on configuring Alerts.
Chat
To send a text chat message to the contact, type your message in the space provided at the bottom of the screen and click Send.
All messages in the conversation appear in the window above the text entry box, with the most recent messages appearing at the bottom, scrolling up as new messages are received. Timeline entries will be scrolled upwards as well.
Your outgoing messages appear with your profile picture on the right.
Incoming messages show the contact’s picture to the left.

The contact will see a flag on the extension icon in the browser address bar, and a light will flash within the extension to alert the user of the incoming message.
The Call tab is used to initiate a telephone conversation with the contact.
|
Note: You do not need to enter any additional digits to reach an outside line (where applicable) as this has already been configured through the PBX. |
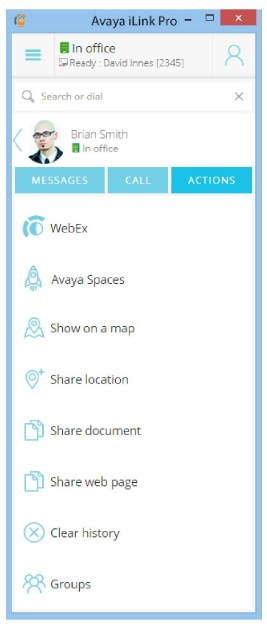
Use the Actions tab to interact with the contact in other ways. Not all options are available for all contacts.
Some of these options require additional licensing, so contact your administrator for details. Click here for a complete description of these items.

Click here for a complete description for all of these options.
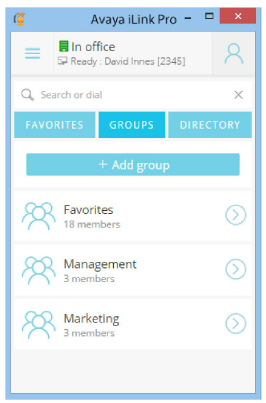
Large lists of contacts can make it difficult to find the one that you need. Organize contacts into logical Groups to make finding them easier.
From the Groups tab you can create, delete and rename groups, as well as control the membership of each. Each person can be added to more than one group. Each group that you create, and the members it contains, are specific to your account and will be the same when you connect through any device. The IX Messaging database is not affected by these changes.
The Favorites group is created automatically by the application and cannot be deleted or renamed.
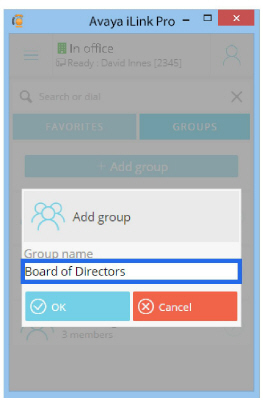
Add group
Select Add group to create a new collection for contacts.
Give the group a name, then click OK to create the group.
Once a group has been created, you can add contacts through the Manage group members ![]() option within the group.
option within the group.
Click on any group to view the list of people it contains.
Selecting a contact will open their details page where you can view their timeline or begin a chat session. You can also place a call through your default device by clicking the telephone icon.
Edit Group ![]()
With a group opened, use the Edit Group icon ![]() to change the name of the group, or to remove it from the application.
to change the name of the group, or to remove it from the application.
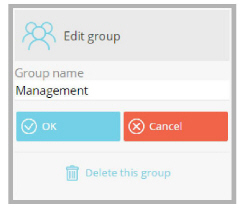
•Enter a new Group name and click OK to confirm the change.
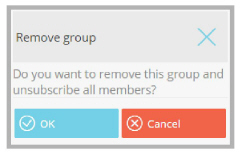
•Click Delete this group to permanently remove the collection from the program. Click OK to confirm this action. All members of the collection will be removed from your subscribed list but will remain in the database.
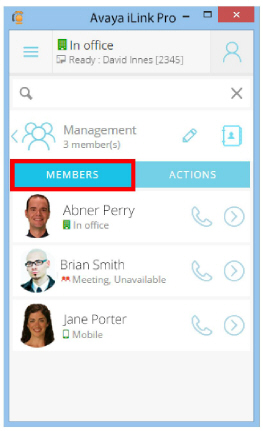
Click the Manage members button to see all contacts who have been placed into this group.
•Add new members to the group using the Search people field. When the person has been located, click the Add icon ![]() to the right of the person’s name to add them to the group.
to the right of the person’s name to add them to the group.
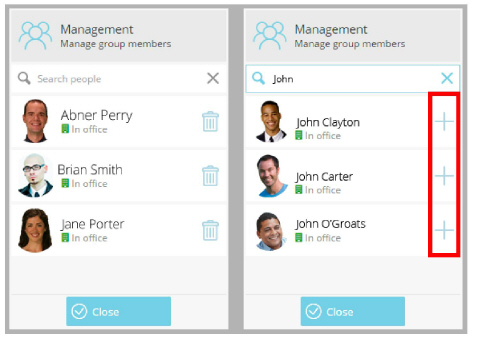
•Click the trash can ![]() to the right of the contact’s name to remove them from the current group. Their status in other groups is not affected.
to the right of the contact’s name to remove them from the current group. Their status in other groups is not affected.
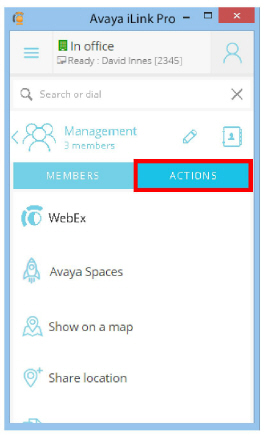
Actions
Under the Group Actions tab, you can connect with all members of the chosen group through the selected channel.
Click here for a complete description for all of these options.Click here for complete details on all of these options.
Open the Directory tab to view the company phone book defined on the IX Messaging server. The groups created there, and the contacts they contain, are displayed.
Use Directory to locate the contact you want. Add them to a group to make them easier to find the next time.

The Menu button at the top of the screen provides instant access to your chat and telephone archives. It also houses the program configuration items so you can customize your experience.
Settings ![]()
Use the options under Settings to configure the program to work the way that you do. Specify the 3rd party programs that you want Avaya iLink Pro to be integrated with, and configure the various notifications that keep you up-to-date with those around you.
Configure your Options to have the application work the way you do.
Each item on this list toggles on / off.
All of these settings are optional. Although none are required, some are enabled by default.
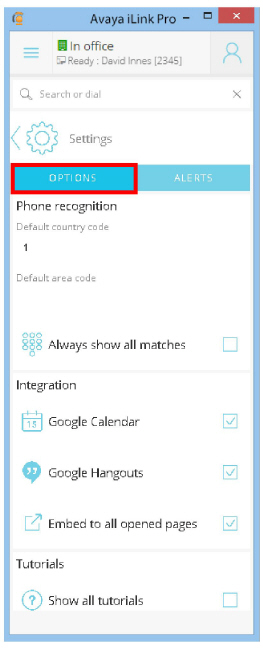
Phone recognition
These settings control any additional numbers that are added to a outgoing dialed number.
•The administrator will configure the values for Area code and Country code on the server, and those values will be displayed here. You should only change these settings if you are out of the office and require different local dialing rules at your location.
•Always show all matches changes the manner in which search results are displayed. When enabled, the program will show all matches to a search, with multiple versions of the phone number parsed using the local dialing rules (e.g. enter 7079700, results are +1(905)707-9700 or 90 5 707 9700). When disabled, the phone number will not be parsed and will be shown and dialed precisely the way it was entered (e.g. 7079700).
Integration
Integration controls how Avaya iLink Pro interacts with your other applications.
![]() Enable Google calendar to allow Avaya iLink Pro to update your presence using the entries in your calendar. For example, if a meeting is scheduled in Google Calendar, your presence in Avaya iLink Pro will be changed automatically to Meeting, Unavailable at the correct time to reflect your status. After the meeting, it will be returned to the default value.
Enable Google calendar to allow Avaya iLink Pro to update your presence using the entries in your calendar. For example, if a meeting is scheduled in Google Calendar, your presence in Avaya iLink Pro will be changed automatically to Meeting, Unavailable at the correct time to reflect your status. After the meeting, it will be returned to the default value.
 When Google Hangouts is enabled, the presence bar will be updated whenever you join or leave a Hangout.
![]() Embed to all opened pages will add the Avaya iLink Pro slider to the browser window to make accessing the extension much easier. Reboot the browser after setting this option to complete the change.
Embed to all opened pages will add the Avaya iLink Pro slider to the browser window to make accessing the extension much easier. Reboot the browser after setting this option to complete the change.
Tutorials
![]() Turn on Show all tutorials to enable the in-program pop-ups that will help guide you through the application.
Turn on Show all tutorials to enable the in-program pop-ups that will help guide you through the application.
Alerts
This menu allows you to define how and when the program provides notifications regarding your contacts.

Sounds ![]()
Choose whether or not the application will play a sound when an alert is generated.
•Enable Use sounds to play a sound effect when a notifiable event occurs. If this item is turned off, only on-screen prompts will be used for notifications.
•Silent if unavailable will mute all sound effects configured for alerts if your presence is set to Unavailable. This prevents your meetings from being disturbed.
Notifications ![]()
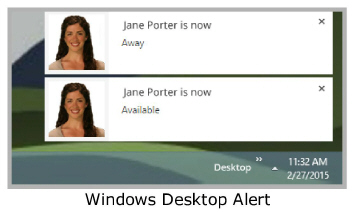
Specify when the application alerts you to changes with your contacts. Whenever a contact’s status changes, a pop-up alert in the Windows desktop will be generated.
A notification may be triggered when the following occur:
•Online status change - the contact logs into or logs off from Avaya iLink Pro.
•Availability change - an online contact becomes available / unavailable / away.
•Incoming chat - generates an alert whenever someone else wants to start a text chat session with you.
•Active call - an alert is generated when a contact starts or ends a telephone call.
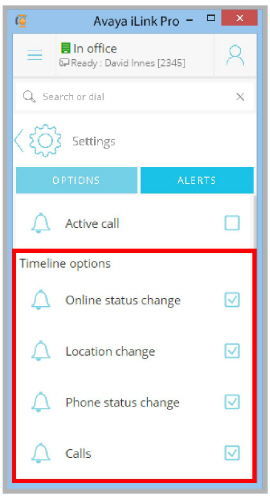
Timeline options ![]()
Configure these options to filter the alerts generated in the Timeline for each contact.
A Timeline event may be triggered when the following occur:
•Online status change - the contact logs into or logs off from Avaya iLink Pro.
•Location change - an online contact changes their location (i.e. from In office to Meeting).
•Phone status change - adds to the Timeline whenever a contact answers their phone or hangs up after the call.
•Calls - a Timeline entry is generated whenever you start or end a telephone call.
Logout ![]()
This item will terminate all functions and disconnect you from the program. You will be returned to the login screen. Other users of the system will see you as Offline.
Click Connect to relaunch the program.
Conversations ![]()
Conversations provides an archive of any text chat sessions you have had. A new chat session can be launched from here as well.
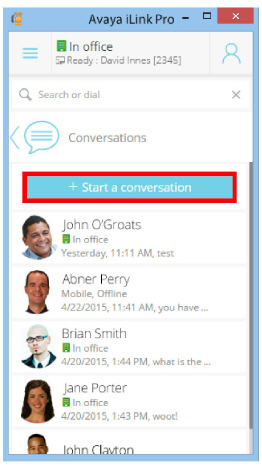
Start Conversation
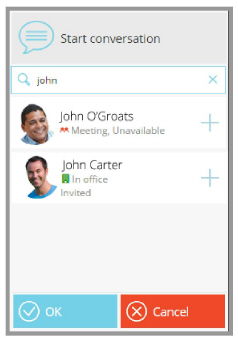
The Start conversation button is used to create a new chat session. You will be asked to select a contact to invite. Enter a contact name or extension into the search bar and click ![]() next to the correct individual from the list returned.
next to the correct individual from the list returned.
Click OK to start the chat session. The person that you invited will receive a notification through Avaya iLink Pro that they are requested to attend.
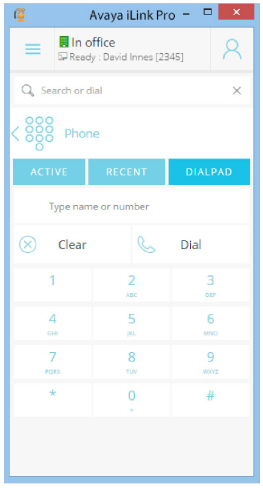
Phone ![]()
The Phone tab contains the history of your Active and Recent telephone calls. The Dialpad allows you to manually dial a call from the computer.
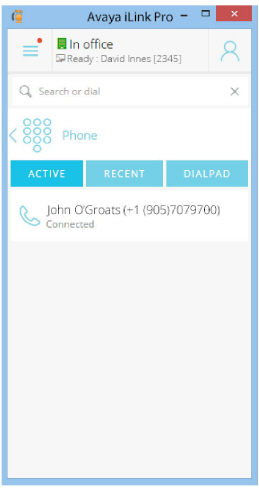
Active Calls
This tab displays all ongoing (Active) telephone conversations. Click on a listed call to view Call Controls.
Recent Calls
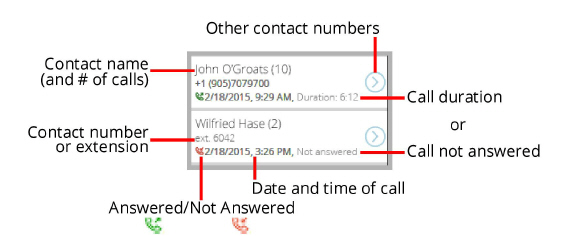
The specifics for Recent telephone calls are kept here. The details of the call are shown.
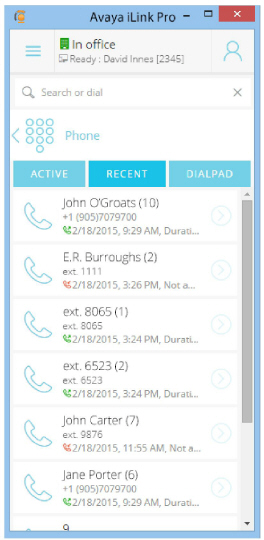
The Recent archive will hold call details for some time, after which they will be removed from the system.
Click on any Recent entry to reconnect with that person. Click the contact to place a call back to the listed number, or click the arrow ![]() to choose the number to call for that contact.
to choose the number to call for that contact.
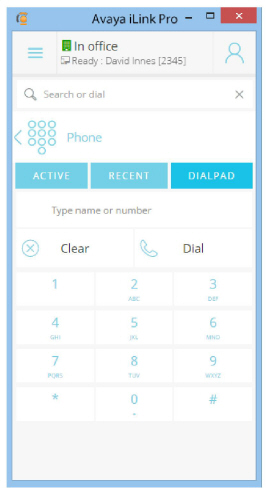
Use the Dialpad to place a telephone call to any number or extension.
Use the mouse to click the keys, or enter the numbers through the computer keyboard.
When ready, click Dial to place the call through the currently selected telephone device.
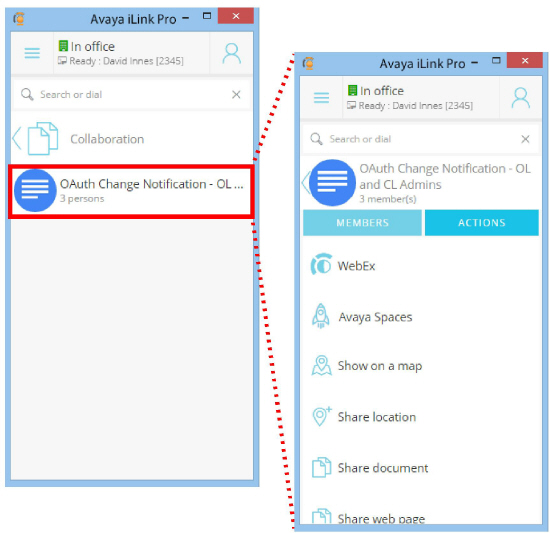
Collaboration ![]()
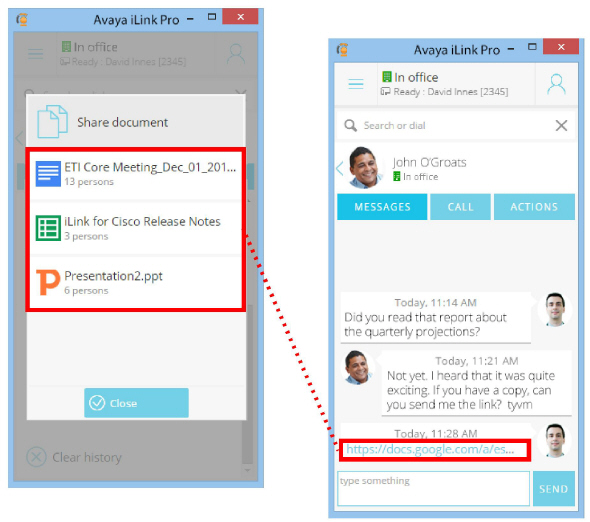
A document that is stored on Google Drive and shared with other people can be used to start a meeting.
The document must be open on your computer (e.g. in Google Docs), not viewed directly from the drive, before it will appear under the Collaboration tab.
Click the document to review the list of people that it has been shared with, and to start a WebEx meeting, a Google Hangout, or a conference call with the entire group. You can also review the locations of each contact on the list through Google Maps.
Click Members to see a list of all of the people the document is shared with.
Click on one of the Collaboration Action options to start the selected event. All contacts with whom the document has been shared will receive an invitation through Avaya iLink Pro (for Chat and Google Hangouts), or through an email (for WebEx).
Click here to see an explanation for all action items.
Call Controls are available whenever a call is made through the Avaya iLink Pro dialer, or from the keypad of the device.
From the telephone, the Hold, Mute and Hangup functions are supported. When present on the device, the Speakerphone is also available and is controlled from the set.
The keypad within Avaya iLink Pro also supports call transfers during a call.

![]() - Put on hold will pause the call, muting the microphone and allowing another call to be placed.
- Put on hold will pause the call, muting the microphone and allowing another call to be placed.
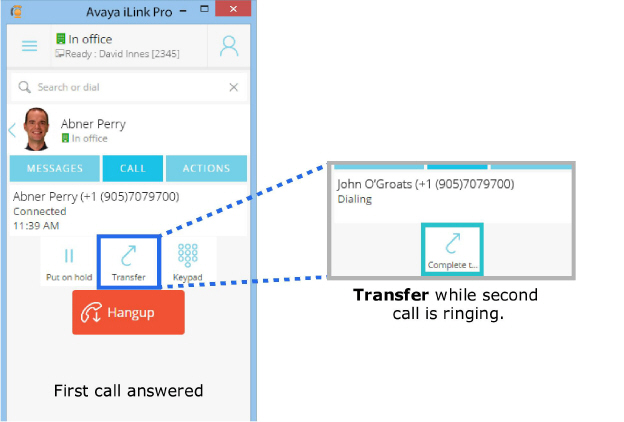
![]() - When Transfer is selected, the current call is put on hold. Place a second call to another contact.
- When Transfer is selected, the current call is put on hold. Place a second call to another contact.
When the second number called begins to ring, click Complete transfer to send the call to that number.
![]() - Mute audio will stop the outgoing audio stream until this item is pressed again. This prevents local conversations from being broadcast to all listeners.
- Mute audio will stop the outgoing audio stream until this item is pressed again. This prevents local conversations from being broadcast to all listeners.
![]() - Click Dialpad to bring up a number pad which will allow you to enter additional keystrokes for the call. If you need to enter a security code or a mailbox number, use the Keypad.
- Click Dialpad to bring up a number pad which will allow you to enter additional keystrokes for the call. If you need to enter a security code or a mailbox number, use the Keypad.
![]() - When sending a call to another number, click Complete Transfer to forward the call once the second number starts to ring.
- When sending a call to another number, click Complete Transfer to forward the call once the second number starts to ring.
![]() - Use Cancel Transfer to terminate a call to a new contact before they answer.
- Use Cancel Transfer to terminate a call to a new contact before they answer.
![]() - Click Hangup to end the call.
- Click Hangup to end the call.
You can navigate away from the Call window without interrupting the call.
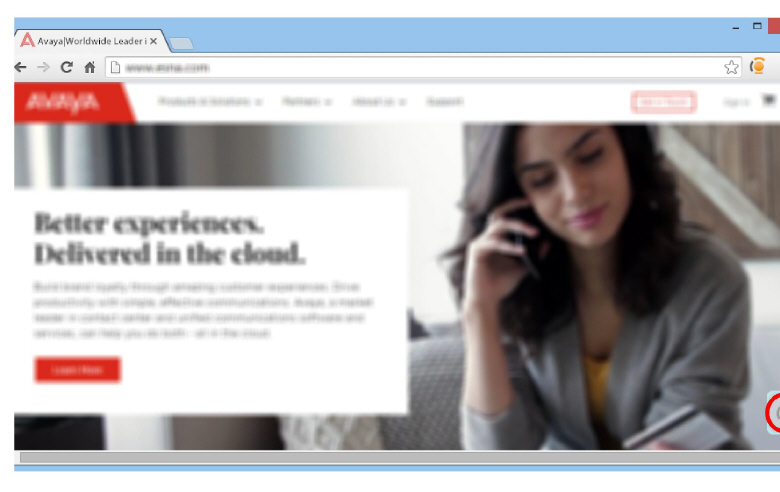
On web pages that contain telephone numbers, Avaya iLink Pro will identify them and place a click-to-dial icon beside each one.
Click the icon to place a call to that number through Avaya iLink Pro.

At various places throughout the app you can create a new connection with the contact or group being viewed. Not all of these channels may be available. Contact your administrator for details.
|
Note: Some of these communications channels require additional licensing. Contact your reseller for details. |
The available contact methods are:
Cisco’s WebEx is an application that can be used to setup larger meetings, and can include desktop and program sharing, whiteboards, and audio / video conferencing. Both applications may require additional licensing, extensions or plug-ins to be installed.
|
Note: The Avaya iLink for WebEx application must also be installed if WebEx meeting support is required. |
Launch a WebEx meeting in a browser window. When you start an event, the viewed individual, all members of the group or the collaboration project automatically receive an invitation to attend. More people can be added before the event starts, or after it has begun.
If there is a chat session currently in-progress, it will continue during the event.
1.Select WebEx ![]() .
.
|
Note: Where appropriate, the necessary licenses must be purchased separately. |
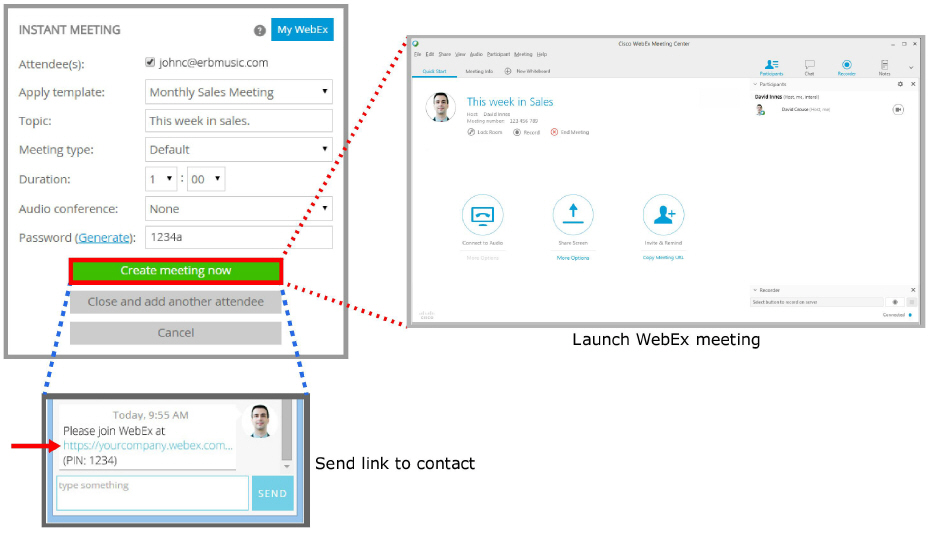
2.For the person who started the WebEx meeting, Avaya iLink Pro will automatically launch to host the meeting.
The Avaya iLink for WebEx Instant Meeting window appears which allows you to setup the meeting parameters (i.e. password access) and add additional participants. The selected contact is already included as an attendee.
Click Create meeting now to launch the WebEx meeting in a browser and send each attendee an invitation through both their Avaya iLink Pro chat window and email. The invitation includes a link to join the meeting.
Avaya Spaces ![]() :
:
Google Hangouts will launch in the browser window. Click Join to start the meeting.
The contact will receive an invitation in the chat window of Avaya iLink Pro. The invitation includes a link to join the meeting.
Use Show on a map to display this contact’s location using Google Maps.
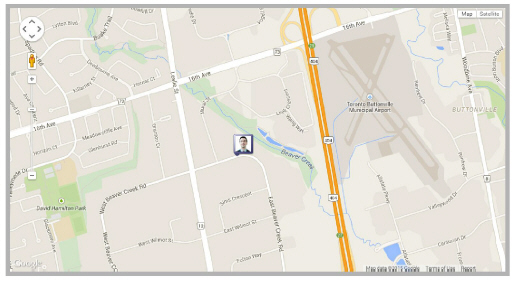
When used with more than one contact (e.g. Groups), the map will show all of those people on the map.

Select this item to send a Google Maps image through Chat that shows your location.
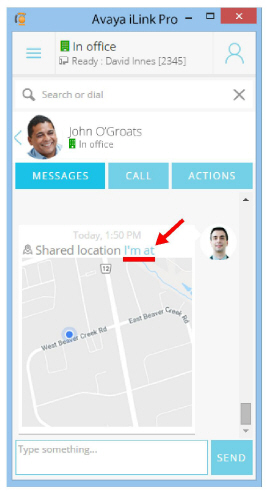
Click I’m at above the map to open Google Maps in a browser with a larger version of the map displayed.

Use this option to share a document with the contact. The document must be stored on Google Drive, and you must have it open in the browser before it will appear in the list to share.
Once shared, the contact or the group will receive a link in their chat window that will take them to the document. The contact(s) will also be added to the list of people authorized to view the document.
Click the document to share to send a link to the document to the contact(s).
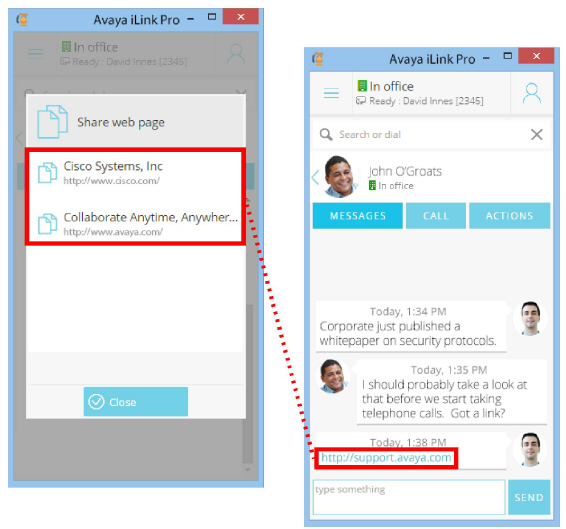
The Share web page item will display a list of all pages open in the browser. Click on the desired page to send the contact or group a link to that site in the chat window.
This item will remove all stored entries for this contact. These include records of chat sessions, timeline entries, and telephone conversations.
Groups are collections of related contacts that are created by the user as required. The Groups button allows you to assign the contact to an existing collection. Groups are managed through the Groups tab here.
Place a checkmark in the box beside the group(s) you want to add the contact to.
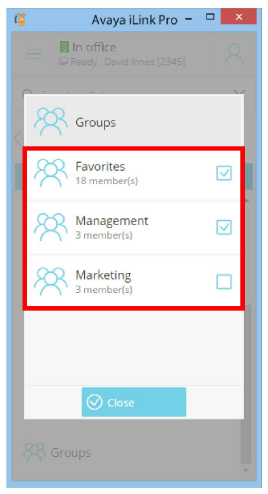
|
Note: The Favorites group is embedded in the application and cannot be renamed or deleted. People added to Favorites appear on the main page of Avaya iLink Pro. |
Avaya iLink Pro can be integration with both Salesforce Classic and the new Lightning user interface. The connection procedure is different for each integration. Refer to the appropriate section for you site requirements.
Salesforce Classic Integration
Avaya iLink Pro can be installed as a plug-in to the Salesforce CRM program. This provides users with contact, presence, and call management functions directly within Salesforce.
|
Note: Avaya iLink Pro provides support for both the Salesforce Classic view and the Lightning user interface. This section is for users of the Salesforce Classic interface. |
|
Caution: Salesforce and Avaya iLink Pro must both be installed and operating correctly before proceeding. |
The following file will be imported into Salesforce to setup the integration. Use any text editor (e.g. Notepad) to create the file. When ready, save it in the XML format.
|
Hint: Copy the text and paste it into Notepad, then save it with the TXT format. Then, in Windows, rename the file, replacing the TXT extension with XML. For example, rename FILENAME.TXT to FILENAME.XML. |
<callCenter>
<section sortOrder="0" name="reqGeneralInfo" label="General Information">
<item sortOrder="0" name="reqInternalName" label="InternalName">iLinkCTI110</item>
<item sortOrder="1" name="reqDisplayName" label="Display Name">iLink Call Center Adapter v.11.0</item>
<item sortOrder="2" name="reqAdapterUrl" label="CTI Adapter URL">https://manage1.esna.com/sfcti/cti.bridge.v2.html</item>
<item sortOrder="3" name="reqUseApi" label="Use CTI API">true</item>
<item sortOrder="4" name="reqSoftphoneHeight" label="Softphone Height">500</item>
<item sortOrder="5" name="reqSoftphoneWidth" label="Softphone Width">250</item>
<item sortOrder="6" name="reqSalesforceCompatibilityMode" label="Salesforce Compatibility Mode">Classic_and_Lightning</item>
</section>
<section sortOrder="1" name="reqDialingOptions" label="Dialing Options">
<item sortOrder="0" name="reqOutsidePrefix" label="Outside Prefix"></item>
<item sortOrder="1" name="reqLongDistPrefix" label="Long Distance Prefix"></item>
<item sortOrder="2" name="reqInternationalPrefix" label="International Prefix"></item>
</section>
<section sortOrder="2" name="CallResults" label="Call Results">
<item sortOrder="0" name="Results" label="Result codes (comma separated list)"></item>
</section>
<section sortOrder="3" name="Matching" label="Phone matching options">
<item sortOrder="0" name="SearchTemplates" label="Search templates (comma separated list)"></item>
<item sortOrder="1" name="FormatTemplates" label="Format templates (comma separated list)"></item>
</section>
<section sortOrder="4" name="Experimental" label="Experimental options">
<item sortOrder="0" name="ActivitySubtype" label="Apply activity subtype"></item>
</section>
</callCenter>
Open CTI Integration
|
Note: By default, Chrome will block pop-ups while browsing. Avaya iLink Pro, when used as a plug-in with Salesforce, requires pop-ups to access advanced searches to identify incoming callers and access records. To ensure complete functionality, enable pop-ups when using the Salesforce plug-in. |
Adding the Avaya iLink Pro plug-in to Salesforce requires the server to be configured for OpenCTI integration. This configuration is performed by the administrator before the plug-in will work correctly for clients.
Follow these steps to ensure the proper integration of Salesforce with Avaya iLink Pro.
|
Warning: OpenCTI integration with Avaya iLink Pro is only possible with Salesforce version 13+. |
|
Warning: The required Call Center adapter for Salesforce is only available with the Enterprise edition and higher. |
1.If you have not done so already, create the Call Center Definition XML File as outlined on page 133.
2.Login to Salesforce using an account with site administrator credentials.
3.Go to the Setup page.
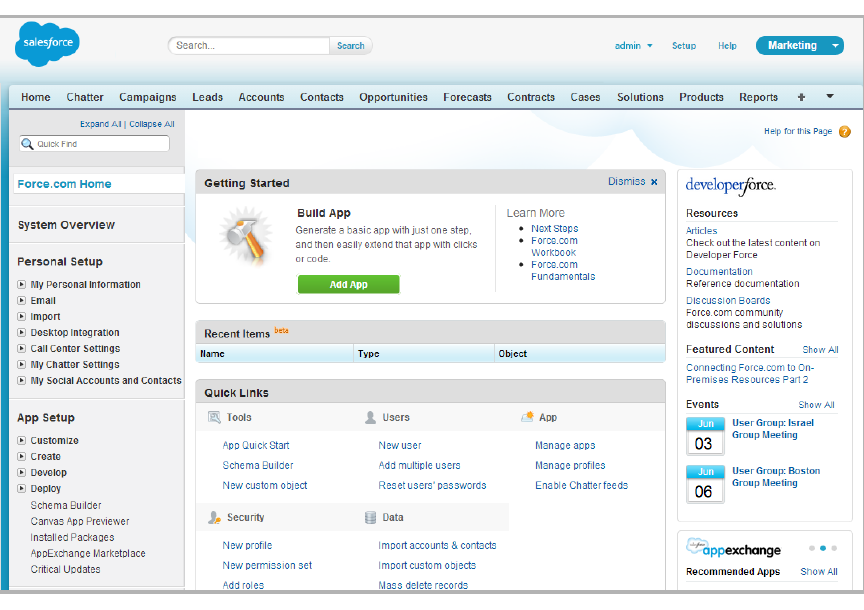
4.Go to App Setup > Customize > Call Center > Call Centers and click Continue.
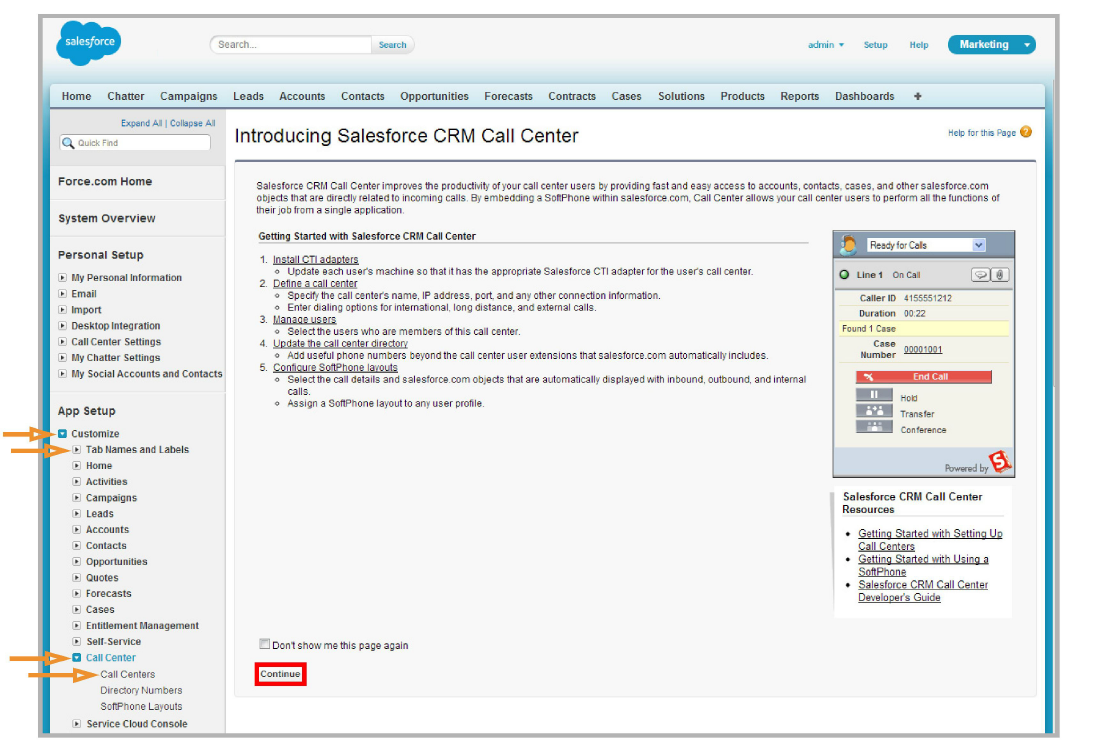
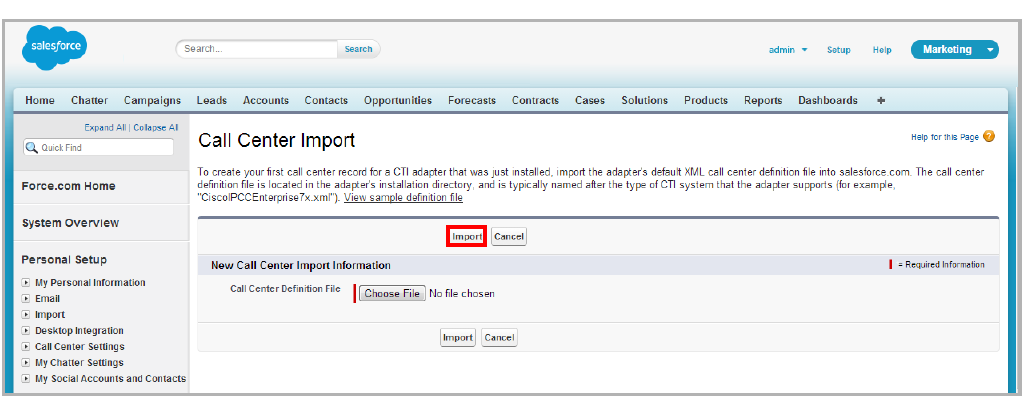
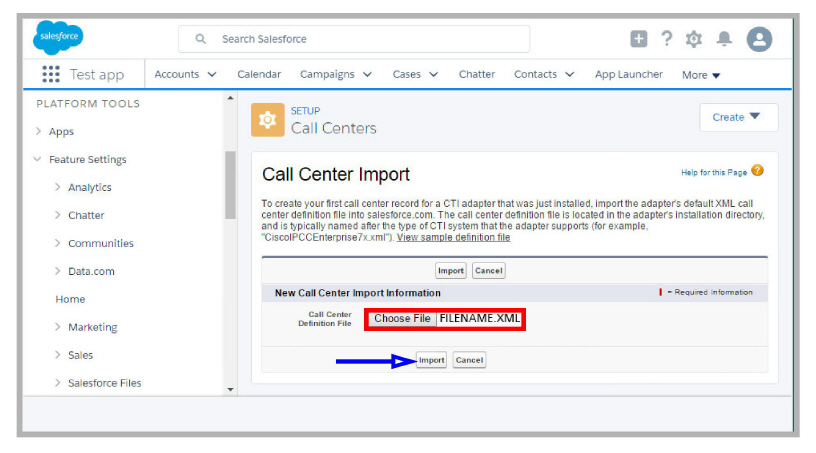
5.In the All Call Centers window, click Import.

6.Click Choose File, and select the Call Center Definition file created in step 1.
With that file selected, click Import.
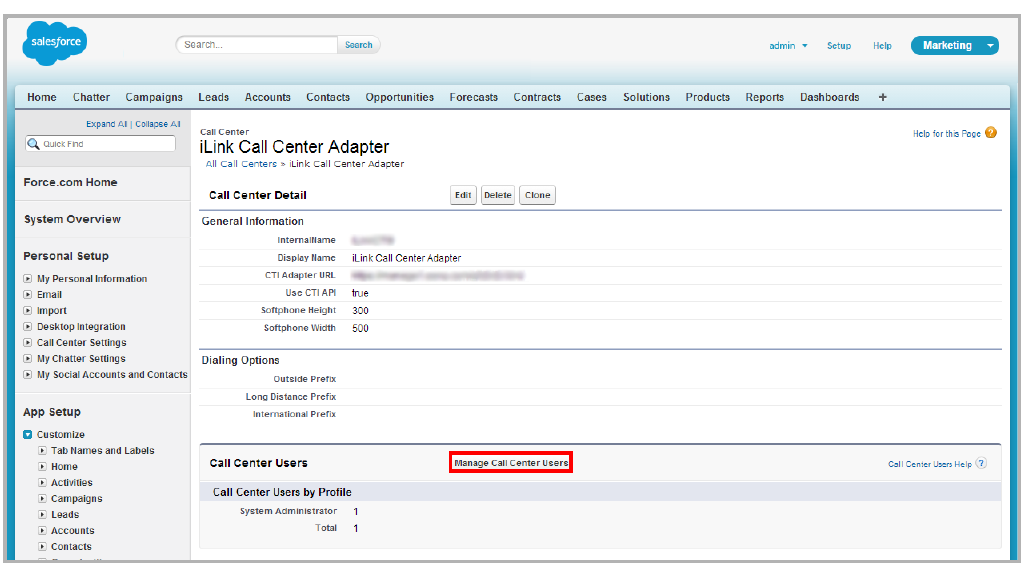
7.Returning to the All Call Centers window, choose the newly created Call Center and click Edit.

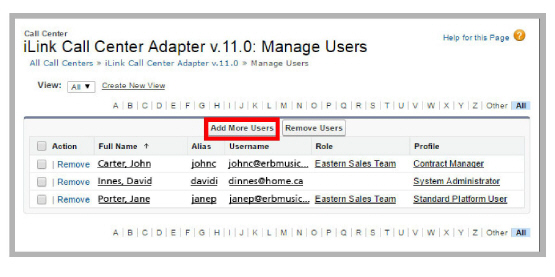
8.Click Manage Call Center Users to add clients to the new call center.
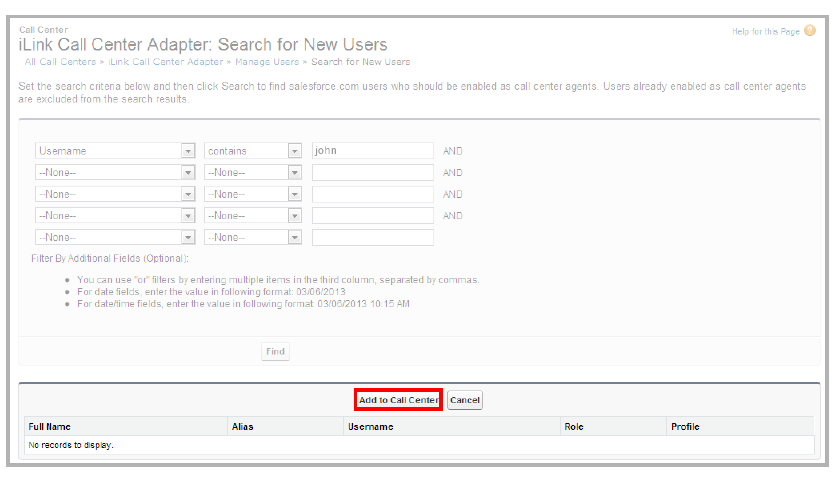
9.Click Add More Users.

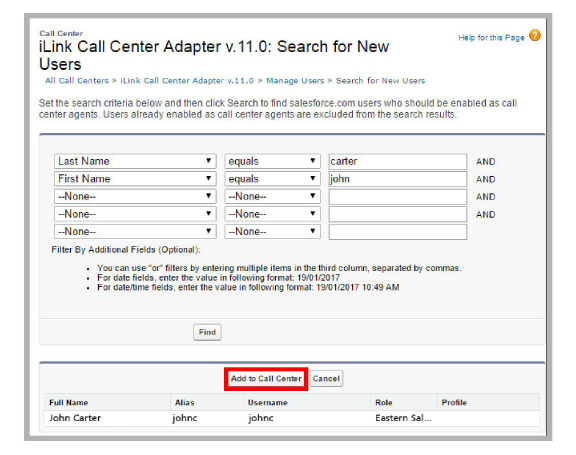
10.Add all of the required users to the list.
Once all of the users have been added, click Add to Call Center.
11.Integration is now complete. Once it becomes available, clients will need to go to the Chrome web store
(https://chrome.google.com/webstore) to download the Avaya iLink Pro plug-in.
Once that has been installed, you will have UC functionality available within Salesforce.
When using the Salesforce plug-in with iLink for Cisco, the interface works in the same fashion as it does when installed into a browser with the following additional integrations.
When iLink for Cisco places or receives telephone calls, the program performs several functions within Salesforce to improve work flow. Instant access to contact records, and automatically creating activity log entries improves the usability of the plug-in.
When receiving a telephone call, iLink for Cisco will extract the caller ID, if present, and pass this information to Salesforce. Settings made within Salesforce determine whether a pop-up is seen, if the matching client record is opened automatically, or if nothing at all occurs. This behavior can be changed by the administrator.
1.While logged into Salesforce using an administrator account, click Setup.

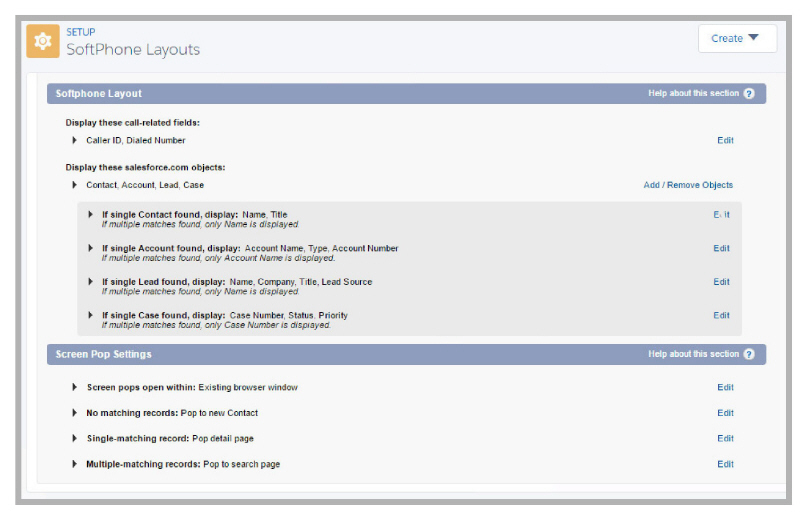
2.In the left-hand pane, go to Build > Customize > Call Center > SoftPhone Layouts.
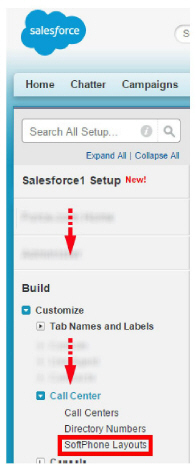
3.Select a layout and click Edit.

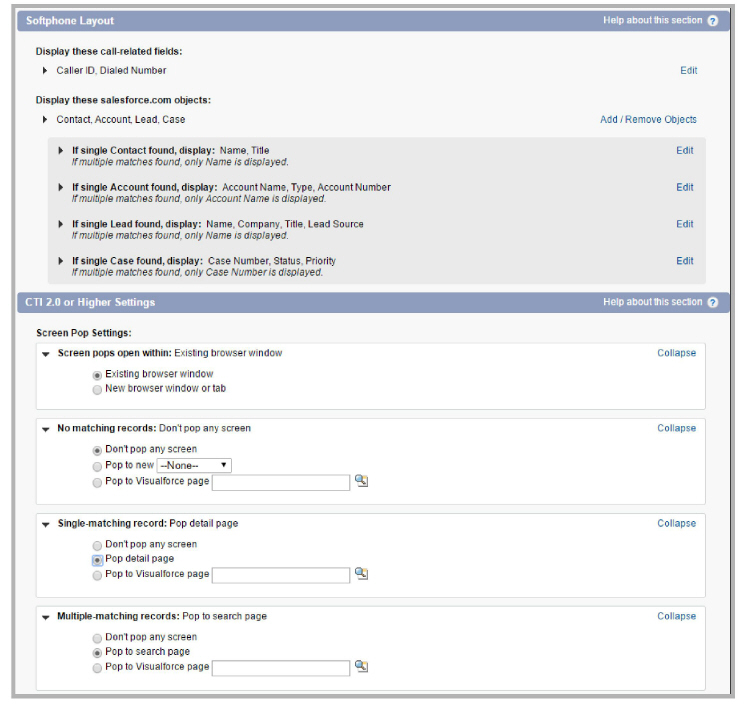
4.Under the dropdown menu for Select Call Type, choose Inbound, Outbound, or Internal.

5.Edit the settings to change the behavior of the program during a call.
Please refer to the Salesforce documentation for more details on these options.
On Inbound Calls
Upon receiving an call, iLink for Cisco will read the caller ID information, if present, and will pass the details to Salesforce to handle according to the behaviors configured above.
For Outgoing Calls
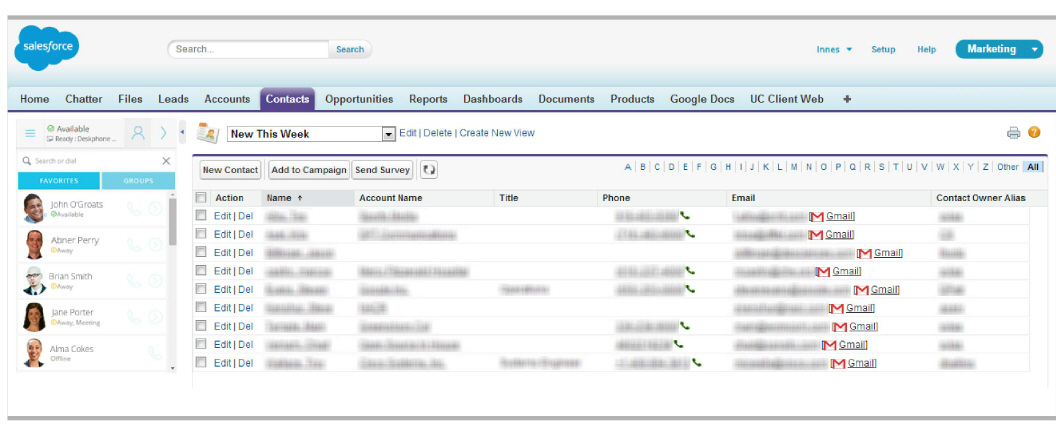
When placing a call, iLink for Cisco does not open a contact record. When the number is clicked within Salesforce, iLink for Cisco will use that information to locate the contact record and add an activity report to the database with the call details.
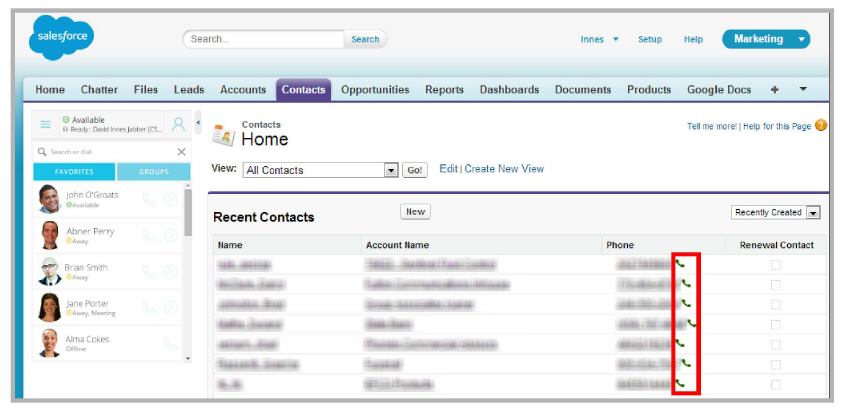
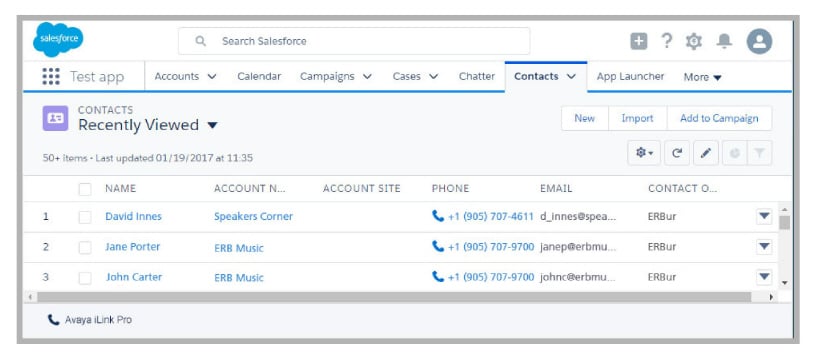
The Click-to-Dial feature is active within Salesforce. Any contact telephone numbers the plug-in finds will have the click-to-dial icon  placed beside them for quick and easy dialing.
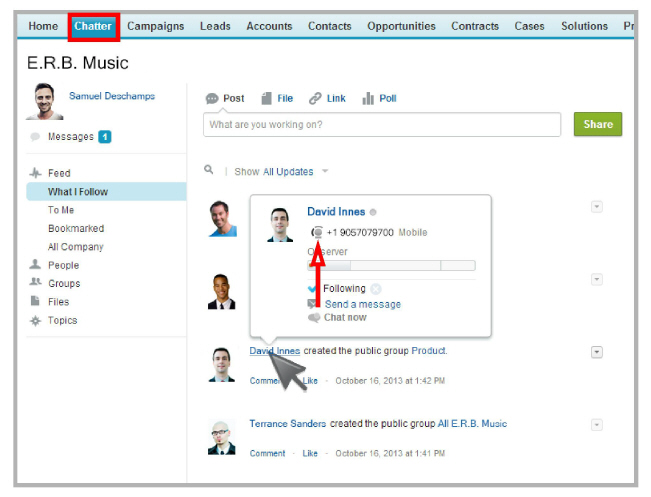
From the Chatter tab within Salesforce, contacts that you are following are displayed. Moving the mouse over a contact’s name pops up the Hovercard. If a telephone number is present on the Hovercard, the Click-to-Dial feature will be available for that number too. Click the program icon to place the call.

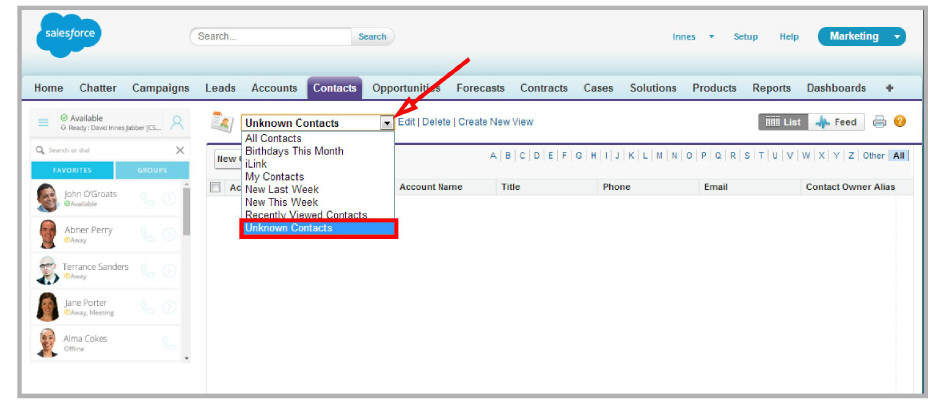
Salesforce provides the ability to collect similar items together for easier processing. To find all of the calls received from unknown contacts, build a filter that will search the database looking for the name “-” (hyphen), which iLink for Cisco adds as the default when receiving unidentifiable calls.
To create a filter:
1.Open Salesforce and go to the Contacts tab.
2.Click Create New View.
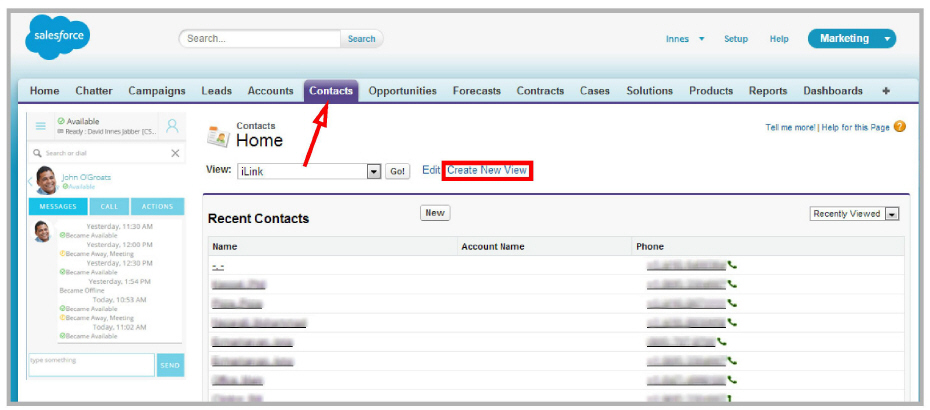
3.Give the filter a name. Choose to search all contacts.
Set First Name equals the hyphen character - .
The remaining fields can be left at their default values.

4.Click Save.
Run the filter when necessary to see a list of all calls received from contacts whose details could not be matched with an entry in the database.
Salesforce Lightning Integration
Avaya iLink Pro can be installed as a plug-in to the Salesforce CRM program. This provides users with contact, presence, and call management functions directly within Salesforce.
|
Note: Avaya iLink Pro provides support for both the Salesforce Classic view and the Lightning user interface. This chapter is for users of the Salesforce Lightning interface. |
|
Caution: Salesforce and Avaya iLink Pro must both be installed and operating correctly before proceeding. |
The following file must be imported into Salesforce to setup the integration. Use any text editor (e.g. Notepad) to create the file. When ready, save it in the XML format.
|
Hint: Copy the text and paste it into Notepad, then save it with the TXT format. Then, in Windows, rename the file, replacing the TXT extension with XML. For example, rename FILENAME.TXT to FILENAME.XML. |
<callCenter>
<section sortOrder="0" name="reqGeneralInfo" label="General Information">
<item sortOrder="0" name="reqInternalName" label="InternalName">iLinkCTI110</item>
<item sortOrder="1" name="reqDisplayName" label="Display Name">iLink Call Center Adapter v.11.0</item>
<item sortOrder="2" name="reqAdapterUrl" label="CTI Adapter URL">https://manage1.esna.com/sfcti/cti.bridge.v2.html</item>
<item sortOrder="3" name="reqUseApi" label="Use CTI API">true</item>
<item sortOrder="4" name="reqSoftphoneHeight" label="Softphone Height">500</item>
<item sortOrder="5" name="reqSoftphoneWidth" label="Softphone Width">250</item>
<item sortOrder="6" name="reqSalesforceCompatibilityMode" label="Salesforce Compatibility Mode">Classic_and_Lightning</item>
</section>
<section sortOrder="1" name="reqDialingOptions" label="Dialing Options">
<item sortOrder="0" name="reqOutsidePrefix" label="Outside Prefix"></item>
<item sortOrder="1" name="reqLongDistPrefix" label="Long Distance Prefix"></item>
<item sortOrder="2" name="reqInternationalPrefix" label="International Prefix"></item>
</section>
<section sortOrder="2" name="CallResults" label="Call Results">
<item sortOrder="0" name="Results" label="Result codes (comma separated list)"></item>
</section>
<section sortOrder="3" name="Matching" label="Phone matching options">
<item sortOrder="0" name="SearchTemplates" label="Search templates (comma separated list)"></item>
<item sortOrder="1" name="FormatTemplates" label="Format templates (comma separated list)"></item>
</section>
<section sortOrder="4" name="Experimental" label="Experimental options">
<item sortOrder="0" name="ActivitySubtype" label="Apply activity subtype"></item>
</section>
</callCenter>
Open CTI Integration
|
Note: By default, Chrome will block pop-ups while browsing. Avaya iLink Pro, when used as a plug-in with Salesforce, requires pop-ups to access advanced searches to identify incoming callers and access records. To ensure complete functionality, enable pop-ups when using the Salesforce plug-in. |
Adding the Avaya iLink Pro plug-in to Salesforce requires the server to be configured for OpenCTI integration. This configuration is performed by the administrator before the plug-in will work correctly for clients.
Follow these steps to ensure the proper integration of Salesforce with Avaya iLink Pro.
|
Warning: OpenCTI integration with Avaya iLink Pro is only possible with Salesforce version 13+. |
|
Warning: The required Call Center adapter for Salesforce is only available with the Enterprise edition and higher. |
1.If you have not done so already, create the Call Center Definition XML File as outlined on page 150.
2.Login to Salesforce Lightning using an account with site administrator credentials.
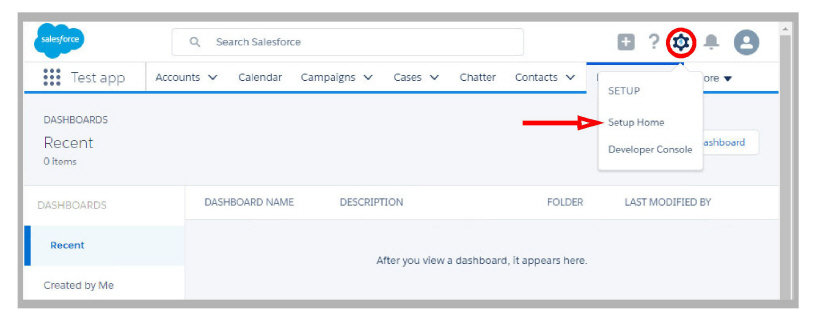
3.Click the Setup icon, and choose Setup Home from the dropdown list.
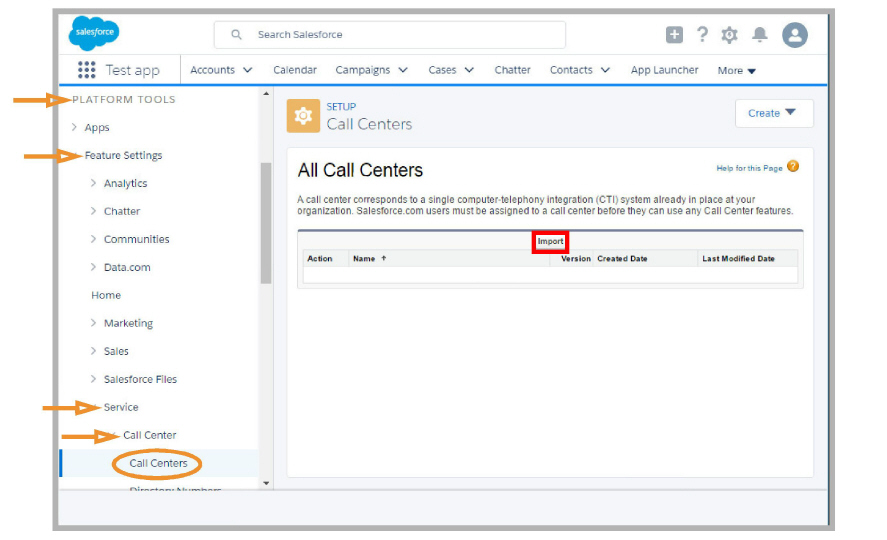
4.Go to Platform Tools > Feature Settings > Service > Call Center > Call Centers. Click Import.
5.Click Choose File, and select the Call Center Definition file created in step 1. With that file selected, click Import.
6.Returning to the All Call Centers window, click the newly created Call Center.

7.Click Manage Call Center Users to add clients to the new call center.

8.Click Add More Users.
9.Add all of the required users to the list. When finished, click Add to Call Center.
10.Integration is complete.
Clients must now go to the Chrome web store (https://chrome.google.com/webstore) to download the Avaya iLink Pro plug-in.
Once installed, the client will have UC functionality available within Salesforce.
Using Salesforce
When using the Salesforce plug-in with Avaya iLink Pro, the interface works in the same fashion as it does when installed into a browser with the following additional integrations.
Inbound and Outbound Calling
When Avaya iLink Pro places or receives telephone calls, the program performs several functions within Salesforce to improve work flow. Instant access to contact records, and automatically creating activity log entries improves the usability of the plug-in.
Configuring Call Behavior
When receiving a telephone call, Avaya iLink Pro will extract the caller ID, if present, and pass this information to Salesforce. Settings made within Salesforce determine whether a pop-up is seen, if the matching client record is opened automatically, or if nothing at all occurs. This behavior can be changed by the administrator.
1.Login to Salesforce Lightning using an account with site administrator credentials.
2.Click the Setup icon, and select Setup Home from the dropdown list..

3.Go to Platform Tools > Feature Settings > Service > Call Center > SoftPhone Layouts.

4.Select a layout and click Edit.
5.Under the dropdown menu for Select Call Type, choose Inbound, Outbound, or Internal.

6.Edit the settings to change the behavior of the program during a call.
Please refer to the Salesforce documentation for more details on these options.
On Inbound Calls
Upon receiving an call, Avaya iLink Pro will read the caller ID information, if present, and will pass the details to Salesforce to handle according to the behaviors configured above.
For Outgoing Calls
When placing a call, Avaya iLink Pro does not open a contact record. When the number is clicked within Salesforce, Avaya iLink Pro will use that information to locate the contact record and add an activity report to the database with the call details.
Click-to-Dial 
The Click-to-Dial feature is active within Salesforce. Any contact telephone numbers the plug-in finds will have the click-to-dial icon  placed beside them for quick and easy dialing.

Click the icon or the number to place a telephone call to that contact using your currently selected telephone device.
Calling from Chatter
From the Chatter tab within Salesforce, contacts that you are following are displayed. Moving the mouse over a contact’s name pops up the Hovercard. If a telephone number is present on the Hovercard, the Click-to-Dial feature will be available for that number too. Click the program icon to place the call.
Creating a Filter
Salesforce provides the ability to collect similar items together for easier processing.
|
Hint: To find all of the calls received from unknown contacts, build a filter that will search the database looking for the name - (hyphen), which Avaya iLink Pro adds as the default when receiving unidentifiable calls. |
To create a filter:
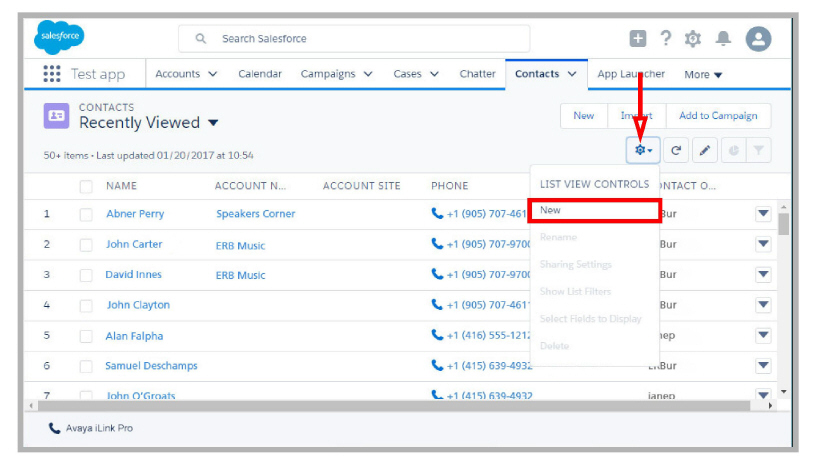
1.Open Salesforce and go to the Contacts tab.
2.Under the List View Controls icon, select New.
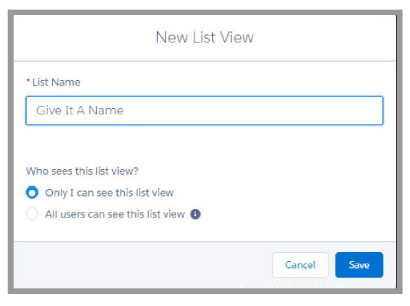
3.On the New List View window, give the filter a name. Select which people can access this filter. When ready, click Save.
4.Click Add Filter.
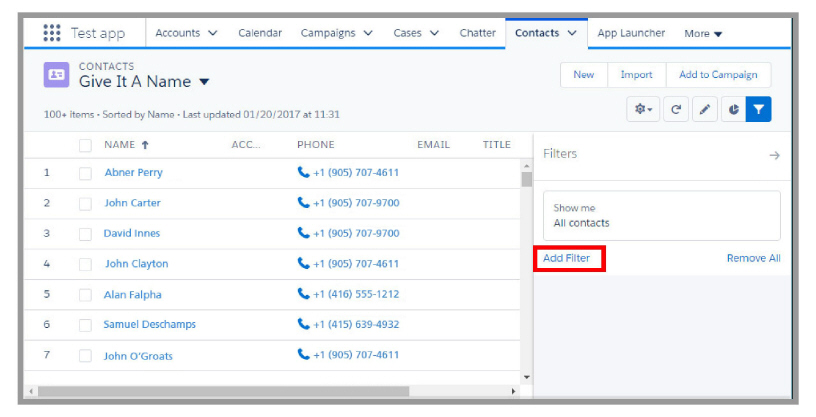
5.Choose Show me All Contacts.
Set the Field and Operator entries to specify where to search and the logic to apply. Enter the string to search for in the Value field.
Click Done.

6.Click Save. The filter will be created, and then applied to the contact list.
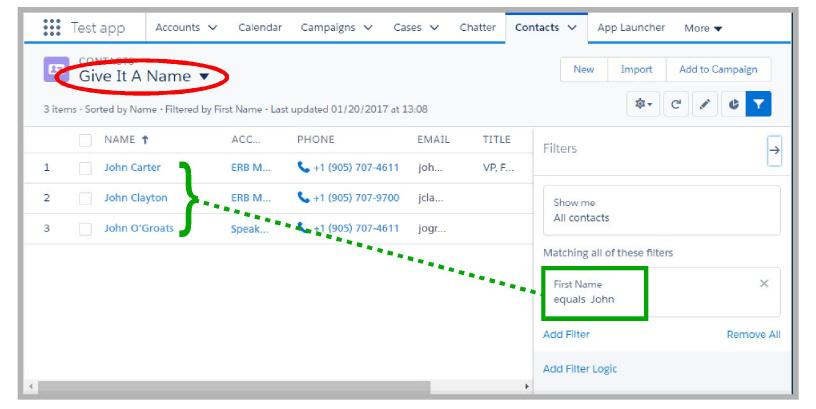
Run the filter when necessary to see a list contacts specified. Click the current view name on the Contacts tab and select a filter from those available.


