Depending upon your site’s requirements and software, you have the option to integrate Avaya Messaging with several email systems. None of these are required. Where appropriate, refer to the chapter that best suites your requirements.
|
Chapter |
Integration |
Why you want it |
|---|---|---|
|
|
Creates a secure connection through OAuth2 to your Gmail and Google Apps accounts. |
|
|
Exchange using EWS |
The simplest connection between your Exchange server and IXM. |
|
|
Exchange without EWS |
A connection between Exchange and IXM for legacy systems. |
|
|
Exchange 2010 |
A connection between Exchange 2010 and IXM. |
|
|
Office 365 using Graph |
Setup the latest high security integration procedures for maximum data integrity. |
|
|
Office 365 using EWS |
Quick connection between your O365 server and IXM. |
Messaging and an Exchange server are able to integrate through the IMAPCSE services, providing a truly unified messaging experience. Once the configuration is complete the servers communicate and synchronize all data among themselves, eliminating the need for you to constantly manage multiple locations.
Each user’s Exchange credentials are stored within the Messaging mailbox, allowing the server to synchronize messages to and from the Exchange server. End users can manage their credentials through Web Access. Administrators may also manage credentials from the admin console.
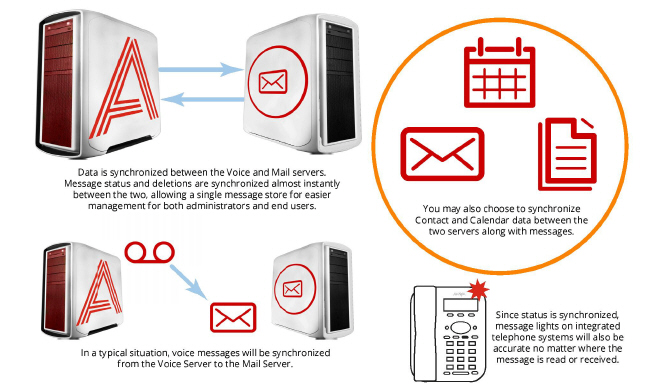
When a voice server integrates with an email server, the data between the two is synchronized, allowing for accurate information regardless of the point of access. Receiving messages, and any actions performed by the users is synchronized between the two servers constantly, ensuring that your content is always up-to-date.
Administrators can also customize what will be synchronized. A full synch includes contact and calendar entries along with messages. If the system has telephone and message light integration, MWI (message waiting lights) will also remain accurate since the status of messages are synchronized between the servers.
|
Requirements |
Details |
|---|---|
|
License |
IMAPCSE License |
|
Software |
Officelinx version 8.5 - 10.7 Messaging version 10.8 or higher |
Server configuration requires the creation of a superuser account from the active directory that has the necessary permissions within the Exchange console. Once the account has been made, it must be added to the voice server configuration, and the channel of communication between the two servers must be established.
Exchange server must also have IMAP enabled in order for Messaging to communicate properly. Once the superuser account is ready, enable IMAP for your Exchange server through the command shell.
Creating a superuser from Active Directory
A new user account must be created before it can be setup as a superuser with the necessary access privileges.
1.From the active directory, create a new user.
The user name can be anything.
For this guide, we will be using “super_user” as the user name and “perf.local” as the domain within which Exchange 2010 is installed.
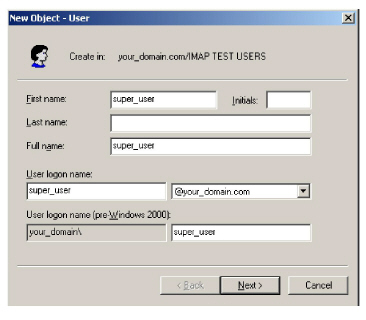
|
Note: Change the domain and user name to match your network’s requirements. |
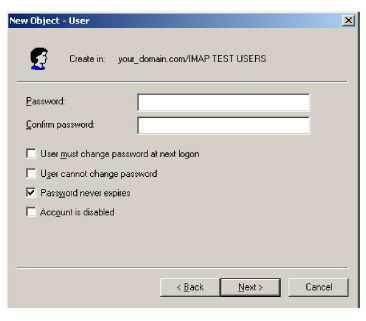
2.Ensure that Password never expires is enabled.
Since this password is applied to the Feature Group, an expired password means that all mailbox accounts associated with that Feature Group will not be synchronized until the password is reset.
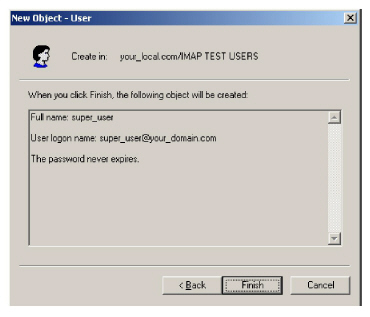
3.Confirm the information then click Finish to add the user.
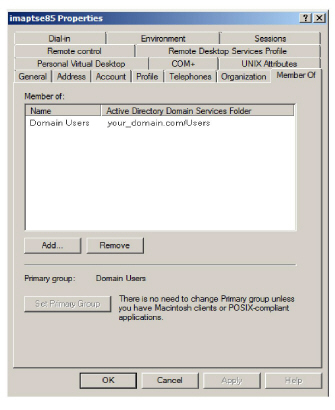
4.After the user is created, ensure that it is a member of a group with the necessary access.
The correct group to join may vary from system to system, but the key is to ensure that this user has full administrative access to the Exchange server.
Proceed to the Exchange 2010 configuration after the superuser account is ready.
Exchange 2010 superuser Creation/Configuration
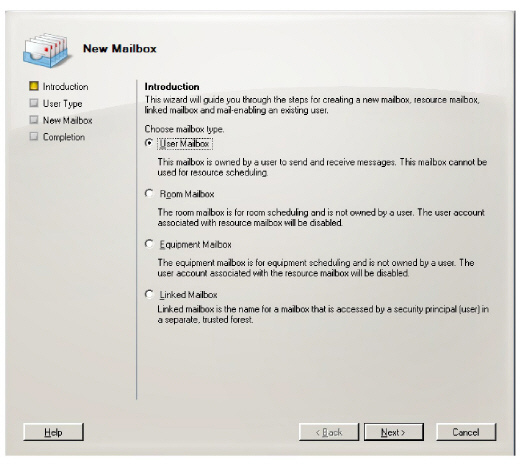
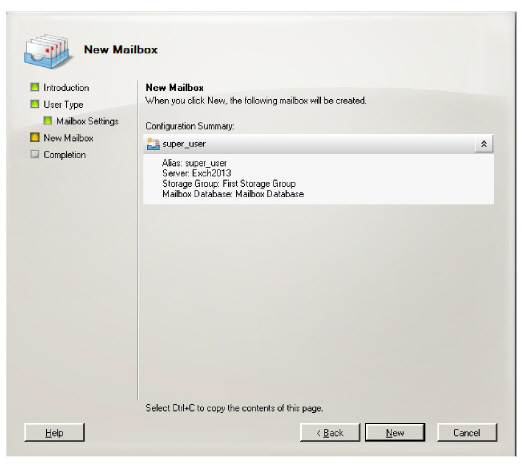
Once the superuser account is ready on Active Directory, create a mailbox for that user in the Exchange 2010 environment.
1.Create a new User Mailbox mailbox from the
Exchange 2010 Management Console.
2.When prompted, choose Existing User.
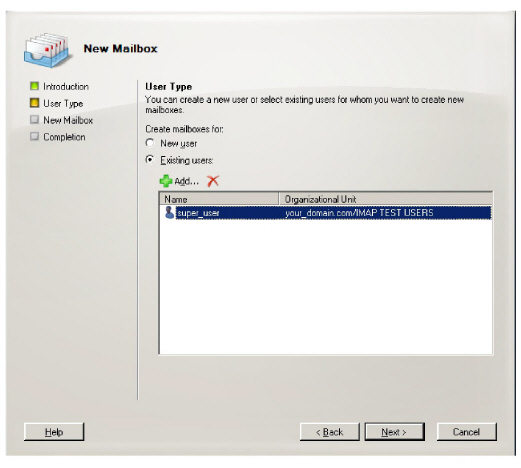
3.Click on the Add button.
In the popup window, select the superuser account that was previously in the Active Directory.
Click OK to add that account to the list of new mailboxes.
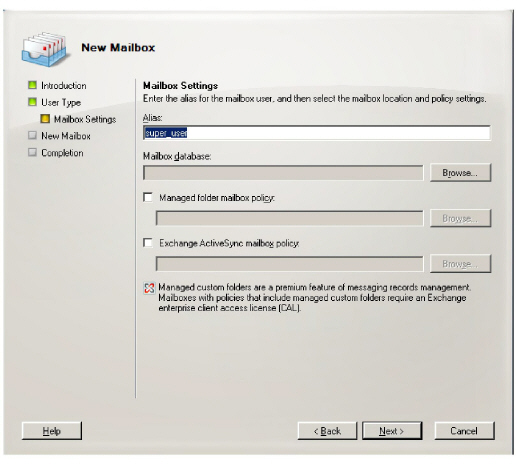
4.Click Next to continue.
5.Select the correct database and change any other settings that are required by your system configuration.
6.Confirm the information then click New to create the mailbox.
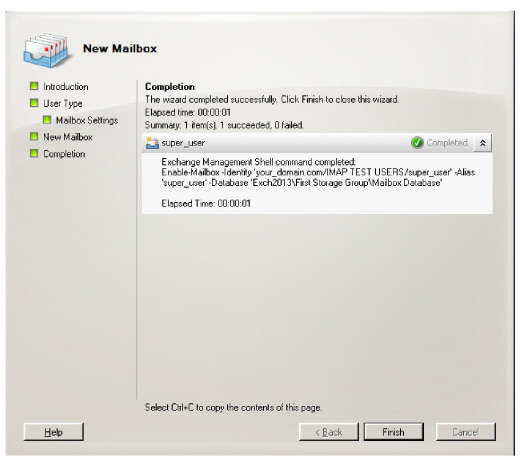
7.The superuser account has been created.
Click Finish to exit the wizard.
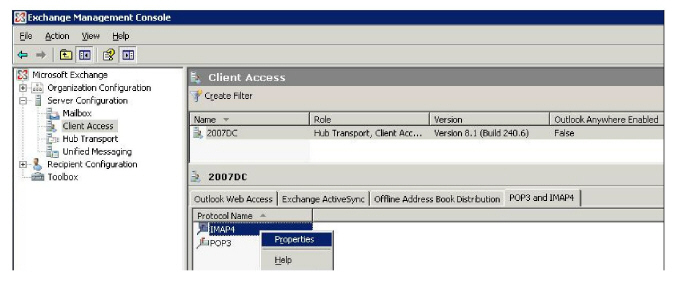
8.In order for a superuser account to properly manage all messages, you must allow a higher number of connections than there are by default.
Open the IMAP4 Properties from the Client Access section.
9.From the Connection tab, set
Maximum connections from a single user to 1000.
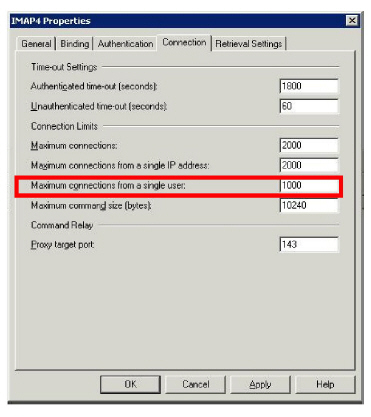
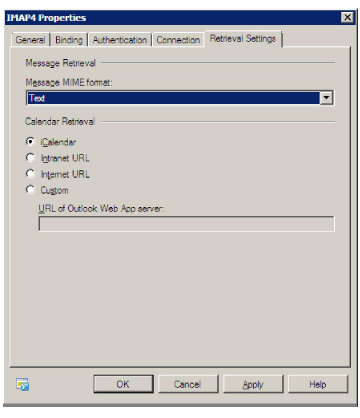
10.From the Retrieval Settings tab, set Message MIME format to Text.
Click OK to save your changes.
Now that the superuser account is ready, prepare the Exchange 2010 server for integration and apply the correct administrative rights to the superuser account.
11.The UC CSE PIM Synchronization Engine service must login and run with the Superuser credentials.
Open the Computer Management console and select Services.
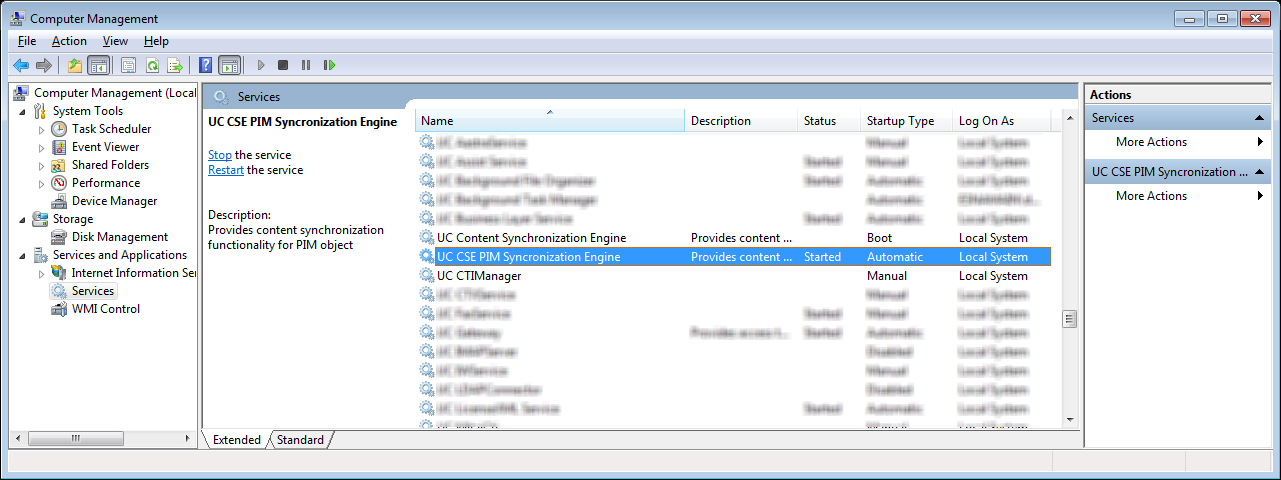
12.Stop the UC CSE PIM Synchronization Engine service.
13.Right-click the service and select Properties.
Go to the Log On tab, and enable This Account.
Enter the username and password for the superuser account in the spaces provided.
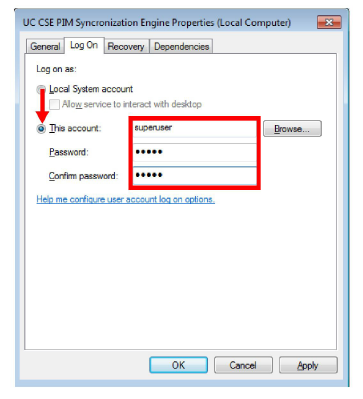
Click Apply and OK when finished.
14.Restart the service.
Exchange 2010 Shell Configuration
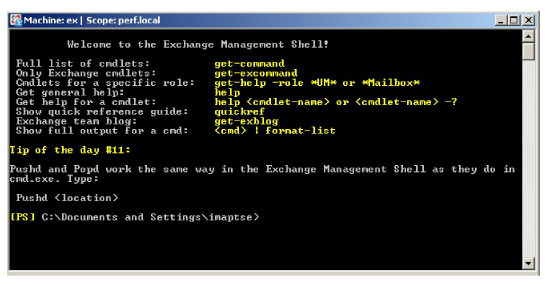
Since only simple actions are available through the GUI, continue the configuration through the Exchange Management Shell.
|
Note: <> represents a single space in the command. |
Configuring the IMAP server
All IMAP server settings may be viewed by typing the command:
Get-imapsettings
For integration with the IMAPCSE, you must execute this command to change the way in which logins are handled by IMAP.
Set-imapsettings<>–logintype<>PlaintextLogin
By default, the IMAP server daemon is disabled in Exchange 2010, so you must turn it on manually. You must configure the server so that the IMAP services are always started automatically for server restarts.
Set-service<>msExchangeIMAP4<>–startuptype<>automatic
Start the IMAP Service
Start–service<>msExchangeIMAP4
At this stage, the IMAP service will be running, and it will start each time the computer restarts.
To test this, open a command prompt (Windows prompt not Exchange Shell) and enter telnet<>serverIP<>143. You should see the banner reply. You may also verify the procedure by checking the status of the service.

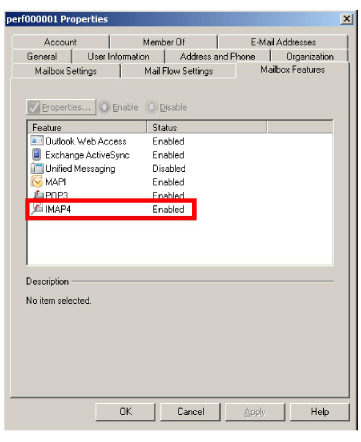
IMAP Enabling All Existing Mailboxes in a Store
If the mailboxes within your Exchange server do not have IMAP enabled, you can use the following commands to enable the feature for the mailboxes. You may confirm the status of the feature by opening the mailbox properties, then going to the Mailbox Features tab as shown here.
|
Note: All mailbox accounts that require IMAPTSE synchronization must have IMAP enabled under Exchange. |
IMAP Enabling All Users
Get-mailbox<>|<>Set-CASMailbox<>–ImapEnabled:$true
This command gets each mailbox and pipes it into the Set-CASMailbox command sequentially.
IMAP Enabling a Single User
Use this command to individually enable IMAP on each user.
Set-CASMailbox<>%mailbox%<>–ImapEnabled:$true
The %mailbox% variable represents the mailbox account name for which you want to enable IMAP.
Configuring Permissions for the superuser Account
The following commands will give the superuser account permission to logon to all user’s mailboxes. There are two separate commands needed; type the first, hit enter, and then type the second.
In both cases, the %superuser% variable represents the domain and superuser account you have created in the previous steps. For example, if the superuser’s user name is SUPER_USER, and the domain is COMAPNY.COM, enter COMPANY\SUPER_USER in place of %superuser%.
Command 1
Get-Mailbox<>|<>Add-ADPermission<>-User<>'%superuser%'<>-ExtendedRights<>'Send-as'<>-InheritanceType<>All
Command 2
Get-Mailbox<>|<>Add-MailboxPermission<>-User '%superuser%'<>-AccessRights<>'FullAccess'<>-InheritanceType<>All
This is the last configuration step required on the Exchange 2010 server and you are ready to move on to the Messaging configuration.
|
Note: If you add new mailbox accounts to the Exchange server after this point, you must enable those accounts for IMAP manually as well. To do this, use the following commands. |
IMAP Enable a New Mailbox
Set-CASMailbox<>%mailbox%<>–ImapEnabled:$true
Run a Modified Version of Command 2 Without the Pipeswitch
add-mailboxpermission<>-identity%mailbox%<>-User '%superuser%'<>-AccessRights<>'FullAccess'<>-InheritanceType<>All
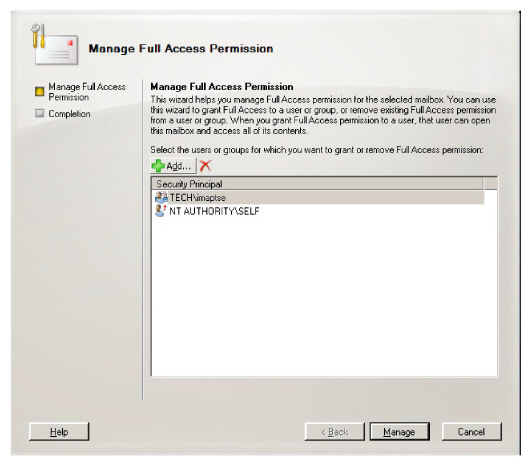
You can confirm the access rights for the superuser account by opening the Manage Full Access Permission panel. The superuser account name should be listed.
A More Secure Solution
Command 1 and 2 (above) provide full access for the superuser to the entire store drive. Instead, you can use these commands to limit access to just the MSExchange stores:
Get-MailboxDatabase | Add-ADPermission -User '%superuser%' -AccessRights ExtendedRight -ExtendedRights Receive-As, ms-Exch-Store-Admin
|
Note: If a new mailbox database is created for Microsoft Exchange, you must re-enter this command so that the new file is given the correct user access rights. |
For Messaging and Exchange to be able to synchronize data, Messaging must be able to communicate with the Exchange server using the correct credentials. The superuser account streamlines this process while still enforcing individual password security protocols on each mailbox.
Adding the CSE Endpoint
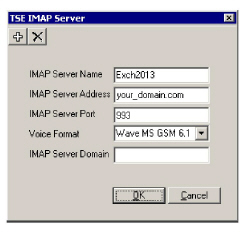
In order for the Messaging server to recognize the Exchange server, you must add a new CSE Endpoint entry in the Messaging Admin > TSE IMAP Server section.
IMAP Server Name: This name is for your reference and does impact system performance.
IMAP Server Address: Enter the server address of the Exchange server.
IMAP Server Port: The port number of the Exchange server. By default, IMAP uses port 993.
Voice Format: From the dropdown menu, select the voice format used when sending voice messages to external voice servers.
IMAP Server Domain: Enter the Domain address of the IMAP server. Since it is possible to define the IMAP Server Address using an IP address, the Domain address entered here is used to verify the Reply to address of a mailbox using IMAP CSE synchronization, preventing typical message looping scenarios.
|
Note: CSE was formerly known as TSE. |
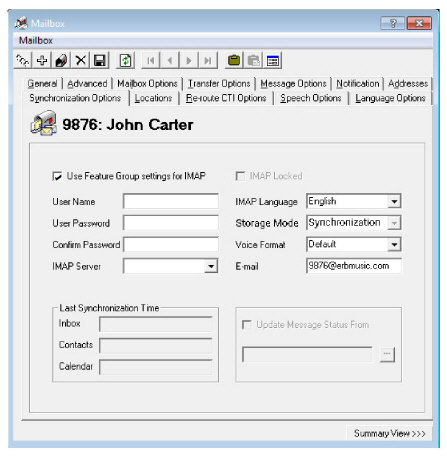
Individual Mailbox Configuration
With the superuser account, you do not have to fully enter the individual mailbox credentials for IMAPCSE synchronization.
Enable Use Feature Group settings for IMAP then enter the
User Name (this will be the alias for the Exchange account that the current mailbox will be synchronized with) and leave the User Password and IMAP Server fields empty.
|
Note: The user must be a Messaging & Collab or Messaging user to utilize synchronization. |
Assign the mailbox to the Feature Group that is going to have the superuser account credentials.
Save all changes and move onto Feature Group Configuration.

Feature Group Configuration
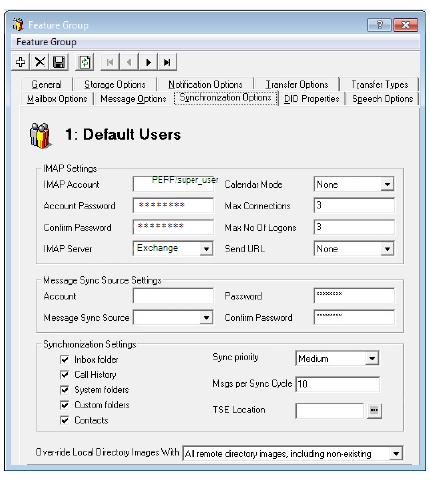
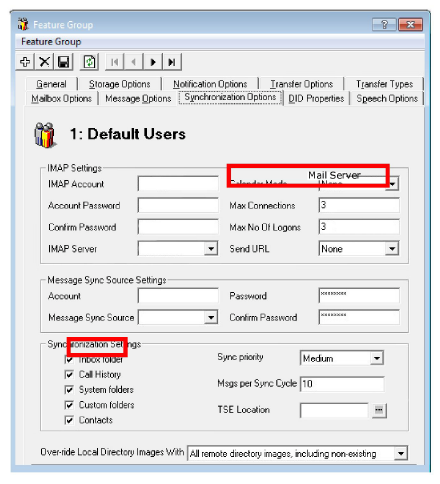
The Feature Group plays a key role in IMAPCSE synchronization by providing the necessary credentials. From the Synchronization Options tab, configure the settings as follows:
IMAP Account: Enter the account name for the superuser. The typical format will be domain/super_user_name.
Account Password: Enter the password of the superuser account.
Confirm Password: Re-enter the password.
IMAP Server: Select the CSE Endpoint created in the previous steps.
Save all changes and proceed to Registry Settings.
Registry Settings
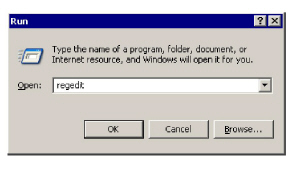
In order for Messaging to manage communications with the Exchange server, you must manually add a registry value on the Messaging server. Run the registry editor by typing regedit from the Run command.
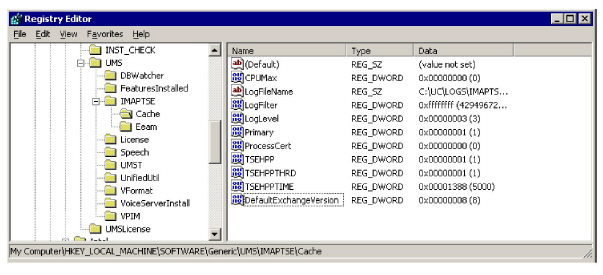
Browse to HKEY_LOCAL_MACHINE\SOFTWARE\Generic\UMS\IMAPTSE\Cache.
Create a new DWORD Value entry in this location.
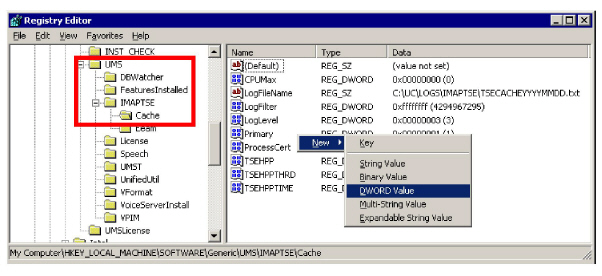
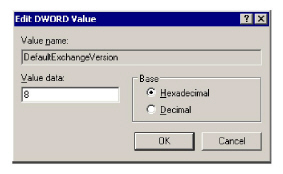
Name the entry DefaultExchangeVersion and assign it a value of 8.
The new registry entry will appear in the Registry.
Proceed with Certificate Configuration.
Certificate Configuration
In order to ensure that the communication between Messaging and the Exchange server is not interrupted by security measures, install the certificate from the Exchange server computer on the Messaging server.
The simplest way to achieve this is to access the OWA (Outlook Web Access) web page of the Exchange server.
|
Note: This procedure may vary depending on the way in which you have the domain servers configured. The goal of this process is to add the Exchange server as a trusted PC on the Messaging server computer, which can be accomplished manually by the system administrator. |
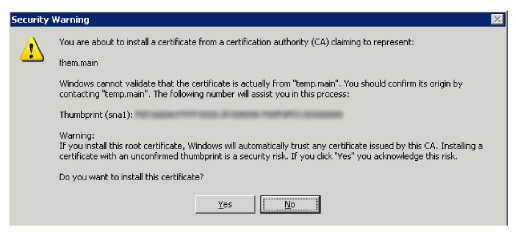
1.Open the Internet Explorer web browser, then navigate to the OWA page
(e.g. https://exchange_2010/owa).
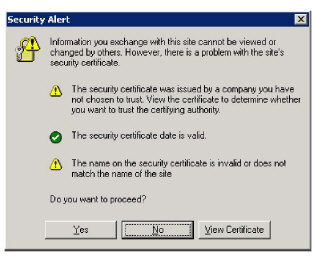
You will see the following security warning popup.
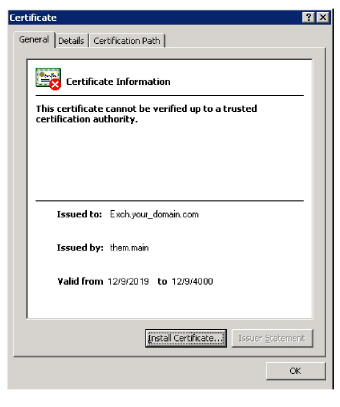
Click on View Certificate.
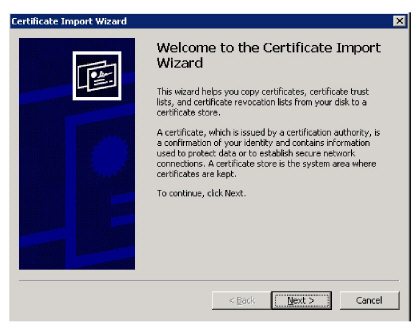
2.Click on Install Certificate to launch to certificate wizard.
|
Caution: For all certificates, always ensure that you are on the proper web page, and confirm the issuer of the certificate for security purposes before proceeding with the installation. |
3.Click Next.
4.Enable Automatically select the certificate store based on the type of certificate then click Next.
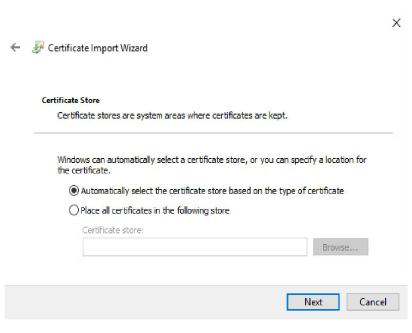
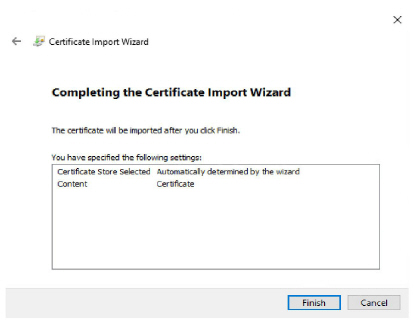
5.Confirm that the information is correct, then click Finish.
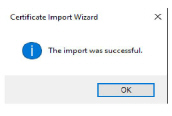
6.The following popup confirms the import was successful.
Click OK.
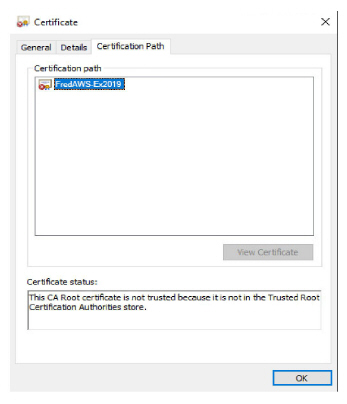
7.You will be able to confirm the status of the certificate through this window.
|
Note: Ensure that the domain server is also certified, not just the Exchange server. |
8.Depending on the security settings on the system, you may also see the following warning popup.
Click Yes to accept the certificate in this case.
The certificate configuration is now complete. Restart the servers to ensure that the services are properly initialized.
Once you have configured the IMAP CSE server with your mail server, you will be able to select the degree of synchronization from the Feature Group. Ensure that you verify all of the information so that users do not lose any calendar, contact or message data during synchronization.
|
Warning: As a precaution, backup the calendar and/or contact events of your users before proceeding with the contact and calendar synchronization. |
|
Note: If you did not install the Exchange MAPI component during the initial Messaging installation, you must do so manually now by running the ExchangeMapiCdo.msi file from MSExchange folder on Messaging installation DVD. This is a required component for contact and calendar synchronization. |
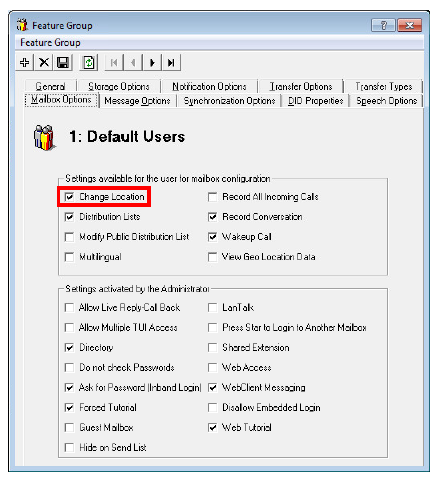
Feature Group configuration requires changes on two tabs; Synchronization Options and Mailbox Option. You can define exactly what is going to be synchronized for the users from these two sections.
From the Synchronization Options tab, you can specify which messages are going to be synchronized between the servers.
Enable Contacts if you wish to enable contact synchronization between the two servers.
To enable calendar synchronization, select Mail Server from the Calendar Mode dropdown menu.
The other fields, such as Inbox Folder, are used for message synchronization between the servers. Refer to the message integration section for details.
From the Mailbox Options tab, enable Change Location to allow an event on the mail server calendar to automatically change the UC location of the user.
By customizing these settings you can easily segregate calendar and contact synchronization along with message synchronization when enabling features for your users, allowing you to control exactly who has access to certain features.
Once calendar and contact synchronization has been enabled, all transactions occur on the server in the background, so you do not have to configure anything on your own. Use your mail server as you normally would, and any calendar or contact entries will now be mirrored in your Messaging mailbox as well.
The following is typical behavior for synchronization so that you can understand exactly how your calendar and contact entries are being handled by the servers.
|
Note: All of the calendar events and contacts from your mail server will be copied into your Messaging mailbox as soon as the administrator finishes configuring the systems. |
|
Note: Backup your calendar events and contacts periodically as a precaution. |
When you create a calendar entry in Outlook, or most other email programs, the same entry will appear in your Messaging mailbox.
The time and date of the meeting is automatically sent to the Messaging mailbox. By default, the location for these events will be marked as Meeting. You may change this manually through Web Access, or in the case of Outlook, you may utilize the iLink Pro Desktop tool bar to assign a specific location to the event.

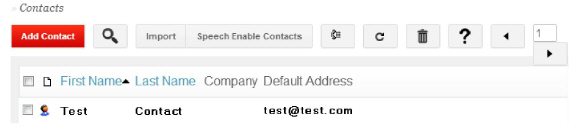
When you create a contact entry from Outlook, the entry will be copied into your Messaging mailbox.
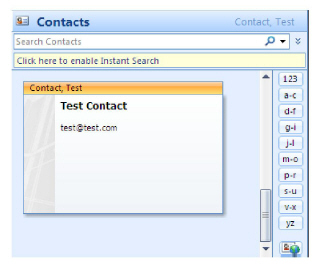
Contact information is automatically sent to the Messaging mailbox.
|
Caution: Deleting contacts is also synchronized. If you delete an entry from Outlook, it will also be deleted from Messaging, and vice versa. |
MS Exchange Performance Considerations
Microsoft (http://support.microsoft.com/kb/905803) advises that a large numbers of items in folders can decrease the speed of operations in Exchange. This table shows the maximum number of files recommended per folder for optimum server performance.
|
Items in Folder |
Exchange 2003 |
Exchange 2007 |
Exchange 2003 |
|---|---|---|---|
|
Messages |
<5000 combined |
<20000 |
<100000 |
|
Contact and Calendar Entries |
<5000 |
<10000 |