Exchange 2019/2016/2013 Integration: Using EWS
Depending upon your site’s requirements and software, you have the option to integrate Avaya Messaging with several email systems. None of these are required. Where appropriate, refer to the chapter that best suites your requirements.
|
Chapter |
Integration |
Why you want it |
|---|---|---|
|
|
Creates a secure connection through OAuth2 to your Gmail and Google Apps accounts. |
|
|
Exchange using EWS |
The simplest connection between your Exchange server and IXM. |
|
|
Exchange without EWS |
A connection between Exchange and IXM for legacy systems. |
|
|
Exchange 2010 |
A connection between Exchange 2010 and IXM. |
|
|
Office 365 using Graph |
Setup the latest high security integration procedures for maximum data integrity. |
|
|
Office 365 using EWS |
Quick connection between your O365 server and IXM. |
Avaya Messaging and an Exchange server are able to integrate through the IMAPCSE and Exchange Web Services (EWS), providing a truly unified messaging experience. Once the configuration is complete the servers communicate and synchronize all data among themselves, eliminating the need for you to constantly manage multiple locations.
Each user’s Exchange credentials are stored within the Messaging mailbox, allowing the server to synchronize messages to and from the Exchange server. End users can manage their credentials through Web Access. Administrators may also manage credentials from the admin console.
The use of EWS for Exchange 2019 and 2016 is required since IMAP is no longer supported. When using Exchange 2013, the use of EWS is optional and follows the same procedures. This chapter may be applied to both versions.

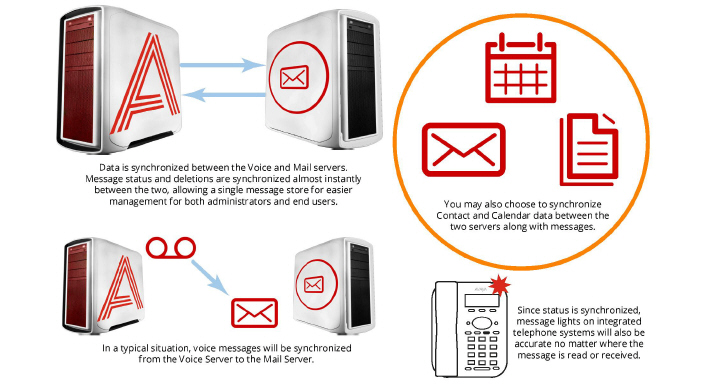
When a voice server integrates with an email server, the data between the two is synchronized, allowing for accurate information regardless of the point of access. Receiving messages, and any actions performed by the users is synchronized between the two servers constantly, ensuring that your content is always up-to-date.
Administrators can also customize what will be synchronized. A full synch includes contact and calendar entries along with messages. If the system has telephone and message light integration, MWI (message waiting lights) will also remain accurate since the status of messages are synchronized between the servers.
|
Requirements |
Details |
|---|---|
|
License |
IMAPCSE License |
|
Software |
Messaging version 10.5 or higher |
Server configuration requires the creation of a superuser account from the active directory that has the necessary permissions within the Exchange console. Once the account has been made, it must be added to the voice server configuration, and the channel of communication between the two servers must be established.
Your Exchange server must also have Exchange Web Services (EWS) enabled in order for Messaging to communicate properly.
You must have a corporate Exchange server, either locally on virtually, configured and operating before proceeding.
|
Caution: Exchange 2019 and 2016 do not support non-EWS connections. Only EWS can be used. |
Exchange Superuser Creation/Configuration
Once the superuser account is ready on Active Directory, create a mailbox for that user in the Exchange environment.
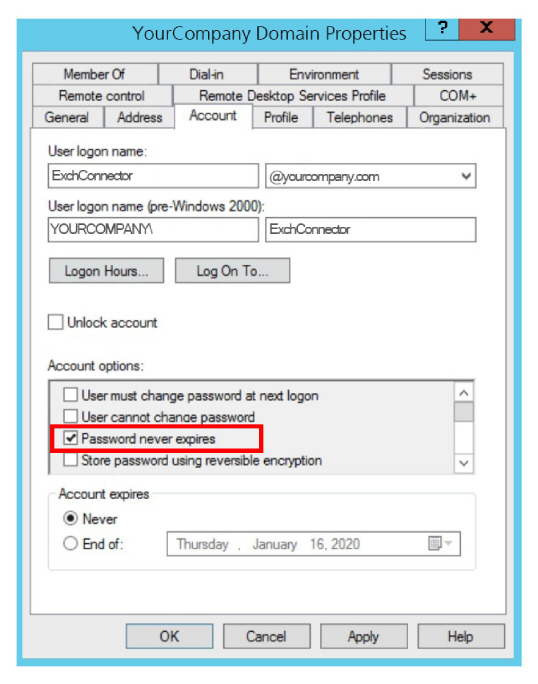
1.As an administrator, create a new user on your network using Active Directory. Configure any Organizational Units or company policies as required. This user MUST have Password never expires enabled.
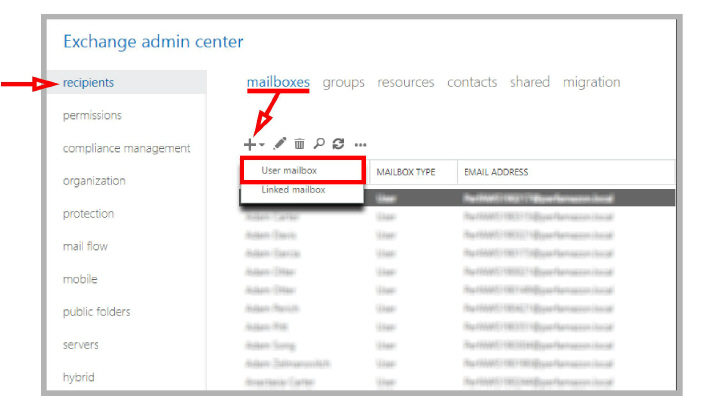
2.Open the Exchange admin center in a browser (e.g. https://IPaddressOfExchangeServer/ecp). Login with the Exchange admin credentials. Go to the recipients menu at the mailboxes tab. Click New ![]() . Select User mailbox.
. Select User mailbox.
3.Enable Existing user. Click browse and select the user created in step 1. Provide a human friendly Alias to refer to this user.
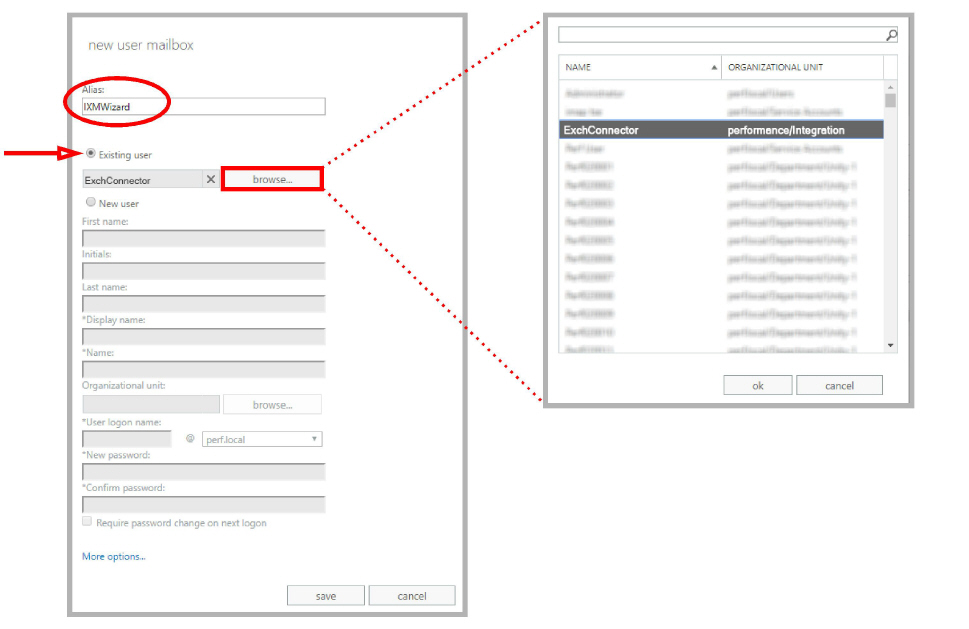
When ready, click Save.
4.In the left-hand panel, select permissions. Under the admin roles tab, click New ![]() .
.
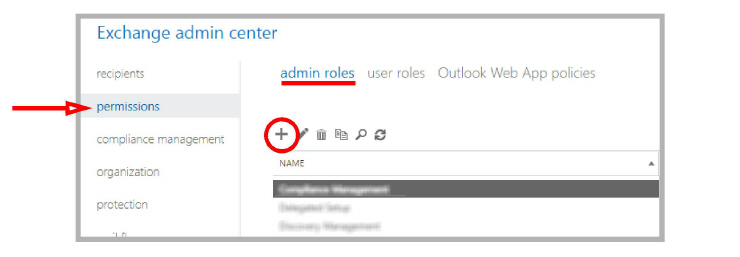
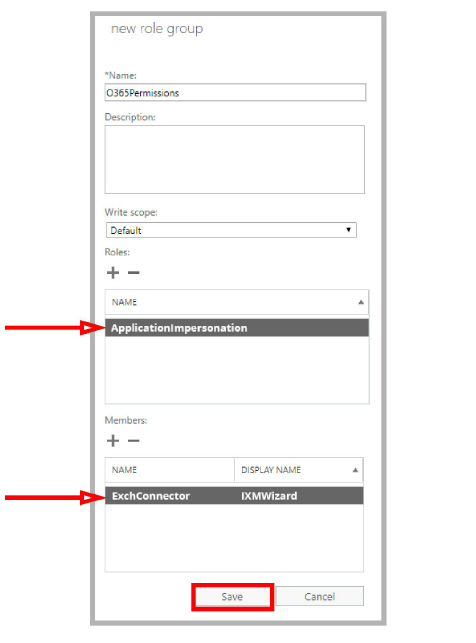
5.Give the Role a name (a Description is optional). Beside Roles, click Add ![]() .
.
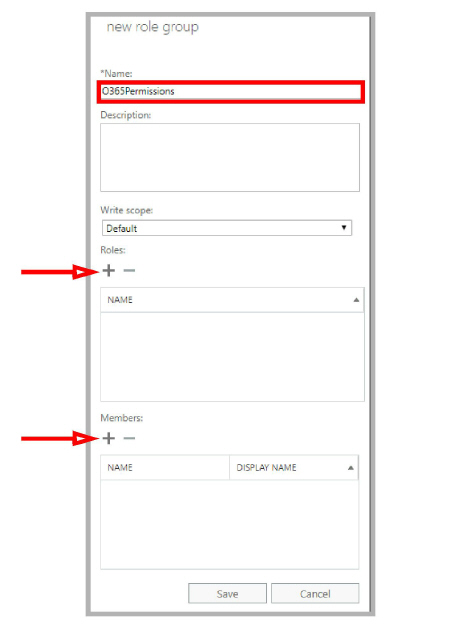
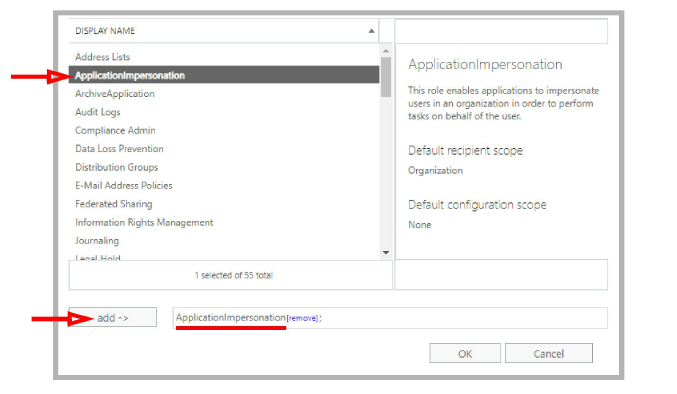
6.Select ApplicationImpersonation and click add ->. Click OK.
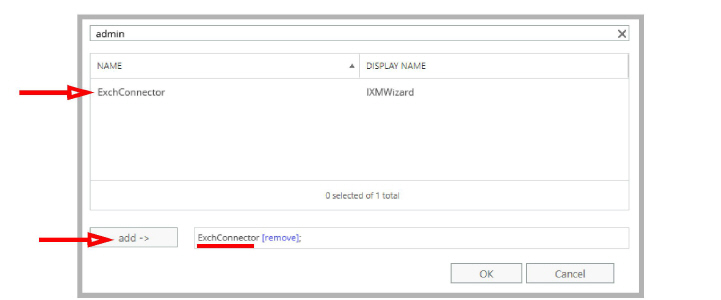
7.Below Members, click Add ![]() . Locate the account you just created, select it and click add ->. Click OK.
. Locate the account you just created, select it and click add ->. Click OK.
8.Returning to the new role group pane, click Save.
Confirm that the new role appears in the list.
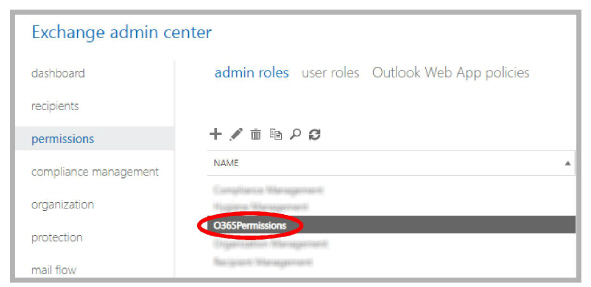
The new account has been created.
For Messaging and Exchange to be able to synchronize data, Messaging must be able to communicate with the Exchange server using the correct credentials. The superuser account streamlines this process while still enforcing individual password security protocols on each mailbox.
Adding the CSE Endpoint for EWS
In order for the Messaging server to recognize the Exchange server, you must configure a CSE Endpoint entry in the IXM Admin > TSE IMAP Server section to use the EWS server. A entry should already be present in IXM Admin based upon the choice of email client you made during installation.
|
Note: TSE is the previous name for CSE services. |
Double-click the server, or right-click and create a new one.
IMAP Server Name: This name is for your reference and does impact system performance.
IMAP Server Address: Enter the IP address of the EWS server. The address MUST be prefixed with ews: (all lower case, with a colon).
IMAP Server Port: Set this to the port number of the EWS server. The default is 993.
Voice Format: Select the voice format used when sending voice messages to external voice servers.
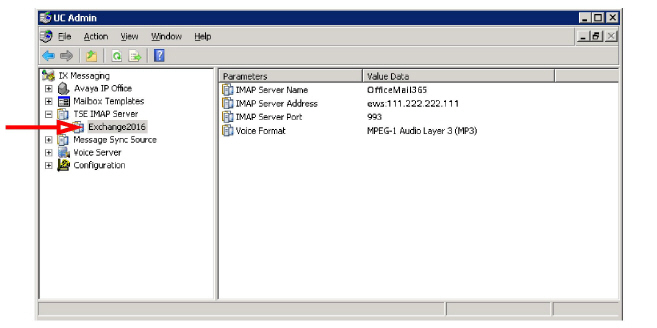
Feature Group Configuration
Once the TSE IMAP Server entry has been created, go to Feature Group > Synchronization Options and modify the Office 365 user mailboxes as follows:
IMAP Account: Enter the user/service account created in step 3 above. Include the complete [email protected] (e.g. [email protected]).
Account / Confirm Password: Enter the super user/service account password from step 3.
IMAP Server: Type in the name of the IMAP TSE Server created in the previous step (e.g. OfficeMail365).
Calendar Mode: If calendar synchronization is required, select Sync with Mail Server Calendar from the dropdown menu. Otherwise, select None.
Synchronization Settings: Set these options to specify which information will be synchronized between servers.
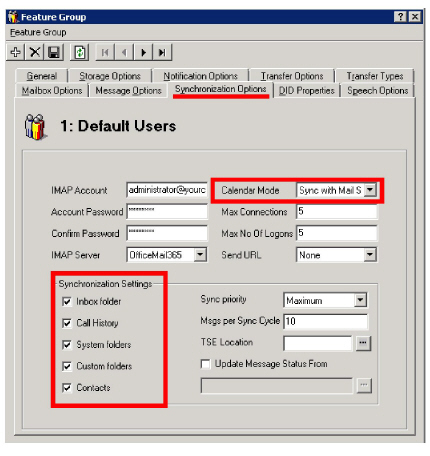
Save all changes.
Individual Mailbox Configuration
With the superuser account, you do not have to enter the individual mailbox credentials for CSE synchronization.
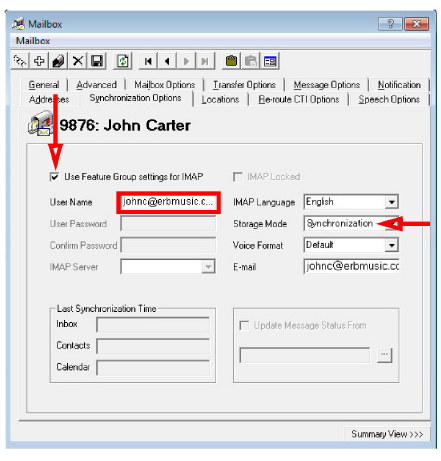
Enable Use Feature Group settings for IMAP then enter the
User Name in the format [email protected]. Set the Storage Mode to Synchronization.
|
Note: The user must be a Messaging & Collab or Messaging user to utilize synchronization. |
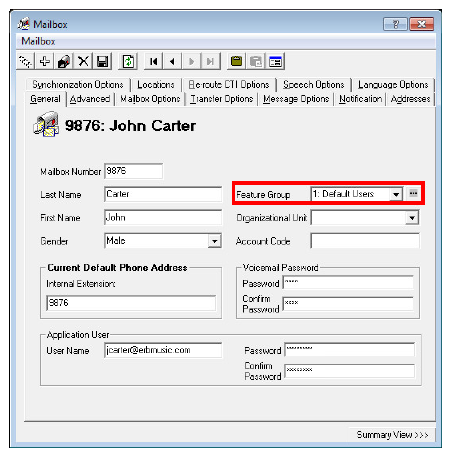
Assign the mailbox to the Feature Group that is going to have the superuser account credentials.
Save all changes and move onto Feature Group Configuration.
Certificate Configuration
In order to ensure that the communication between Messaging and the Exchange server is not interrupted by security measures, install the certificate from the Exchange server computer on the Messaging voice server. For a site using High Availability, install the certificate on the Consolidated Server, and on all Remote CSE servers.
The simplest way to achieve this is to access the OWA (Outlook Web App) web page for Exchange on the voice server.
|
Note: This procedure may vary depending on the way in which you have the domain servers configured. The goal of this process is to add the Exchange server as a trusted PC on the Messaging server computer, which can be accomplished manually by the system administrator. |
1.Open the Internet Explorer web browser, then navigate to your company’s OWA web page
(e.g. https://111.222.1.0/owa).
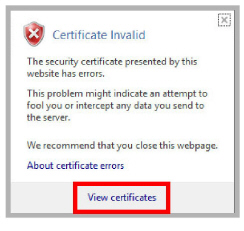
2.In the title bar, click the certificate error tab.

3.Click View certificates.
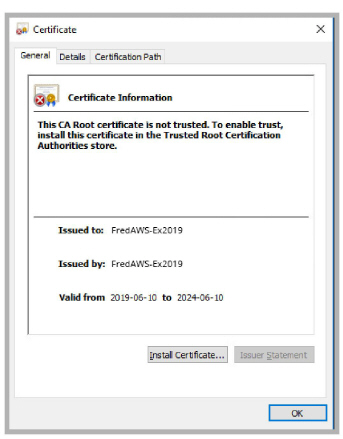
4.Click Install Certificate to launch to certificate wizard.
|
Caution: For all certificates, always ensure that you are on the proper web page, and confirm the issuer of the certificate for security purposes before proceeding with the installation. |
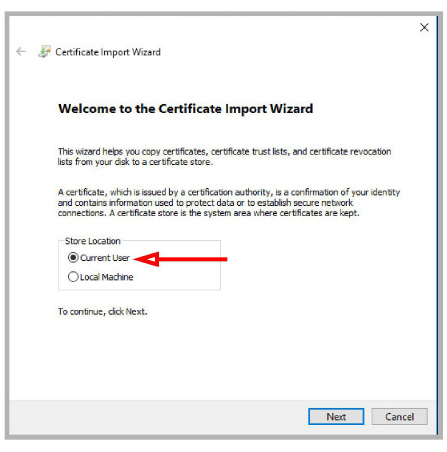
5.Enable Current User and click Next.
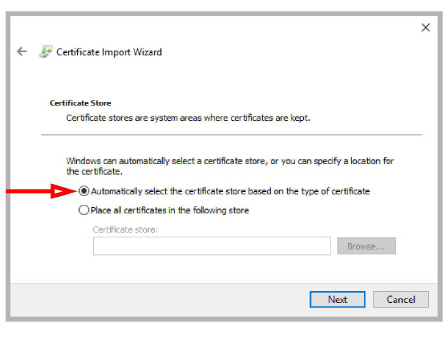
6.Enable Automatically select the certificate store based on the type of certificate then click Next.
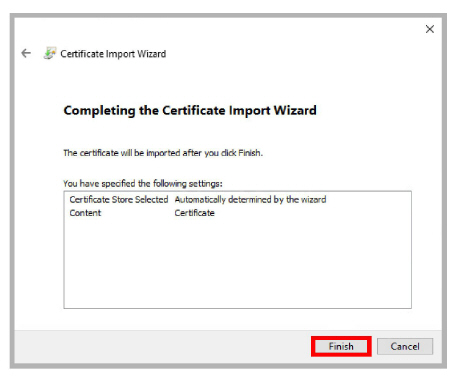
7.Confirm that the information is correct, then click Finish.
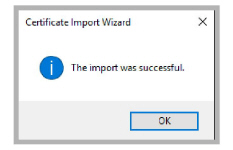
8.The following popup confirms the import was successful.
Click OK.
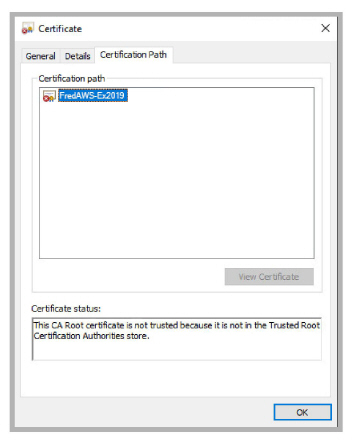
9.You will be able to confirm the status of the certificate through this window.
|
Note: Ensure that the domain server is also certified, not just the Exchange server. |
The certificate configuration is now complete. Restart the servers to ensure that the services are properly initialized.
Once you have configured the IMAP CSE server with your mail server, you will be able to select the degree of synchronization from the Feature Group. Ensure that you verify all of the information so that users do not lose any calendar, contact or message data during synchronization.
|
Warning: As a precaution, backup the calendar and/or contact events of your users before proceeding with the contact and calendar synchronization. |
Windows Configuration
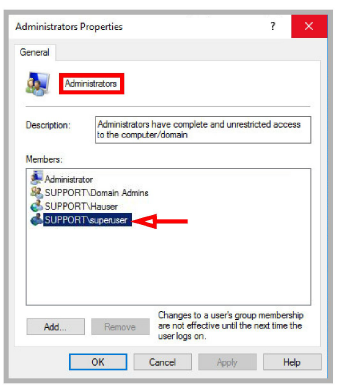
The Superuser account must be configured as a local administrator on the voice server computer.
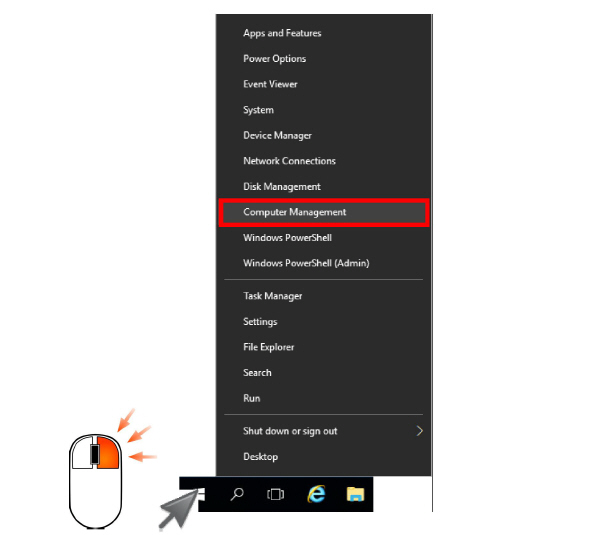
1.In Windows, right-click the Start menu and choose Computer Management.
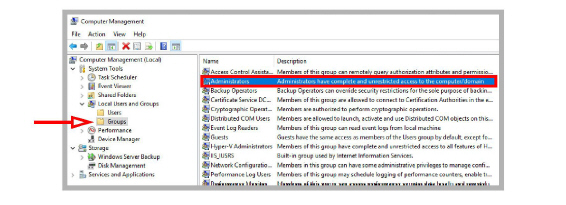
2.Go to System Tools > Local Users and Groups > Groups. Double-click Administrators.
3.Ensure that the Superuser account created has the proper permissions on the Windows environment.
4.The UC CSE PIM Synchronization Engine service must login and run with the Superuser credentials.
Open the Computer Management console and select Services.

5.Right-click the service and select Properties.
Go to the Log On tab, and enable This Account.
Enter the username and password for the superuser account in the spaces provided.
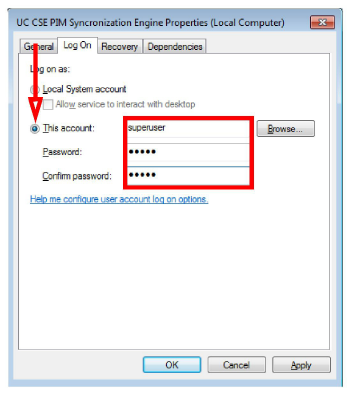
Click Apply and OK when finished.
6.Restart the service.
Messaging Configuration - Feature Group
Feature Group configuration requires changes on two tabs; Synchronization Options and Mailbox Options. You can define exactly what is going to be synchronized for the users from these two sections.
From the Synchronization Options tab, you can specify which messages are going to be synchronized between the servers.
Enable Contacts if you wish to enable contact synchronization between the two servers.
To enable calendar synchronization, select Sync with Mail Server from the Calendar Mode dropdown menu.
The other fields, such as Inbox Folder, are used for message synchronization between the servers. Refer to the message integration section for details.
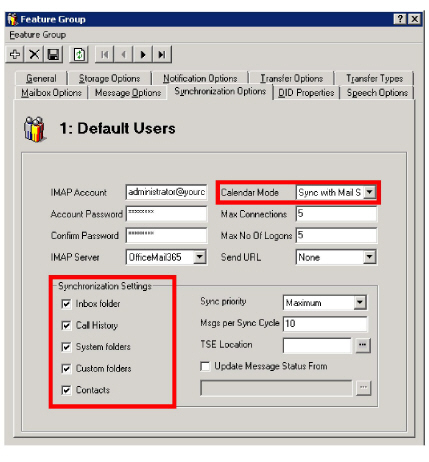
From the Mailbox Options tab, enable Change Location to allow an event on the mail server calendar to automatically change the UC location of the user.
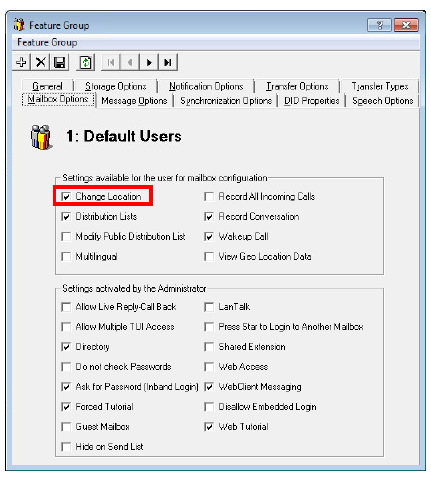
By customizing these settings you can easily segregate calendar and contact synchronization along with message synchronization when enabling features for your users, allowing you to control exactly who has access to certain features.
Once calendar and contact synchronization has been enabled, all transactions occur on the server in the background, so you do not have to configure anything on your own. Use your mail server as you normally would, and any calendar or contact entries will now be mirrored in your Messaging mailbox as well.
The following is typical behavior for synchronization so that you can understand exactly how your calendar and contact entries are being handled by the servers.
|
Note: All of the calendar events and contacts from your mail server will be copied into your Messaging mailbox as soon as the administrator finishes configuring the systems. |
|
Note: Backup your calendar events and contacts periodically as a precaution. |
When you create a calendar entry in Outlook, or most other email programs, the same entry will appear in your Messaging mailbox.
The time and date of the meeting is automatically sent to the Messaging mailbox. By default, the location for these events will be marked as Meeting. You may change this manually through Web Access, or in the case of Outlook, you may utilize the iLink Pro Desktop tool bar to assign a specific location to the event.
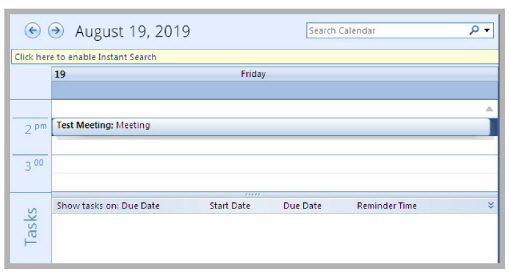
When you create a contact entry from Outlook, the entry will be copied into your Messaging mailbox.
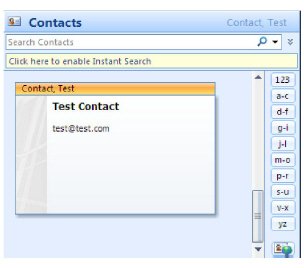
Contact information is automatically sent to the Messaging mailbox.

|
Caution: Deleting contacts is also synchronized. If you delete an entry from Outlook, it will also be deleted from Messaging, and vice versa. |
Synchronization Limits
When using EWS with Exchange, message synchronization is one-way only, from Avaya Messaging to Exchange. Any messages created using Messaging will appear in Exchange, whereas messages created in Exchange will not appear in Messaging.
Message synchronization can place a significant burden on the voice servers which can lead to delays. Changes may take some time to be appear on the other side.
MS Exchange Performance Considerations
Be aware that large numbers of items in folders can decrease the speed of operations in Exchange. This table shows the maximum number of files recommended per folder for optimum server performance.
|
Items in Folder |
Exchange 2007 |
Exchange 2013 |
Exchange 2016 |
|---|---|---|---|
|
Messages |
<20000 |
<100000 |
<100000 |
|
Contact and Calendar Entries |
<5000 |
<10000 |
<10000 |