While most business interactions occur digitally, faxing still remains a required feature for many people. This is especially true when thee are technical limitations or legal requirements involved. Rather than having to purchase a fax machine to handle this traffic, UC users can conveniently send faxes from their computer desktop digitally through the Messaging server with the proper license and feature set enabled.
The fax may be sent out from your computer through these methods:
•Windows Fax Services: Send virtually any item as a fax as long as the software you are using to view the document or image supports printing. You can send any content as a fax by printing it through the fax services integrated with Messaging. However, this method requires some advanced configuration.
Refer to Fax via Windows Fax Services (Windows 7) on page 342 or Fax via Windows Fax Services (Windows XP) on page 353 for more information.
•Email Client: The advantage of this method is being able to send a fax from anywhere there is access to email client. No additional configuration is required. Whether it is a web-based or a dedicated client, you can send a fax through the Messaging server as long as there is access to email. However, you can only send files types that are supported by the server. If the server does not recognize a certain type of file (i.e. docx, pdf), the fax request will fail.
Refer to Email to Fax on page 361 for more information.
•Fax Gadget: This method is similar to the email client but has been streamlined for use with the Web Access interface, either accessed directly or through client applications such as UC Web Gadget.
Refer to Sending a Fax through Fax Gadget on page 364 for more information.
Fax via Windows Fax Services (Windows 7)
Please follow these steps to configure your client machine with the Windows Fax services.
|
Warning: This configuration must take place before installing iLink Pro Desktop. If iPD has already been installed, remove it, enable fax services, then reinstall the application. |
|
Warning: Only TIFF and TXT formats are supported by default. To send a fax in any other format, the computer must have the necessary program installed to support that file type (i.e. MicroSoft Office for doc and docx files, Acrobat Reader 9 (available on the Messaging DVD) or earlier for pdf, etc.). Ensure that this software is installed and working (run at least once) before attempting to send a fax using that format. |
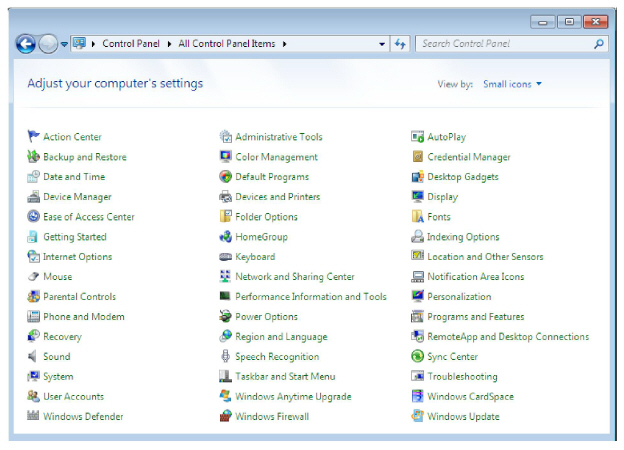
1.Launch the Programs and Features application within Control Panel.
|
Note: Change your viewing style to icons to view the list of applications instead of categories. |

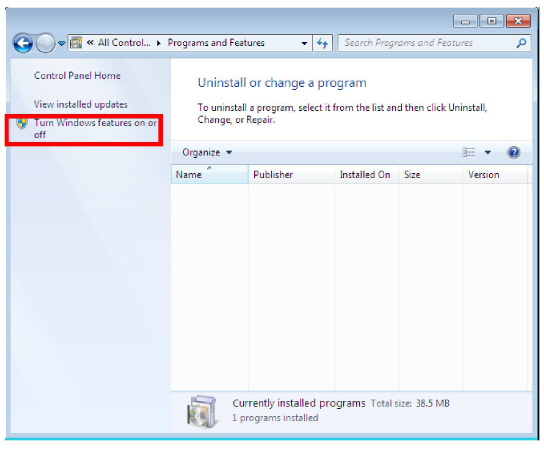
2.Click on the Turn Windows features on or off link on the left-hand pane.
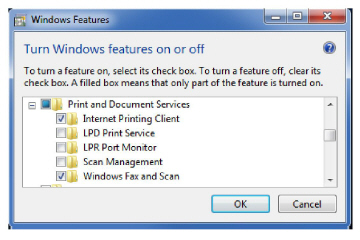
3.From the feature window, enable the following features.
Print and Document Services
•Internet Printing Client
•Windows Fax and Scan
Click OK when you’re done.
|
Note: If these services are already installed on your computer, skip to step 6. |
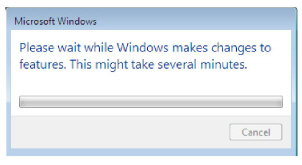
4.Windows will start to add the selected components. This process may take a while.
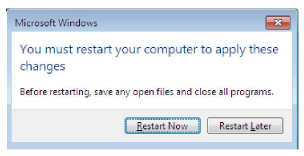
5.If you are asked to restart your computer, click Restart Now to reboot.
6.Once the computer has restarted, install iLink Pro Desktop.
Refer to the Client Applications Guide for more information.
7.When iLink Pro Desktop has been installed, go to
Start > Programs and launch
Windows Fax and Scan.

8.Go to Tools > Fax Settings...

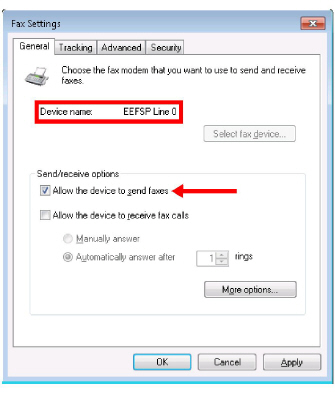
9.From the General tab, confirm that the Device name is EEFSP.
If it is not, click on Select fax device... and choose it from the list.
You must also make sure that Allow this device to send faxes is enabled. Allow the device to receive fax calls should be disabled since faxes are received through the Messaging server. Only enable this checkbox if you have a specific reason to do so.
Click OK to save your changes.
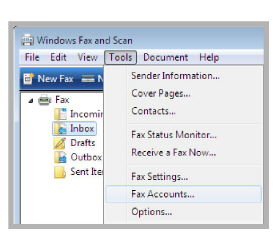
10.Open Tools > Fax Accounts...
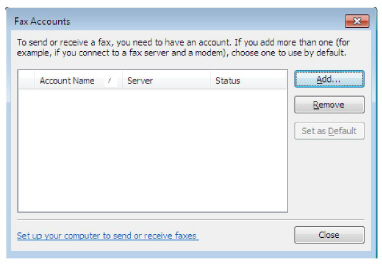
11.Click the Add... button.
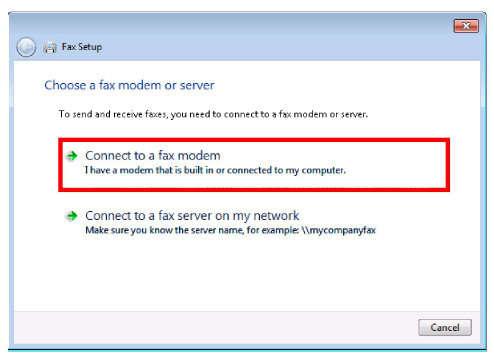
12.Select the Connect to a fax modem option.
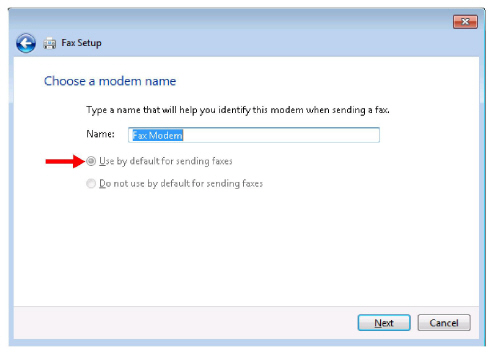
13.Give the connection a name. You may leave it at the default value, or change it according to your preference.
In most cases this item should be the only device configured on your computer. If not, please ensure that
Use by default for sending faxes radio button is enabled before continuing.
Click Next when ready.
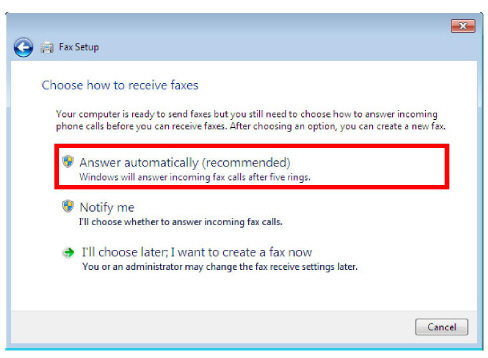
14.Choose the Answer automatically (recommended) option.
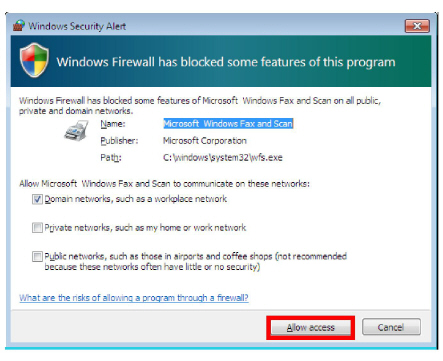
15.If you are prompted regarding your Firewall, click to
Allow access at the bottom of the window.
Your computer is now ready to send fax messages.
|
Note: Keep in mind that you must be logged into iLink Pro Desktop to send faxes. |
Sending Fax from an Application
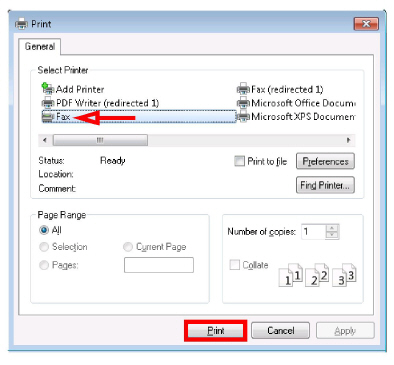
Once your computer is configured for faxing, you can send faxes from any application that can print using the Windows printing tool. To send a fax, select Print from the application of your choice (e.g. Microsoft Office Word, Adobe Acrobat). The Print windows appears.
Select Fax as the print device, then click Print.
|
Note: You must be logged into iLink Pro Desktop in order to send a fax. |
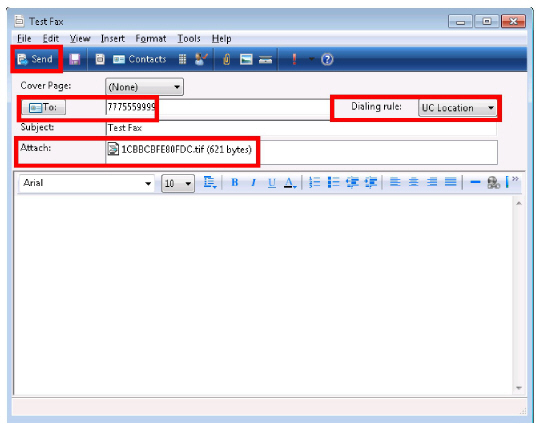
A new window will open to define the destination and any other components required for the fax.
The document being sent as a fax will appear as an attachment.
Ensure that you enter the correct fax number on the To: field.
Set the Dialing rule to UC Location.
All other fields, such as Cover Page, Subject and Body are optional fields which you can utilize to customize your fax message.
When you are ready to send the fax, click the Send button.
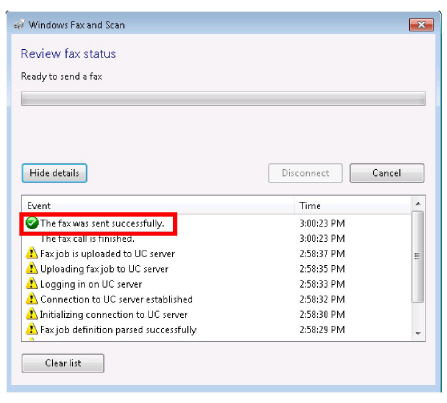
The Fax status window will appear to notify you of the fax’s status. Once transmission has completed successfully, you will be notified here.
If the fax fails for any reason, the details will be shown here. Consult with your system administrator if you are having trouble sending faxes.
|
Note: You can track of all your outgoing faxes from the Windows Fax and Scan application available on the Start menu. |
Fax via Windows Fax Services (Windows XP)
Please follow the below steps to configure your client machine for use with Windows Fax services.
|
Warning: This configuration must take place before installing iLink Pro Desktop. If iPD has already been installed, remove it, enable fax services, then reinstall the application. |
|
Warning: Only TIFF and TXT formats are supported by default. To send a fax in any other format, the computer must have the necessary program installed to support that file type (i.e. MicroSoft Office for doc and docx files, Acrobat Reader 9 (available on the Messaging DVD) or earlier for pdf, etc.). Ensure that this software is installed and working (run at least once) before attempting to send a fax using that format. |
1.Go to Start > Settings > Control Panel. Double-click Add/Remove Programs.
2.Select Add/Remove Windows Components.
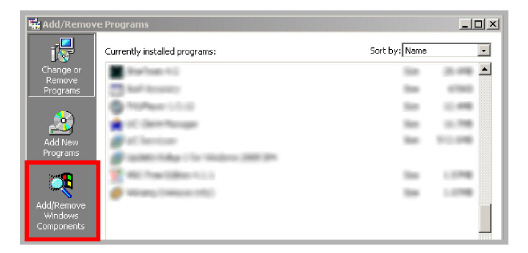
3.Enable Fax Services. Click Next.
|
Note: You may be asked to provide a Windows installation disc depending on the computer settings. |
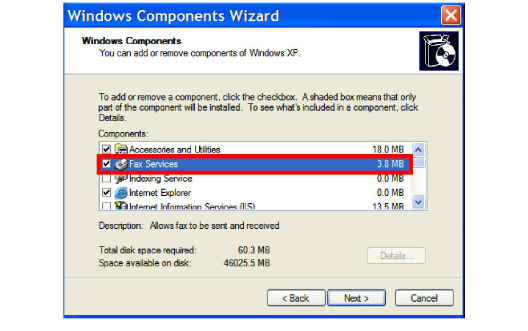
4.Once the process is complete, you will have the ability to send faxes from your desktop.
Sending Fax from an Application
1.Open the document or image that will be sent as a fax.
2.Print the item. This is normally under the File > Print menu.
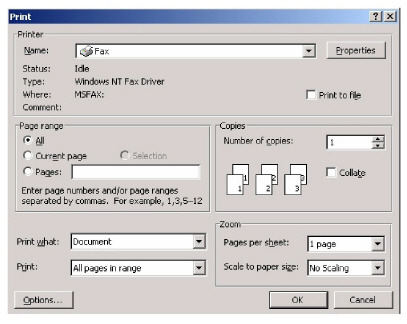
3.When the print dialogue appears, select fax as the print device.
Click OK.
4.The Send Fax Wizard screen appears:
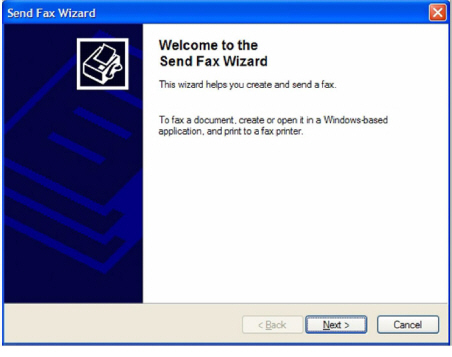
5.Click Next. The Recipient Information screen appears:
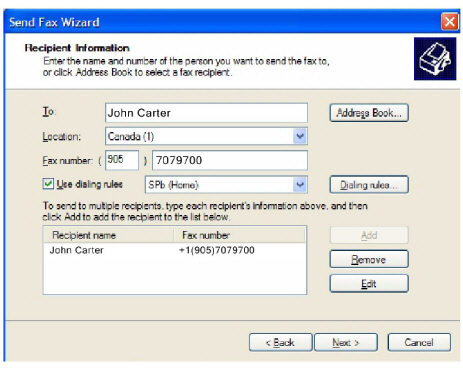
6.Specify the following:
•In the To field, enter the name of the intended recipient.
|
Hint: Click the Address Book button to select a recipient from your personal address book. |
•From the Location dropdown list, select the location (country) of the intended
recipient.
•In the Fax number fields, specify the fax area code and number for the intended
recipient.
•Enable Use dialing rules if you want specific dialing rules to apply. Select the dialing rules from the accompanying dropdown list.
|
Note: To create a new set of dialing rules, click on the Dialing rules button. |
7.Click on the Add button to add the recipient whose information you have just specified.
|
Note: You can add as many recipients as you wish. |
8.Click Next when you have added all desired recipients. The Preparing the Cover Page screen appears:
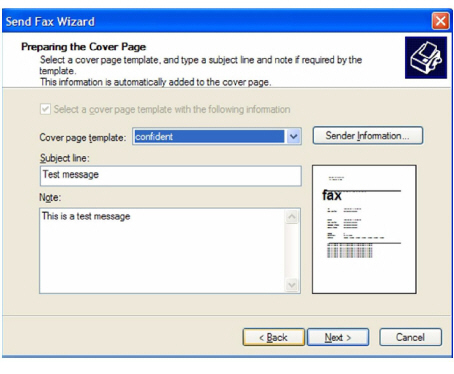
9.From the Cover page template dropdown list, select the cover page template you want to use.
10.In the Subject line field, enter subject text for the fax cover page.
11.In the Note box, enter message text for the fax cover page.
12.Click Next. The Schedule screen appears:
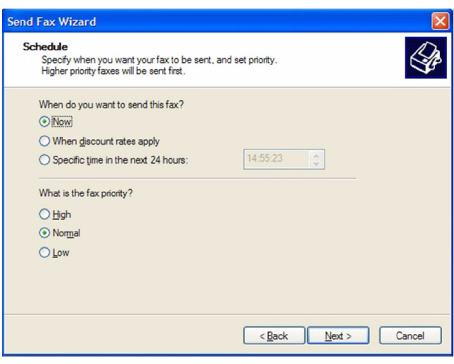
13.Select one of the When do you want to send this fax? radio buttons:
Now - send the fax immediately
When discount rates apply - send the fax the next time discount phone rates apply
Specific time in the next 24 hours - send the fax at a specific time in the next 24 hours. If you select this radio button, you must then specify a time of day from the accompanying spin-box
14.Select one of the following What is the fax priority? radio buttons:
High - high priority for sending fax
Normal - normal priority for sending fax
Low - low priority for sending fax
15.Click Next. The following screen appears:
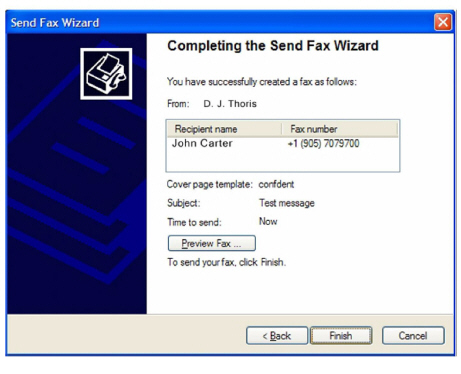
16.If you want to preview your fax, click on the Preview Fax button. Otherwise, click Finish.
|
Hint: To confirm that your fax was sent successfully, check the Sent Items folder of your Fax Console application. |
1.Select Start > All Programs > Accessories > Communications > Fax > Fax Console.

2.In the left hand pane, click to expand Fax. The following list describes the folders under Fax:
•The Incoming folder contains faxes that are currently being received.
•The Inbox folder contains faxes that have been received.
•The Outbox folder contains faxes that are scheduled to be sent.
•The Sent Items folder contains faxes that have been successfully sent.
3.In the left hand pane, highlight a folder.
4.In the right hand pane right click on the fax you want and select Properties.
5.On the General tab, check the status of the fax under Status.
|
Note: If an item is in the Outbox folder, then the fax attempt has failed. Until all retries have been exhausted, Status will read Pending. If all retries have been exhausted, Status will read Failed. |
1.Select Start > All Programs > Accessories > Communications > Fax > Fax Console. The Fax Console detects incoming faxes and stores them in your inbox.
2.To view a fax click Inbox, then double click on the fax you want to view.
You can cancel any fax you have set up to be sent at a future time.
1.If Fax is not open, select Start > All Programs > Accessories > Communications > Fax > Fax Console. The Fax Console appears.
2.To cancel a fax click Outbox, then right click on the fax you want to cancel.
3.Click Delete to cancel the fax.
4.Click Yes.
You can set up Fax so that it continues trying to send your fax if the receiving fax machine is busy.
|
Note: Fax is automatically set up to retry three (3) times at 10-minute intervals. |
1.Select Start > Control Panel. The Control Panel appears.
2.If your Control Panel is in Category View, click Printers and Other Hardware. Click View installed printers or fax printers. The Printers and Faxes screen appears.
OR
If your Control Panel is in Classic View, double-click the Printers and Faxes icon. The Printers and Faxes screen appears.
3.Right click Fax and select Properties. The Fax Properties dialogue box opens.
4.Click the Devices tab, then Properties. The Modem dialogue box opens.
5.Specify the number of retries and the amount of time between retries.
6.Click OK.
If your PC tried to send a fax and failed to connect to a fax machine, you can automatically cancel a failed fax.
1.Select Start > Control Panel. The Control Panel appears.
2.If your Control Panel is in Category View, click Printers and Other Hardware. Click View installed printers or fax printers. The Printers and Faxes screen appears.
OR,
If your Control Panel is in Classic View, double-click the Printers and Faxes icon. The Printers and Faxes screen appears.
3.Right click Fax and select Properties. The Fax Properties dialogue box opens.
4.Click the Devices tab, then click Properties. The Modem dialogue box opens.
5.Click the Cleanup tab.
6.Click to check Automatically delete failed faxes after and specify the number of days.
|
Note: The example shown in this guide uses Gmail. However, this process can be repeated with virtually any email client including web based email, MS Office 365, and MS Exchange. |
Email to Fax requires no user-end configuration. The only requirement is that the fax email is sent to the correct domain using the correct format.
|
Warning: Only TIFF and TXT formats are supported by default. To send a fax in any other format, the computer must have the necessary program installed to support that file type (i.e. MicroSoft Office for doc and docx files, Acrobat Reader 9 (available on the Messaging DVD) or earlier for pdf, etc.). Ensure that this software is installed and working (run at least once) before attempting to send a fax using that format. |
•The network administrator must setup an MX Record that points vpim.yourcompany.com to the IX Messaging voice server (or the Consolidated Server in an HA environment).
•Send URL must be configured and activated on the voice server (see the Security Enhancements chapter in Avaya’s Server Configuration Guide).
•SMTP port 25 needs to be opened on any firewall or security services.
•An active email account and client are also required.
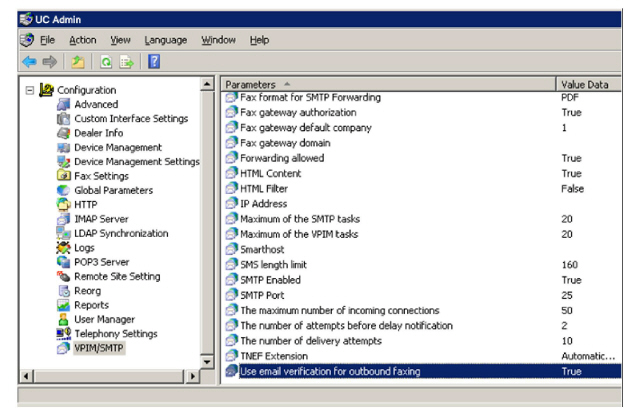
•Under Messaging Admin>Configuration>VPIM/SMTP, set Use email verification for outbound faxing to True.
Create a new email message. In the To... field, type fax= followed by the number of the destination fax machine at(@) your company’s server. For example, [email protected].
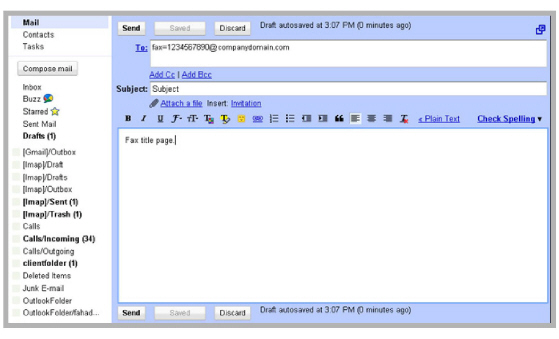
The Subject line and the email message body will be included with the fax as a cover page.
Include the main body of the fax as an attachment to the email.
|
Note: Only TIFF and TXT formats are supported by default. However, if the server has the appropriate programs installed, other formats can be used (PDF requires Acrobat 9 (available on the Messaging DVD), DOC / DOCX need MS Office). |
Send the email when you’re ready.
The message will be accepted by your server and processed into an outgoing fax job.
To prevent spam, once you have clicked the Send button, the Messaging Server will send you an email to confirm that the fax message is to be sent.
This email includes a link which you must click on to authorize the server to send the fax message. Click on the link.
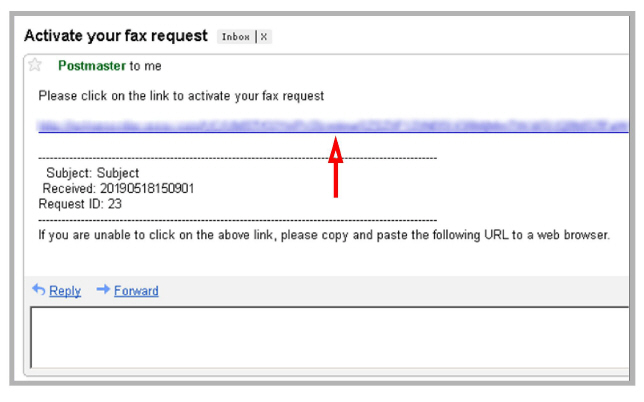
The system will respond with a message verifying that the fax has been queued for sending. The message status can now be tracked in the fax status report folders.

Sending a Fax through Fax Gadget
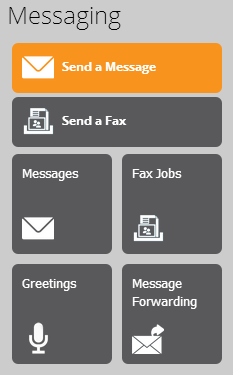
The Fax Gadget appears. This can be accessed through Web Access directly, or through a link from other web applications such as Avaya iLink Pro.
To send a fax, click Send a Fax.
|
Note: Send a Fax will only available if you have a fax board installed on the server to handle fax routing. Otherwise, faxes can be sent by clicking Send a Message and setting the outgoing address to FAX: followed by the fax number (e.g. fax:9057079700). |
On the To field, enter the fax destination number.
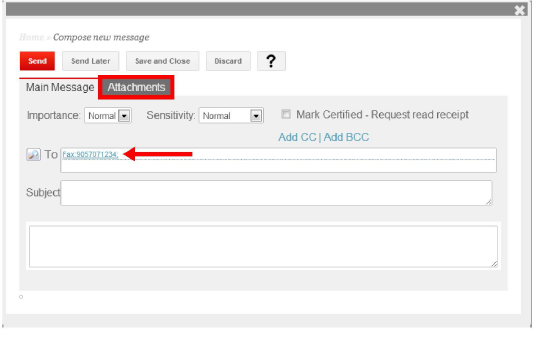
It is best to provide all numbers including both country and area code (e.g. 1-123-765-4321).
When you enter the full fax number on this field, the Fax Gadget will automatically add the Fax: qualifier to indicate that this is a fax message.
Click on the Attachments tab to add content to this fax message. Any attachments to the fax must be in the PDF or TIFF formats unless the UC server has been specifically setup to support other file types.
Click the Add button to open the menu shown here.
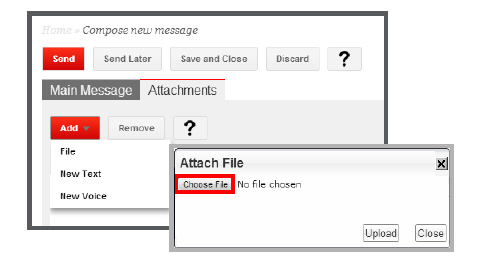
Select File from the menu and click Choose File... to browse for the file to be sent as the fax content.
Once the file has been chosen, click Upload.
The selected file will now be added as fax content.
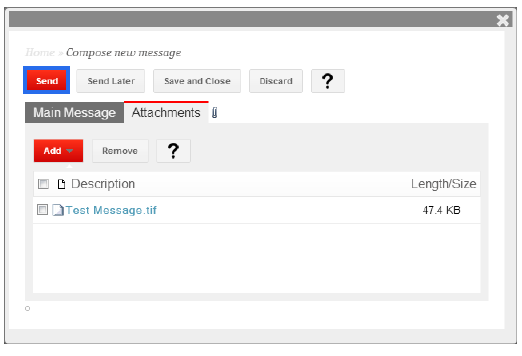
Click Send to transmit the fax immediately.
The fax message you’ve sent will now be listed under Fax Jobs. You will be able to easily check on the status of the fax to ensure that it has been sent out.
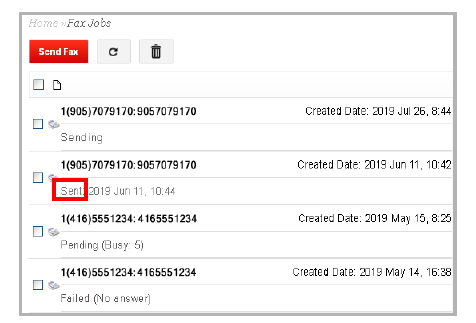
If the status doesn’t change to Sent within a reasonable amount of time, or if the fax message fails repeatedly, please contact your system administrator for help regarding the matter.
Whenever a fax message is sent or received by the UC server, an entry will appear in Admin > Fax Jobs so that the administrator can easily view and manage faxing. All fax jobs will appear in one of three folders and will be moved accordingly.
Outgoing: This folder contains the details of all faxes that are currently being sent that have neither finished nor failed.
Completed: This folder contains the details of all faxes that have been successfully sent.
Failed: This folder contains the details of all faxes that could not be sent. The system has stopped trying to send the fax.

Each of these folders contains the following information for each fax message:
Number: This field displays the job number assigned to the fax.
Sender: This field displays the individual who sent the fax.
Destination: This field displays the Mailbox number to which the fax is directed.
Status: This field displays the current status of the fax (Initial / Pending / Sending / Sent / Canceled / Failed-Busy / Failed-No Answer / Failed-Other / Failed).
Created: This field displays date and time the fax was sent.
Completed: This field displays date and time the transmission of the fax was completed.