Depending upon your site’s requirements and software, you have the option to integrate Avaya Messaging with several email systems. None of these are required. Where appropriate, refer to the chapter that best suites your requirements.
|
Chapter |
Integration |
Why you want it |
|---|---|---|
|
|
Creates a secure connection through OAuth2 to your Gmail and Google Apps accounts. |
|
|
Exchange using EWS |
The simplest connection between your Exchange server and IXM. |
|
|
Exchange without EWS |
A connection between Exchange and IXM for legacy systems. |
|
|
Exchange 2010 |
A connection between Exchange 2010 and IXM. |
|
|
Office 365 using Graph |
Setup the latest high security integration procedures for maximum data integrity. |
|
|
Office 365 using EWS |
Quick connection between your O365 server and IXM. |
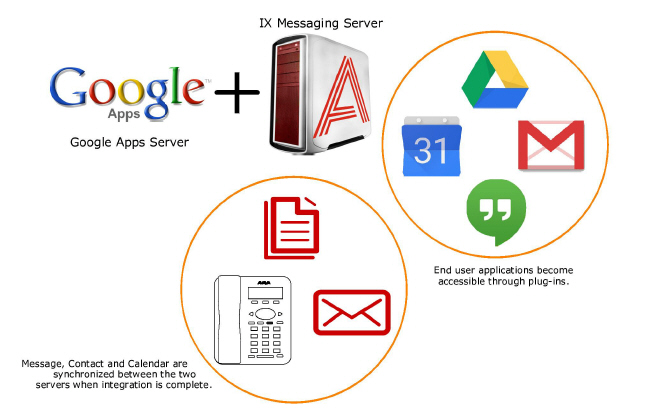
Avaya Messaging transforms the way you handle online communications. With Messaging you can access voice and IM communications, presence, click-to-call, location sharing and other communication tools inside the cloud applications you work in regularly like Gmail, Google Calendar, and other Google Apps.
Avaya Messaging also offers:
•Message Integration: Messaging can synchronize messages with Google Apps and Gmail servers, allowing users to access a single endpoint to manage all of their messages. All of the user’s email, voice and fax messages can be accessed through a single application through this integration. Users can listen to their Google email messages through the phone and to their voice messages from the web by logging into their Google account. Message synch is not bidirectional, so messages received directly in Google cannot be listened to in Messaging.
•Contact & Calendar Integration: Messaging can synchronize contact entries and calendar events with your Google Apps. Any entry that the user creates within Google will be automatically updated in Messaging. The reverse is also true. Any entry that the user creates within Messaging will be automatically updated in Google.
|
Note: Repeating events in Google calendar, such as a weekly meeting, will only be synchronized with Avaya Messaging out to 7 days ahead. Previewing beyond 7 days in advance will not show the recurring event in the calendar. |
By implementing these solutions, users gain access to many new features without substantially changing their work flow. This allows for an increase in productivity without extensive retraining.
Avaya Messaging can also forward incoming messages (voice, email, fax) to a Google Drive location making all of your communications available from anywhere in the world through the Internet.
|
Note: Integration with Google apps and other 3rd party applications and plug-ins may require additional licensing. |
Data synchronization between the Avaya Messaging servers and Google apps only occurs in the following directions.
|
ITEM SYNCHING |
FROM |
TO |
|---|---|---|
|
Inbox |
Messaging |
|
|
Contacts |
|
Messaging |
|
Messaging |
|
|
|
Calendar |
|
Messaging |
|
Messaging |
|
|
Requirements |
Details |
|---|---|
|
License |
--- |
|
Software |
Officelinx version 9.1 - 10.7 Messaging version 10.8 and higher |
Server configuration of Google Integration makes extensive use of CSE and CSE.PIM for message, contact and calendar synchronization. As long as the web server is able communicate properly with the worldwide web, users will be able to configure all of their gadgets and plug-ins on their own through the User Guide on page 111.
Client authentication and synchronization is handled using OAuth 2.0 and the Google API.
Install and configure OAuth2.0
OAuth 2.0 provides secure user authentication and is required for Gmail to access the messaging servers.
OAuth 2.0 Setup
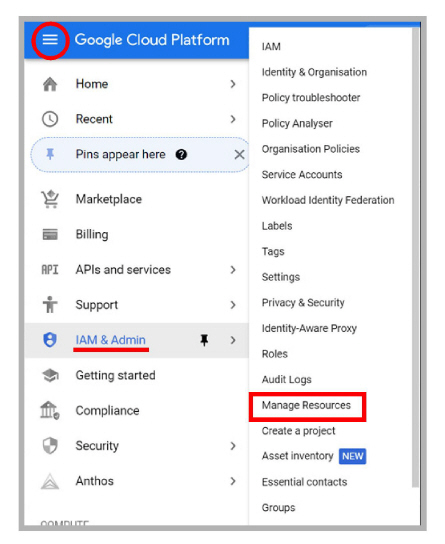
1.Open a web browser and go to https://console.developers.google.com. Login using your Google credentials.
2.Click the Navigation menu ![]() . Select IAM & Admin > Manage Resources.
. Select IAM & Admin > Manage Resources.
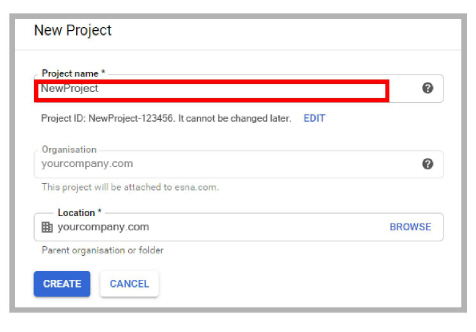
3.Click CREATE PROJECT.

4.Give the new project a name, then click Create.
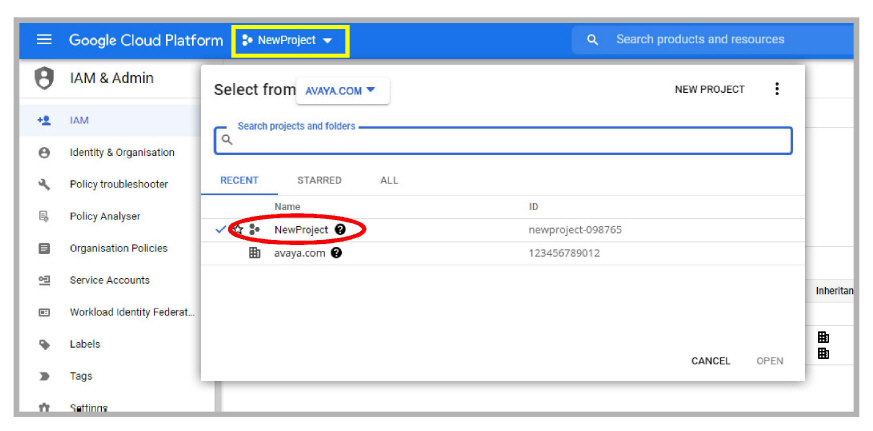
5.Open the navigation menu and select IAM & Admin > IAM. Ensure that the project you just created is chosen in the Select Project dropdown menu.
6.In the left-hand panel, select Service accounts. Click CREATE SERVICE ACCOUNT.
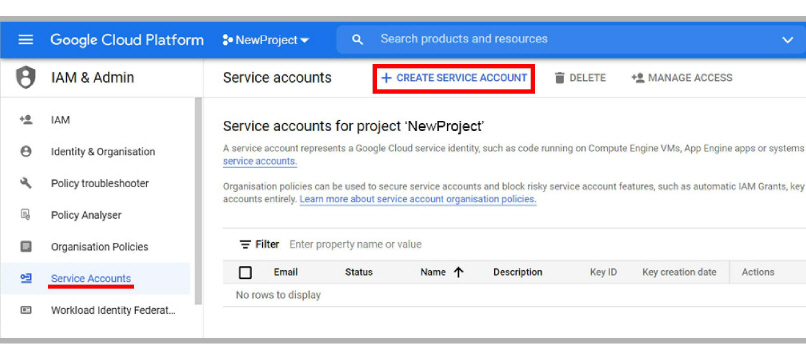
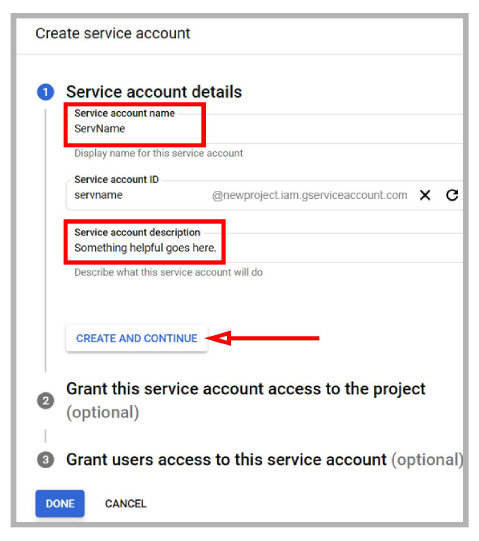
7.Give the account a name and a description, then click CREATE AND CONTINUE.
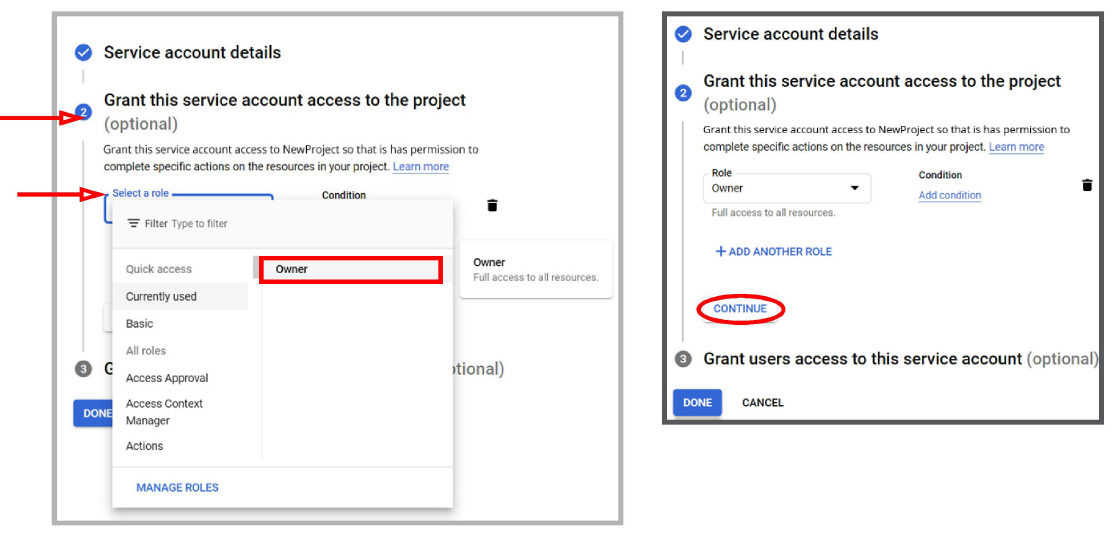
8.From the Select a role dropdown menu, choose Currently used > Owner. Click Continue then Done.
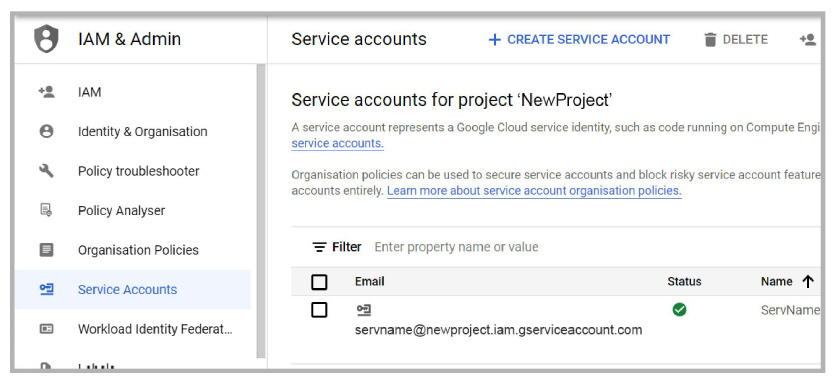
9.Click the name of the service account you just created.
10.Open the KEYS tab and click ADD KEY > Create new key. Enable the P12 option, and click CREATE.
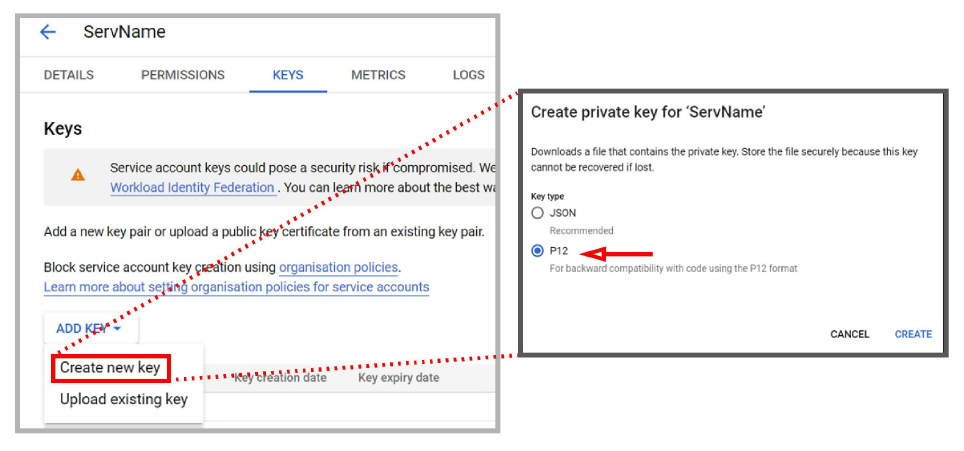
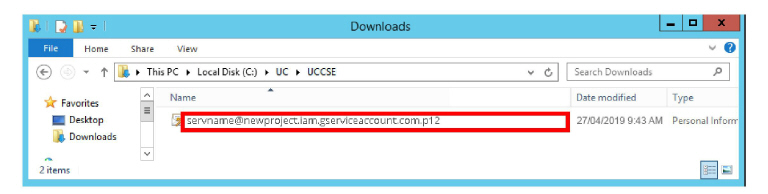
11.The private key file will be created with a .p12 extension. Make note of where the file is saved (i.e. the Downloads folder).
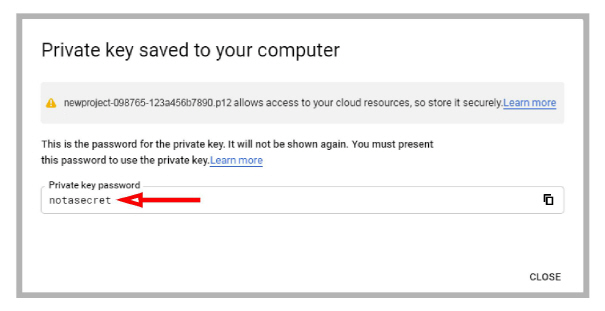
Copy the file to both the C:\UC\UCCSE and C:\UC\IMAPTSE folders.
(Change the path accordingly if your program is installed on a different drive.)
12.Record the Private key password (notasecret) and click CLOSE.
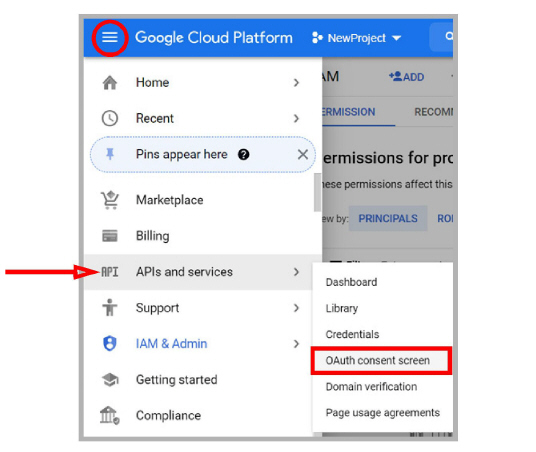
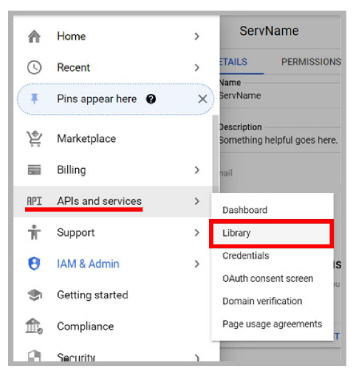
13.Open the Navigation Menu and select APIs and services. Click OAuth consent screen.
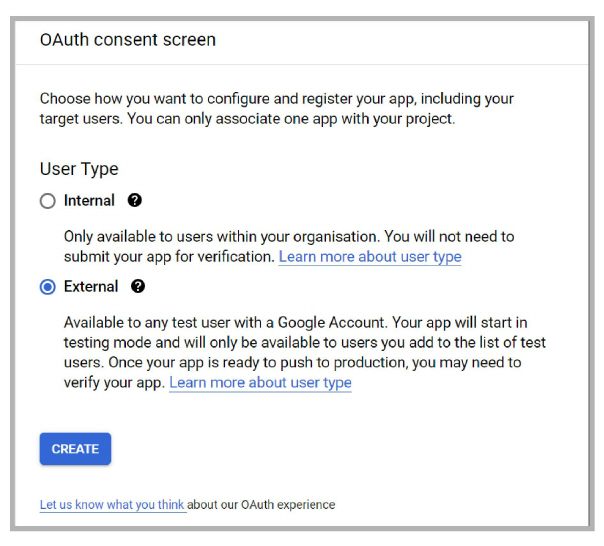
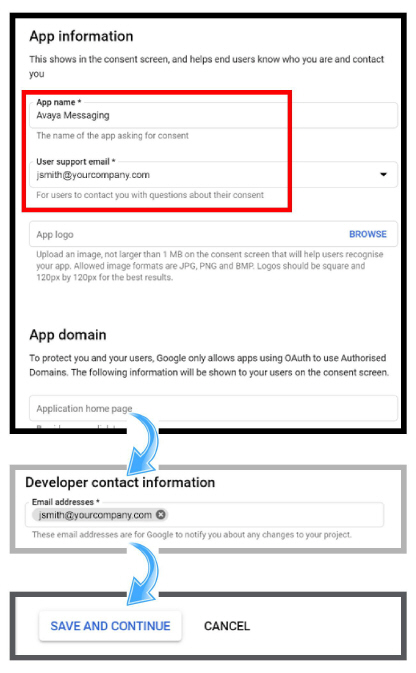
14.Enable External, then click CREATE.
15.Enter an App name for this configuration.
Provide a User support email address where users can find out more about their consent.
When ready, click SAVE AND CONTINUE.
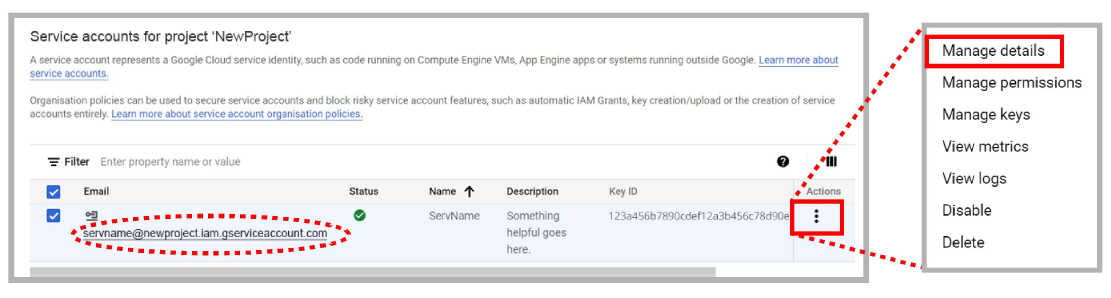
16.From the Navigation menu, go to IAM & admin > Service accounts.
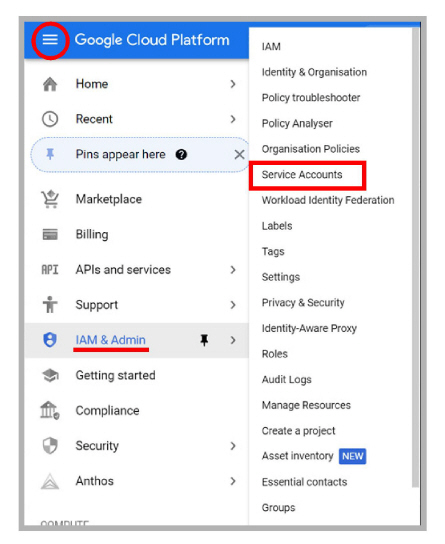
17.For the account you just created, click the Actions icon and choose Manage Details.
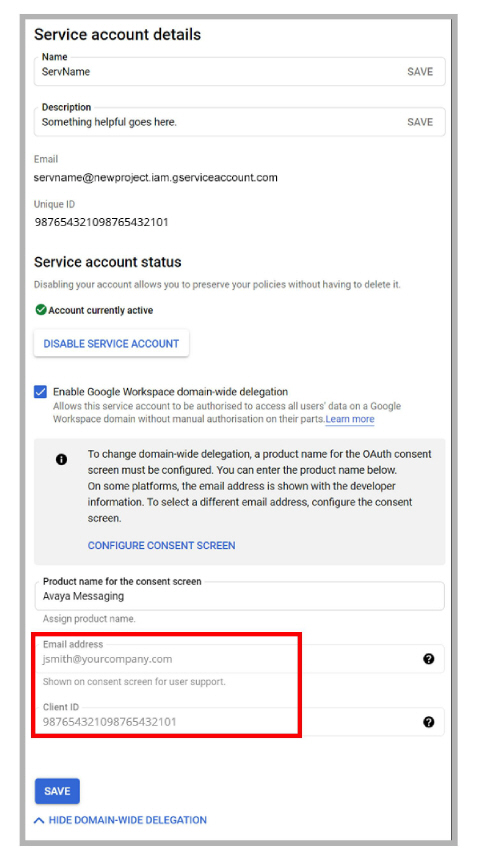
18.Expand SHOW DOMAIN-WIDE DELEGATION and turn on Enable Google Workspace domain-wide delegation.
Enter a product name that will appear on the consent screen.
When ready, click Save.

19.On this screen, record the Email address (for step 24) and the Client ID (for step 28).
|
Hint: You can drag the mouse over the Client ID value or the Email address, copy and paste the string into Notepad. This helps to prevent copy errors. |
20.From the Navigation ![]() menu, open APIs & Services, and select Library.
menu, open APIs & Services, and select Library.
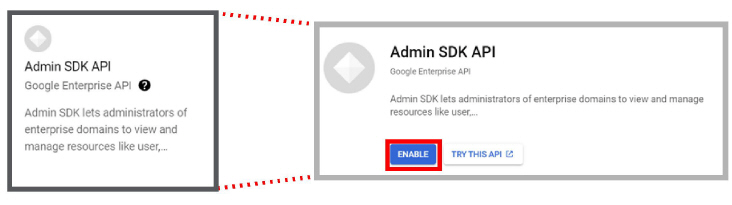
21.Under the Google Workspace category, select Admin SDK API. You may need to click View all to see this item.
Click Enable.
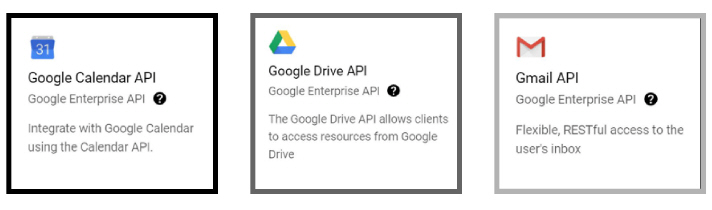
22.Once enabled, return to the Google Workspace page (APIs & Services > Library).
Repeat to enable all of the following APIs:
●Google Calendar API
●Google Drive API
●Gmail API
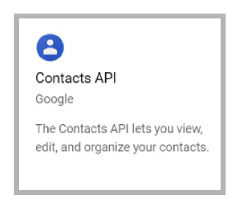
23.Return to the Library, selecting Social this time, then enable Contacts API.
|
Hint: While these settings will work for most sites, not all sites will want to open all of these channels if they are not required. See Minimum Required Scopes and APIs by Product for details. |
24.Rename both copies of the P12 file from step 11 to match the email address recorded in step 19.
Include the domain and the .com extension.
|
Caution: Do Not change the extension of the file. Always ensure it retains the P12 extension. |
Domain Setup
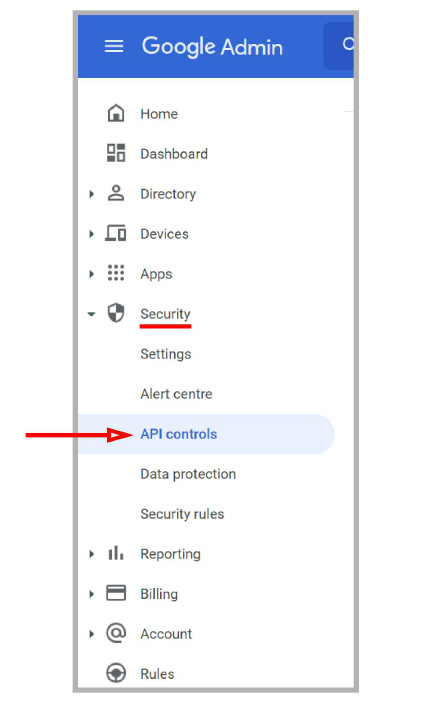
25.Go to admin.google.com and login to Google as an administrator.
In the left-hand panel, open Security > API controls.
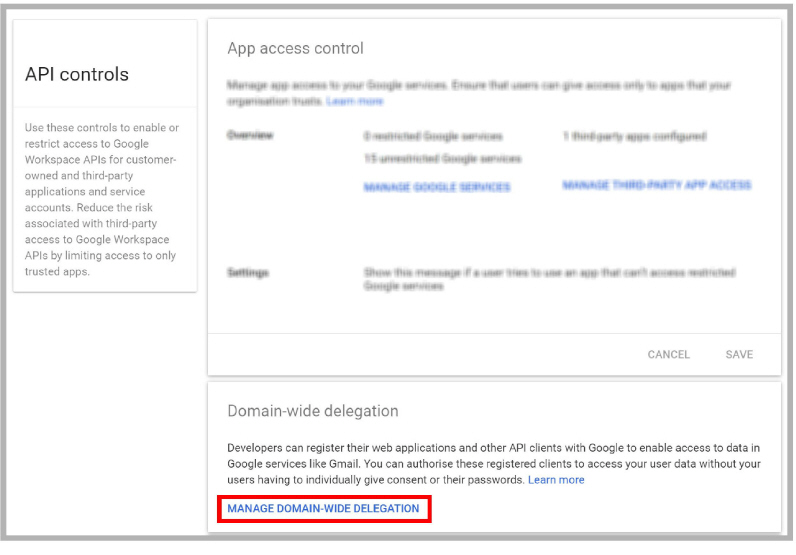
26.Click Manage Domain-wide Delegation.
27.Click Add new.
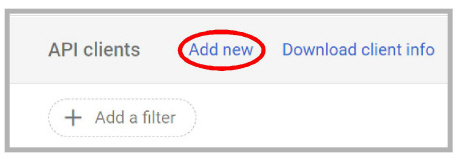
28.In the space provided, enter the Client ID from step 19.
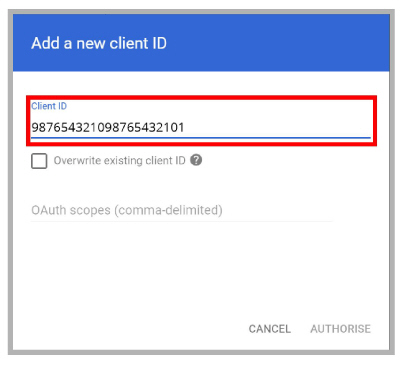
29.In the space for OAuth scopes, enter the following string:
https://docs.google.com/feeds/,https://mail.google.com/,https://www.google.com/m8/feeds/,https://www.googleapis.com/auth/calendar
|
Hint: Copy and paste the string above into the field. This will greatly reduce the chance of misspelling the entry and breaking the configuration. |
|
Important: While these settings will work for most sites, not all sites will want to open all of these channels if not required. See Minimum Required Scopes and APIs by Product for details. |

30.When ready, click Authorise.
31.Verify that the selected scopes were successfully installed.
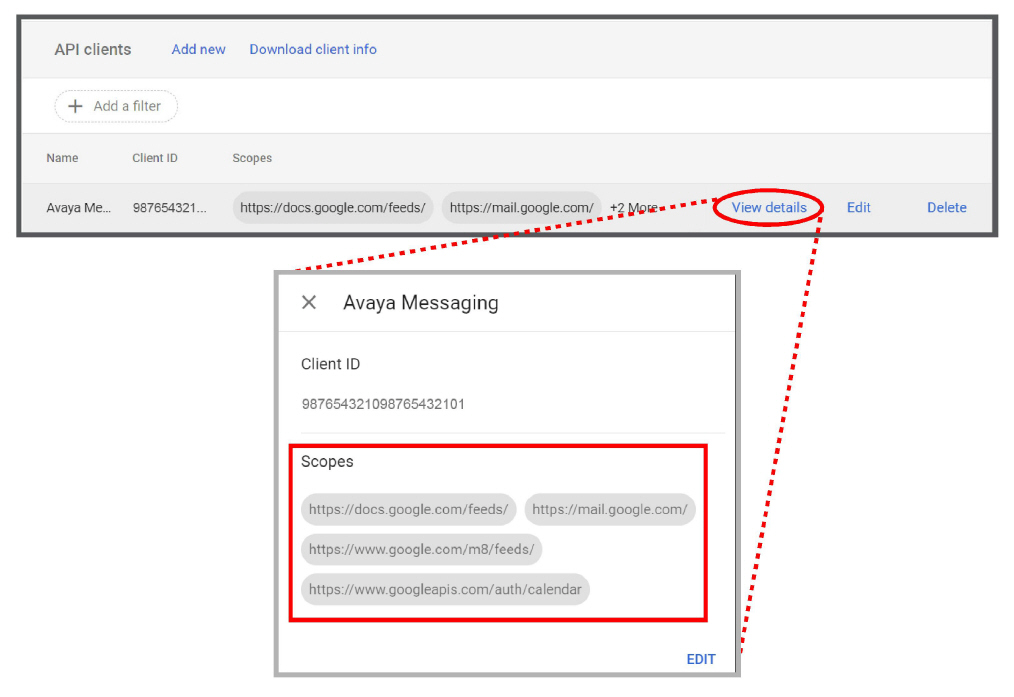
The scopes are:
docs.google.com/feeds
mail.google.com
www.google.com/m8/feeds
www.googleapis.com/auth/calendar
OAuth2 and Messaging High Availability (HA)
When using OAuth2 in an HA environment, the private key must be copied to both of these locations on the Consolidated server (C:\UC\IMAPTSE and C:\UC\UCCSE).
Minimum Required Scopes and APIs by Product
Enabling all of the listed scopes and APIs will work for most situations. However, not all administrators will want to open all of these channels if it is not necessary. This table shows the minimum required scopes and APIs for each product.
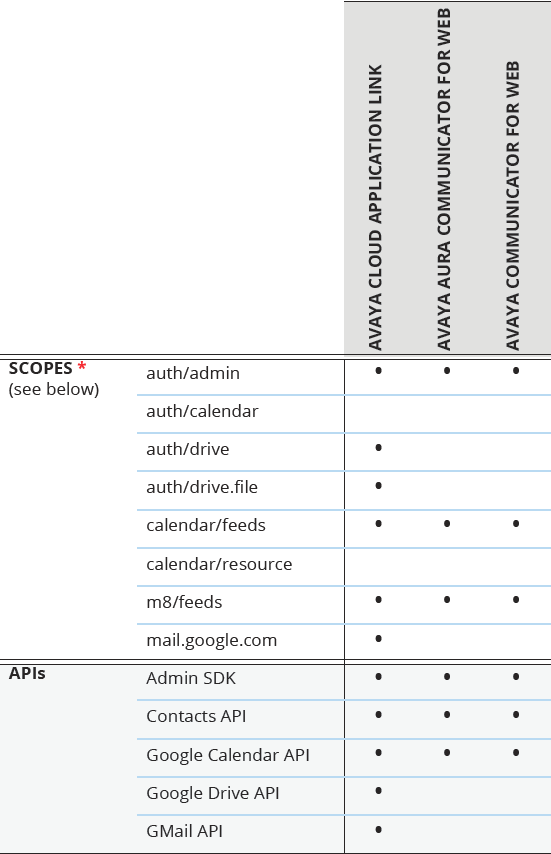
* The full paths for all listed scopes are displayed here.
auth/admin - https://www.googleapis.com/auth/admin.directory.user.readonly
auth/calendar - https://www.googleapis.com/auth/calendar
auth/drive - https://www.googleapis.com/auth/drive
auth/drive.file - https://www.googleapis.com/auth/drive.file
calendar/feeds - https://www.google.com/calendar/feeds/
calendar/resource - https://apps-apis.google.com/a/feeds/calendar/resource/
m8/feeds - https://www.google.com/m8/feeds/
mail.google.com - https://mail.google.com/
Configuring Messaging for use with OAuth 2.0
Once OAuth 2.0 has been configured, Messaging must be setup to use it.
The following procedure is conducted on the Messaging Server.
32.Open IX Messaging Admin.
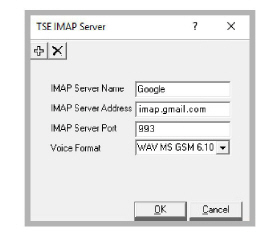
33.Right-click on TSE IMAP Server and select New > TSE IMAP Server.
IMAP Server Name: Enter Google in this space.
IMAP Server Address: Enter imap.gmail.com.
IMAP Server Port: Set this value to 993.
Voice Format: Leave this field unchanged.
Click OK when ready.
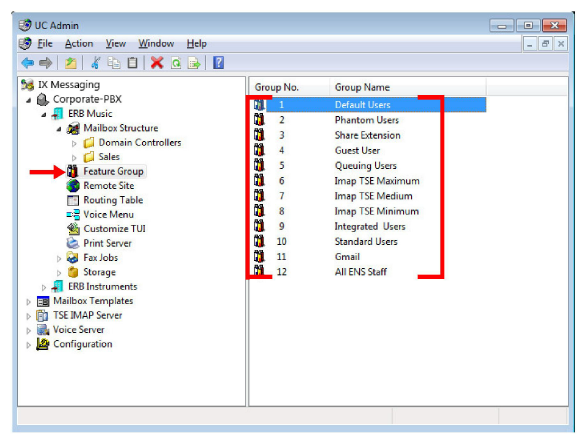
34.Click on Feature Group, and double-click a group to modify in the right-hand pane.
35.Open the Synchronization Options tab. Enter values in the following fields:
IMAP Account: Enter your company domain, followed by a forward slash then the Email address from step 19. For example, yourdomain.com/avaya-secure-connection@avayacloud....
Password and Confirm Password: Type in the Private Key password for the Client ID received in step 12.
IMAP Server: From the dropdown menu, select Google.
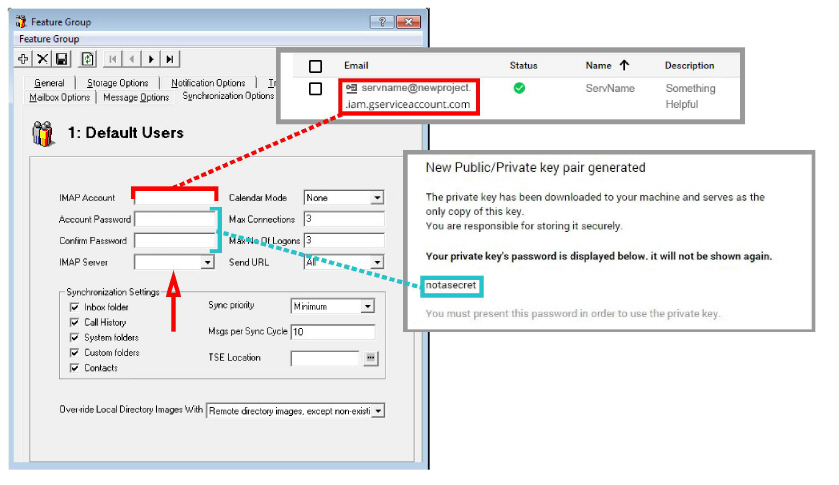
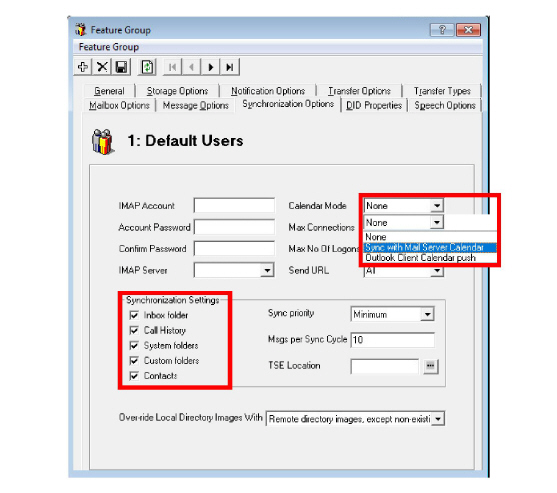
36.Synchronization Settings: Enable all of the items that you want to have synchronized between servers.
Calendar Mode: If calendar synchronization is required, select Synch with Mail Server Calendar from the dropdown list.
37.Click Save  to preserve the changes.
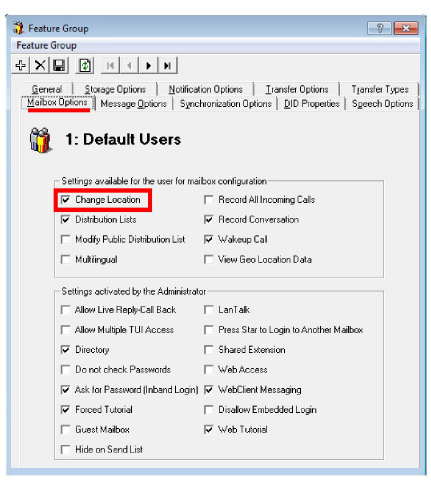
38.Go to the Mailbox Options tab and enable Change Location to allow an event in your mail server calendar to automatically change the UC location of the user. If this feature is not required, leave it disabled.
|
Note: Repeating events in Google calendar, such as a weekly meeting, will only be synchronized with Messaging out to 7 days ahead. Previewing beyond 7 days in advance will not show the recurring event in the IXM calendar. |
39.Click Save  to preserve the changes.
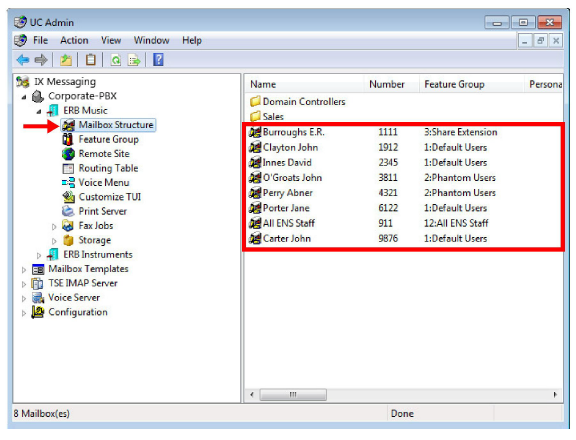
40.In IXM Admin, open Mailbox Structure and double-click a client to modify.
41.Open the Synchronization Options tab. Set Storage Mode to Synchronization.
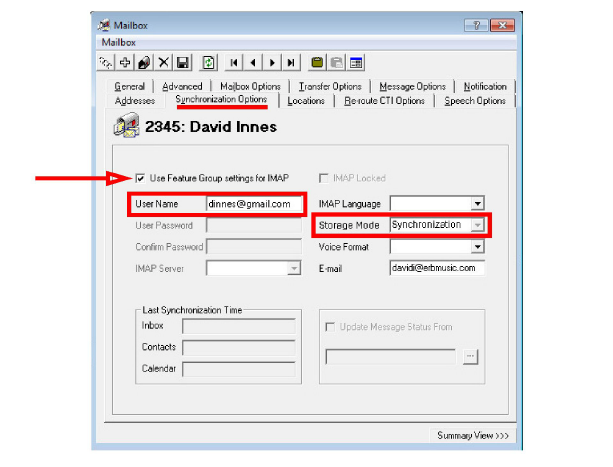
42.Enable the Use Feature Group settings for IMAP checkbox. For User Name, enter the Gmail address for this client.
For example, [email protected]
[email protected]
[email protected]
|
Note: Desktop Capabilities must be set to Advanced for these options to be configured. |
43.Click Save  to preserve the changes.
44.Your Messaging mailbox will now synchronize contacts and/or calendar information with the Gmail account.
|
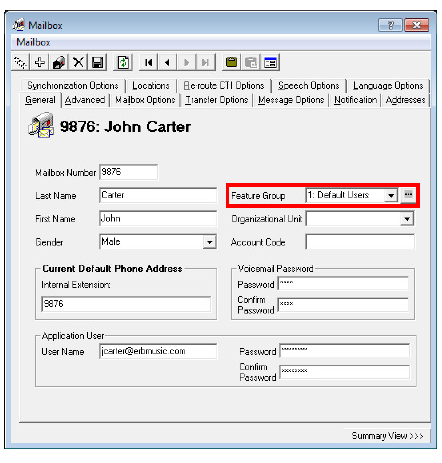
Note: To make sure that your mailboxes are associated with the right Feature Group check your Mailbox configuration window under the General tab. |
45.Repeat steps 40 through 43 for each client that requires OAuth 2.0 synchronization.
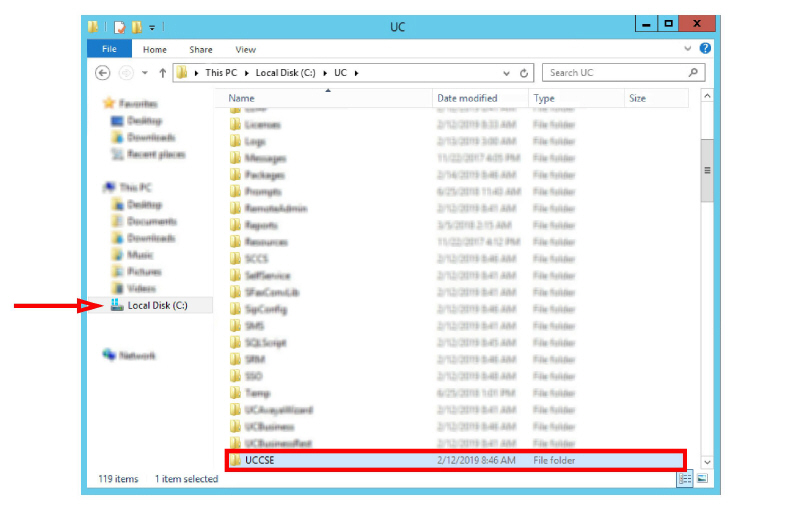
46.On the Voice Server, open the UC/UCCSE folder.
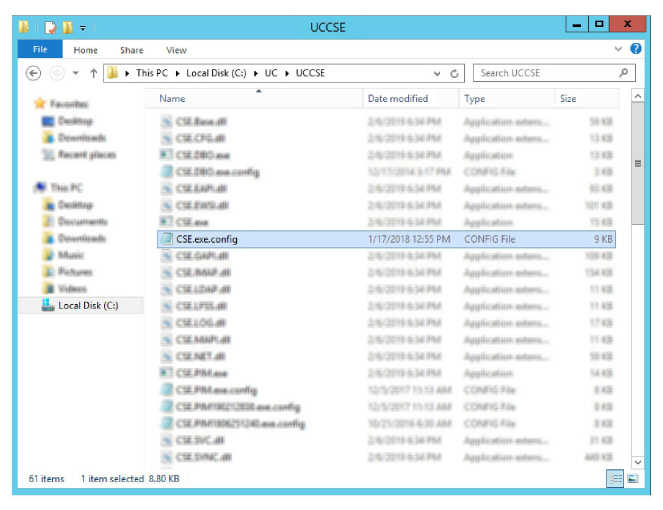
47.Edit the CSE.exe.config file using any text editor (e.g. Notepad).
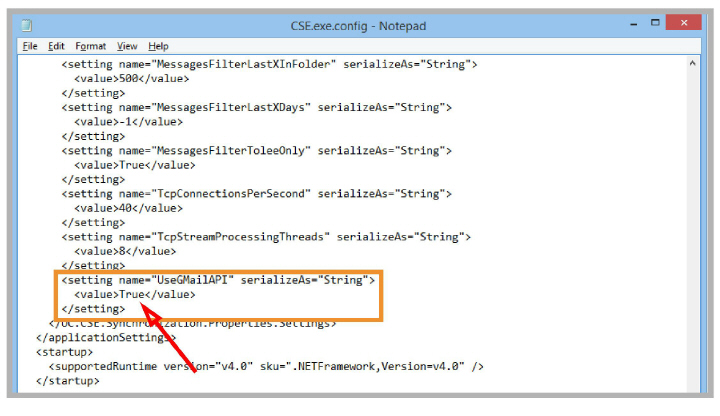
Locate the tag UseGMailAPI and set its value to True.
Go to File > Save to complete the change.
48.Stop and Start the UC Content Synchronization Engine and the UC CSE PIM Synchronization Engine services on the Voice Server, or restart the server.
|
Caution: If this is a High Availability system, restart this services only on the Consolidated Server. |
The setup is complete.
This user guide helps you configure your message, contact and calendar synchronization between Messaging and Google Apps. While the installation and configuration related to these features are straight forward, please backup important data before configuring any synchronization.
In order to consolidate all messages (e.g. voice, text, fax, etc.) in a single email account, synchronize your Gmail or Google Apps email with the UC server’s Web Access mailbox. If your organization is using OAuth2 authorization, you will not have to enter any details beyond the email address.
|
Note: If the synchronization does not work even after entering the correct credentials, your server may not be configured properly for this feature. Please contact your system administrator. |
|
Warning: If you have a custom filters configured on your Google account, it will not apply to messages that are synchronized from the voice server (e.g. voicemail, fax, etc.). |
Contact & Calendar Synchronization
When your administrator has enabled calendar and contact synchronization for you, everything will be occurring on the server side in the background so you do not have to configure anything on your own. You can use your mail server as you normally would and your calendar and/or contact entries will be populated on your Messaging mailbox as well. The following are typical behaviors that the synchronization will follow so that you can understand exactly how your calendar and contact entries are being handled by the servers.

|
Note: When creating a calendar event from Google, you must ensure that the reminder time it set to |
|
Note: All your calendar events and contacts from your current mail server will be populated into your Messaging mailbox right after your administrator finishes the configuration. |
|
Note: You should backup your calendar events and contacts periodically as a precaution. |
|
Note: Repeating events in Google calendar, such as a weekly meeting, will only be synchronized with Messaging out to 7 days ahead. Previewing beyond 7 days in advance will not show the recurring event in Google’s calendar. |
Contact Sync
When you create a contact entry through Gmail, the same entry will be synchronized into your Messaging contacts.
The contact information is automatically sent to the Messaging contact list.

|
Warning: Keep in mind that deletions are also synchronized. If you delete an entry from Gmail, it will be deleted from Messaging, and vice versa. |
Calendar Sync
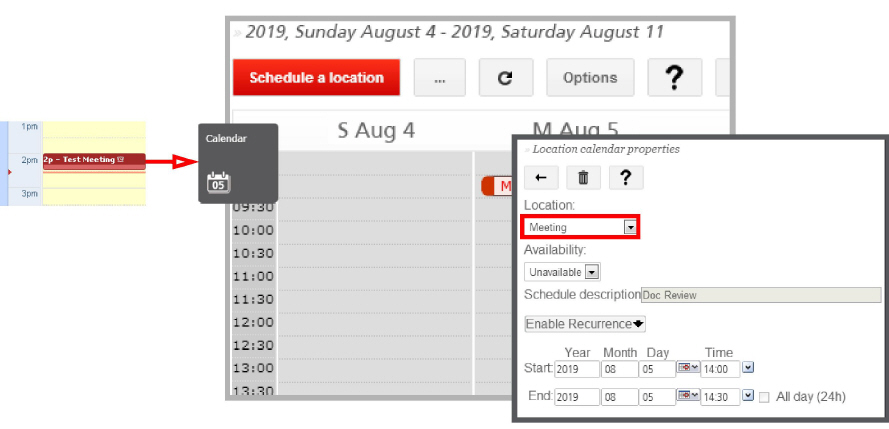
When you create a calendar entry from Google Calendar, the same entry will appear in Messaging. The time and date of the meeting is automatically sent to the Messaging mailbox. By default, the location for these events is marked as Meeting, but this can be changed through the Web Access Calendar icon.
If synchronization is not an option for your site, you may manually copy contacts from one application to the other. Long lists of contacts can be difficult to transfer. To make this process easier, Web Access supports importing CSV (comma separated value) files that can be exported from Google Apps.
1.To export your contacts from Google Apps, log into your Google email account and open your Contacts list.
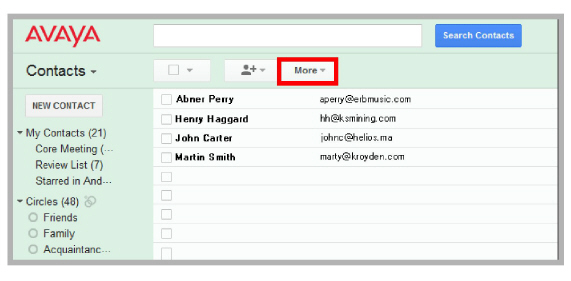
2.Click on More, then Export...
This opens the Export contacts window.
3.You can choose to export selected contact, specific groups of contacts (e.g. My Contacts), or all contacts.
Select All contacts.
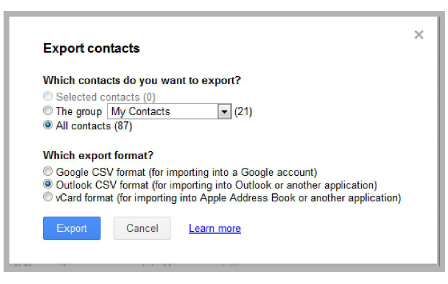
4.For export format, choose Outlook CSV.
Click on Export when ready.
5.When prompted, specify the location where the file will be saved.
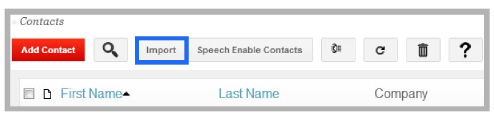
6.With the CSV file ready, open Web Access and click Contacts.
Click the Import button.
7.Click Choose File and select the CSV file exported from Google.
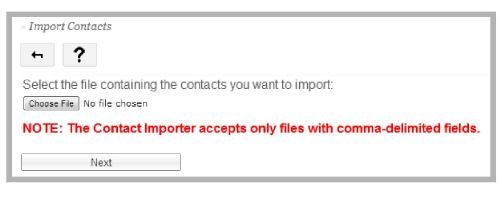
8.Click Next to proceed after the file has been selected.
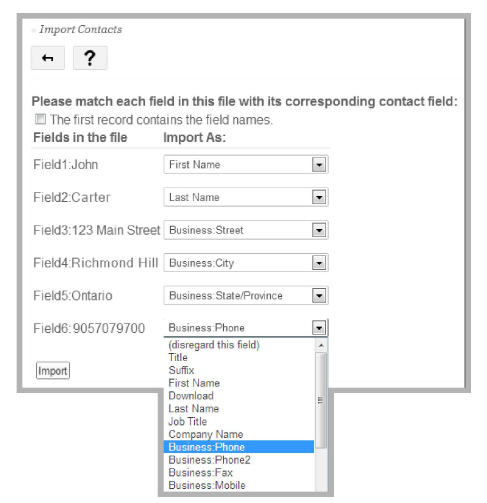
Match the fields from the CSV file to the fields on the Web Access contact list. You will only have to match the information you require. Leave all the unnecessary fields as (disregard this field).
Click Import when all of the required fields have been matched. The contacts will be imported from the CSV file into Web Access.
Reconfiguring Synchronization Components for Gmail
Once the installation has been completed, verify that the system configuration files are set to use GMAIL. This should be done on all servers running CSE: The voice server in a single server environment, the Consolidated server under HA, and all remote CSE servers operating.
|
Note: The CSE.exe.config file is used with message synchronization, while the CSE.PIM.exe.config is used for contact and calendar synchronization. |
1.Open the UC/UCCSE folder on the program installation drive.
2.Within the folder, open the CSE.exe.config file in a text editor such as NotePad.

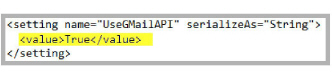
3.Scroll down to find the following lines (UseGMailAPI):
<setting name=”UseGMailAPI” serializeAs=“String”>
<value>True</value>
</setting>
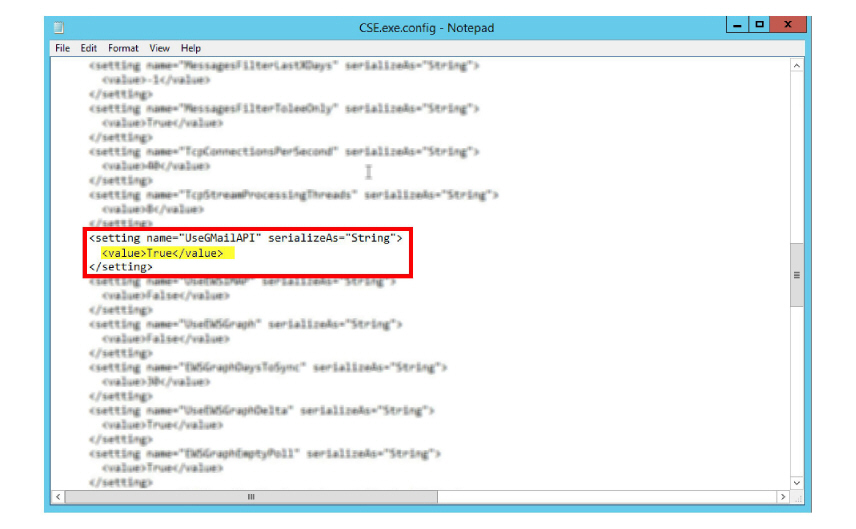
Verify that the Value is set to True. If the value is not True, change it and save the file.
4.Within the UCCSE folder, open the CSE.PIM.exe.config file in a text editor such as NotePad.
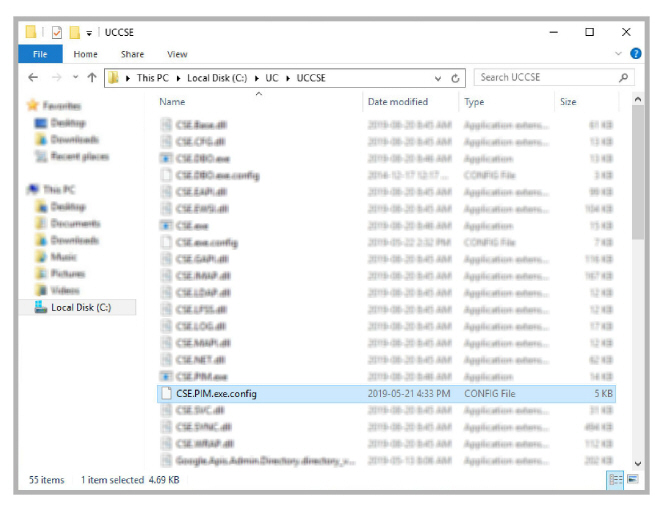

5.Scroll down to find the following lines (UseGMailAPI):
<setting name=”UseGMailAPI” serializeAs=“String”>
<value>True</value>
</setting>
Verify that the Value is set to True. If the value is not True, change it and save the file.
Before continuing, stop and restart the following services:
•UC Content Synchronization Engine
•UC CSE PIM Synchronization Engine
This will force Avaya Messaging to immediately update its systems. Otherwise, there will be a delay before the changes become active.