The Mailbox Bulk Manager program provides system administrators with a means to modify usernames and passwords for large numbers of people at the same time. One or more accounts can have their usernames changed to a standardized format, or their passwords randomized using this program.
The user data can also be exported to a comma delimited (CSV) file, where the changes can be made using any text editor (i.e. Notepad). The updated file can then be imported into the Bulk Manager in order to overwrite the original user data on the voice server.
Starting the Mailbox Bulk Manager
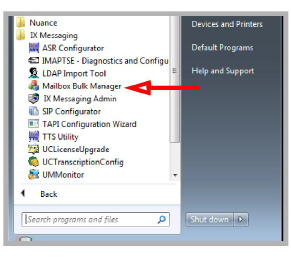
The Mailbox Bulk Manager is in the Messaging menu in the Windows Start button. Click the link to launch the program.
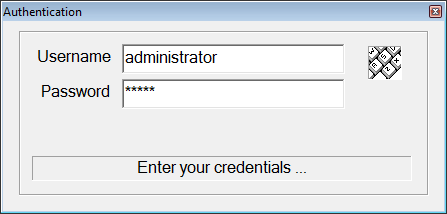
When prompted for authorization, enter the same administrator credentials used with Messaging Admin.
Enter the username and password, then hit Enter to go to the main screen of the Bulk Manager.
Using the Mailbox Bulk Manager
The icons at the top of the window have the following functions when available.
|
Icon |
Description |
|
|
New creates a comma delimited data file in the specified location. This file will be empty, and it can be modified with any text editor (i.e. Notepad). |
|
|
Open will allow an existing comma delimited file’s data to be brought into the program. This file can come from any source. |
|
|
With one or more users selected, click Save to export those users’ data to a comma delimited file in the specified location. |
|
|
Use Save into DB to push all changes into the voice server database. This will overwrite the existing data. |
|
|
Click Refresh from DB to update the display with the current information from the database. All unsaved changes will be lost. |
|
|
Select one or more users, then click Modify Credentials to make changes to their usernames and passwords. |
Managing Usernames and Passwords
After logging in, the program automatically loads the details for the current installation of Messaging.
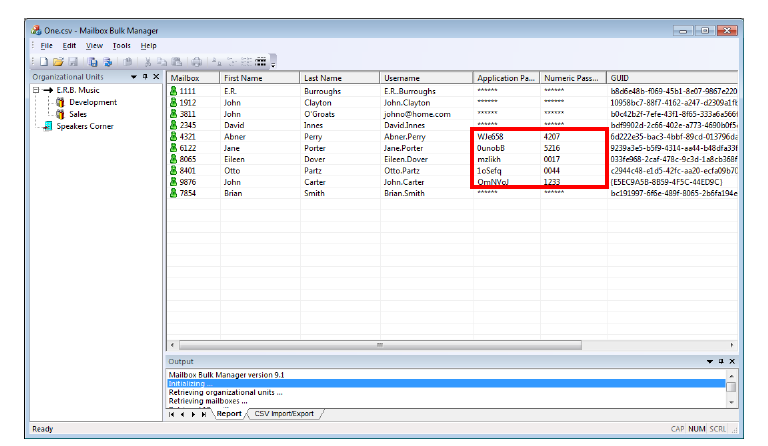
Click on a Company to view all users, including all members of any Organizational Units. Click on an OU to view only the users it contains.
The Application and Numeric Passwords are not displayed for security reasons.
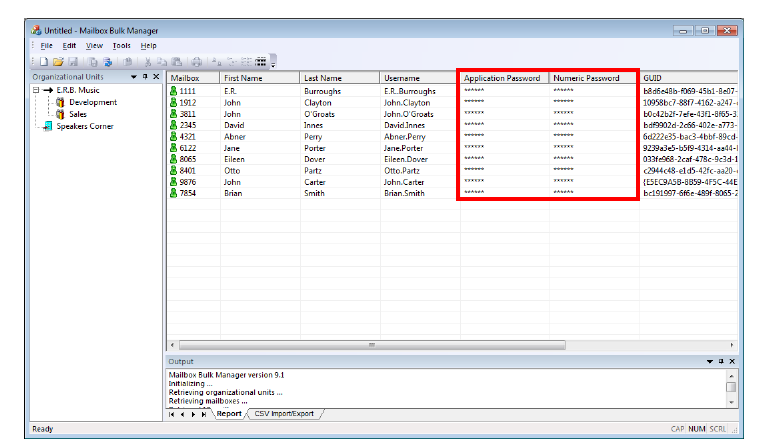
Click on a user to modify.
Use CTRL+ Click and SHIFT + Click to select multiple users.
With the desired users selected, click Tools > Modify Credentials, or click the Modify Credentials ![]() icon.
icon.
Enable all of the necessary items. The selected users will have these changes applied to their account.
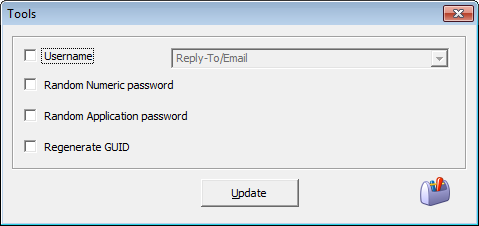
Username: When enabled, select from the dropdown list one of the predefined formats to use for the Application Username. This is required when users log into the system from any source other than a telephone keypad.
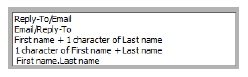
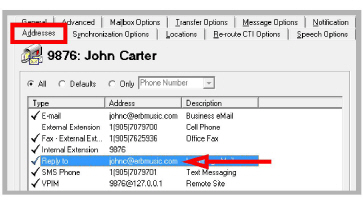
•Reply-To/Email - Choose this option to have the username changed to a user’s email Reply To address ([email protected], [email protected]).
This value is the Reply To option set for each user on their Addresses tab in Messaging Admin.
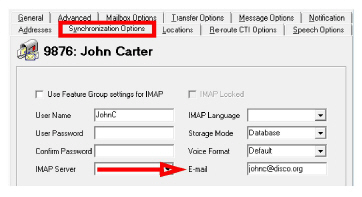
•Email/Reply-To - Choose this option to have the username changed to each user’s email address ([email protected], [email protected]).
This value is the Email address set for each user on their Synchronization Options tab in IXM Admin.
•First name + 1 character of Last name - The username will be changed to the person’s first name, followed by the first letter of their last name (JohnC, AbnerP).
•1 character of First name + Last name - The username will be changed to the first letter of the person’s first name, followed by their last name (JCarter, APerry).
•First name.Last name - The username will be the person’s first name, followed by a dot, and then their last name (John.Carter, Abner.Perry).
Random Numeric password: The numeric password is used when logging into the system from a touch tone phone keypad. Enable this item to change the numeric passwords for all selected users. This password will be all numbers.
Random Application password: The application password is used when logging into the system from any means other than a telephone keypad. This includes all web enabled programs, such as iLink Pro and Web Access. Enable this item to change the application passwords for all selected users. This password will be a combination of numbers and letters.
Regenerate GUID: Enable this option to create a new GUID for all selected users.
Randomized passwords are unique to each user.
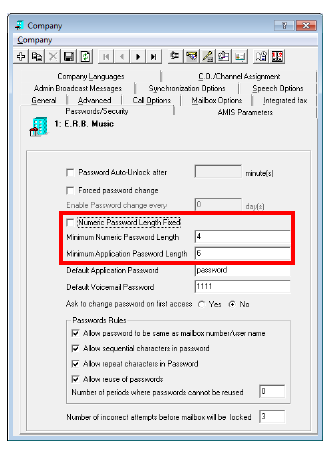
Generated passwords will obey the rules specified for password length on the voice server. These are set in Messaging Admin, on the Company > Passwords/Security tab.
Once the selections have been made, click the Update button to make the changes to all selected users.
|
Warning: All changed passwords are visible in the main window. |
Record their values now so that users can be told what their login credentials have become.
Once the changes have been saved to the database, the passwords will no longer be visible.
The Mailbox Bulk Manager can work with comma delimited (CSV) files. These files can be generated from any source providing they comply with the structural requirements of the program.
The external files must be saved with a CSV file extension. They must conform to standard rules for comma delimited files.
•Each row represents a separate record and ends with a carriage return.
•Individual fields within a record are separated by a comma.
•Individual fields within a record are enclosed in double quotation marks.
The Mailbox Bulk Manager expects each record in the CSV file to contain 9 fields. The first row in the file contains the names for each of the fields. These are:
MbxNumber,FirstName,LastName,UserName,NumericPwd,AppPwd,GUID,Company,MbxID
Company: This value identifies which company at the site the user belongs to. The default value is 1.
MbxID: This code must be unique for all users. Any changes made are applied against the user with the same MbxID.
Exporting User Data to a CSV File
To export the user details to a CSV file, select the desired users in the main window, then click File > Save, or click the Save ![]() icon.
icon.
|
Note: Existing passwords are NOT exported with the other data. Enter password data within the double quotation marks “” for each password. The Bulk Manager can also randomly generate passwords once the file has been imported. Passwords must be generated before the data can be saved to the database. |

An exported CSV file can be edited using a text editor, such as Windows Notepad. It can also be loaded into a spreadsheet or word processor. Make any changes in the editor, then save the file in comma delimited (CSV) format.
|
Hint: The master file can be created and maintained in a third part application, such as Microsoft Excel. If all of the fields, including the title row, are present and populated, and the file is saved in the CSV format, any program can be used as the source of the information. |
|
Warning: The Mailbox Bulk Manager cannot create new users in the database. It can only change existing users. This includes the use of CSV files. New users must be created within Messaging (e.g. Messaging Admin, Web Access), or introduced through the LDAP Import Tool. |
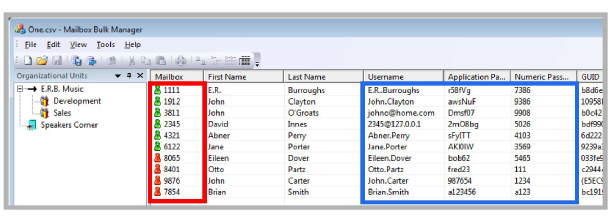
A CSV file, regardless of its source, can be imported into the Mailbox Bulk Manager to overwrite the existing database.
Go to File > Open, or click on the Open ![]() icon. Select the CSV file to import. The updated information will appear in the main window. The display will change to reflect the updates, but it will not overwrite the program data until it is saved to the database.
icon. Select the CSV file to import. The updated information will appear in the main window. The display will change to reflect the updates, but it will not overwrite the program data until it is saved to the database.
Once all changes have been made, verify that all user data is complete. In the main window, the icon to the left of each user’s mailbox number indicates the status of their data.
 - Green indicates that all fields are complete and correctly populated.
 - A Red symbol means that some data is missing or is incorrect. Check that all usernames and passwords have been entered, that numeric passwords are numbers only, and that Application Passwords contain both numbers and letters. Passwords must also conform to the rules configured in Messaging regarding minimum/fixed length.
|
Warning: Record the passwords before saving into the database. Once saved, the password details will be hidden and cannot be retrieved. A password must be reset if it is forgotten. |
Once all users are correctly configured, click File > Save into Database, or click the Save into DB ![]() icon.
icon.
The changes will be made to the voice server database, and the password values will be obscured.
Any existing information in the database will be overwritten. Users who were not selected are unaffected.