|
Note: Port Pooling is not available when using Contact Center integration. |
|
Important: Transferring calls through GIVE IVR uses both a Dialogic port and a SIP port. Both ports will be in use until the transfer is completed. |
Avaya Messaging supports integration with Avaya Aura Contact Center Services. Similar to CallPilot, Avaya Messaging 10.8+ supports the ability to play announcements and collect DTMF digits using the Meridian ACCESS API protocol. A migration tool is also available to allow the recordings to be migrated from the CallPilot system to Avaya Messaging. Avaya Messaging can replace CallPilot through its integration with Avaya Aura Contact Center Services.
The Avaya Aura Contact Center uses CallPilot as the voice services provider to interact with callers. Avaya Messaging must become the voice services provider for Contact Center. This document provides details on the setup and configuration for the following components when replacing CallPilot with Avaya Messaging:
•CS1000 PBXs
•Dialogic Media Gateway (DMG)
•Avaya Messaging voice processing system
•Avaya Contact Center Server
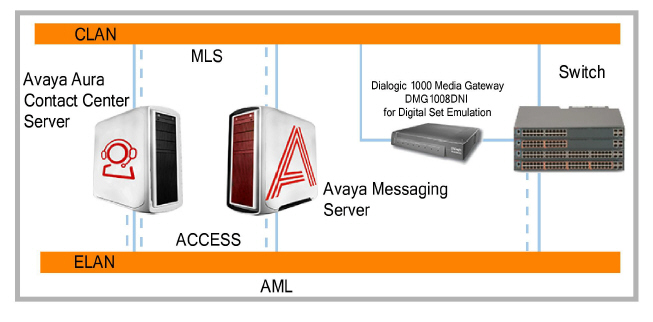
The following subsystems work together to provide voice services to the Avaya Contact Center:
•CS 1000 PBX
•Dialogic Media Gateway
•Avaya Contact Center Server
•Avaya Messaging voice processing system
•Meridian Link Services
These systems communicate across local area networks (LANs).
For complete instructions on configuring PBX, Avaya Contact Center and Meridian Link Services, refer to the corresponding Avaya documentation.
|
Note: The CS1000 has been discontinued. No technical support is available for this product. |
This guide is requires that:
•the Avaya Contact Center Server is installed and operating.
•the PBX is correctly configured to work with Avaya Messaging SIP voice ports (Normal messaging services).
•Meridian Link Services is configured and enabled on the PBX.
•the Avaya Messaging Server is installed and is operating.
•For each DMG port used, the CS1000 must have an AST license.
Subsystem configuration reference information
For an incoming call, control of the call passes from one subsystem to another. Each provides a specific set of features and services.
The following table shows the entities that must be configured on the different subsystems. When configuring an entity on more than one subsystem, you must ensure that the parameters are consistent across all of them.
|
Configuration Element |
PBX |
Avaya Messaging |
Avaya Contact Center Server |
DMG |
|---|---|---|---|---|
|
Avaya Contact Center Server CDNs |
• |
|
• |
|
|
IVR ACD_DNs (ACCESS and IVR) |
• |
•1 |
• |
|
|
Phone sets |
• |
|
• |
|
|
Routes |
• |
|
|
|
|
Scripts |
|
|
• |
|
|
Treatment DNs |
• (optional) |
•1 |
• |
|
|
Voice ports (virtual Agent TNs) / voice channels 2 |
|
• |
• |
• |
|
Voice files and segments |
|
• |
• |
|
1 - For GIVE IVR, IVR ACD_DN (if it passed as default treatment DN) and Treatment DNs should be configured in the Avaya Messaging routing table with corresponding voice menus.
2 - Avaya Contact Center Server control requires dedicated IVR/ACCESS voice ports to operate correctly.
Meridian Link (MLink) is an interface that enables communication between a host application and the PBX. It facilitates the integration of the computer with the PBX. The host processor interacts with the PBX by exchanging application layer messages.
Meridian Link Services
Meridian Link Services (MLS) is a process that runs on the Avaya Contact Center Server that gives the customer CTI server access to the Meridian Link interface. Through MLS, the server can connect to Meridian Link applications over the CLAN.
External applications register with MLS to obtain access to application layer messages. MLS commands that result in call processing requests are sent over the ELAN subnet to the PBX. Examples of external applications that can register with MLS include Computer Telephony Integration (CTI).
Avaya Messaging connects to the Avaya Contact Server over CLAN and uses MLS protocols to support Avaya Contact Center Give IVR and voice services.
Introduction
The PBX provides voice path connections that carry speech traffic (phone calls). They are configured as terminal numbers (TNs) on the PBX. Virtual ACD agent phone sets must be configured to be used as ACCESS/IVR ports in Avaya Messaging voice processing systems and Avaya Contact Center.
Communication
The PBX communicates with the DMG, Avaya Messaging and Avaya Contact Center Server.
Communicating with the DMG
Avaya Messaging is a SIP based system and is, therefore, unable to support PBX IVR/ACCESS voice paths directly.
The Dialogic Media Gateway is used to provide SIP signaling and RTP voice path for Virtual ACD agent phone sets. ACD agent phone sets (Type 2616) must be connected to the DMG digital ports.
Communicating with Avaya Messaging
The PBX communicates with Avaya Messaging over CLAN using SIP protocols for normal unified messaging operations.
Communicating with Avaya Contact Center
The PBX is communicating with Avaya Contact center over ELAN subnet using AML protocol for call management.
|
Important: Older model PBXs may not support SIP. In this case, all traffic must be routed through the DMG. A direct link with the voice server cannot be established since Avaya Messaging only supports SIP. |
Configuring ACCESS/IVR ACD-DNs
An ACCESS/IVR ACD-DN is assigned to ports that provide voice processing services. Program the voice ports as ACD agents belonging to ACCESS/IVR ACD-DNs. The Avaya Contact Center then must acquire the IVR ACD_DNs.
Configure an IVR ACD-DN for each group of voice ports; for example, configure one for ACCESS and another for Give IVR voice ports.
|
Note: When setting up the ACD queue for the CS1000, ensure that the HOML value is set to ‘NO’. |
Configuring Voice Ports
Configure ACCESS/IVR voice ports as virtual agent TNs for Avaya Messaging. These must be configured as an associated set to enable MLink (MLS) messages.
The Avaya Messaging voice ports should be created or changed in Overlay 11.
Use the same responses and values used by CallPilot for any prompts not listed in the table.
|
Prompt |
Response |
Description |
|---|---|---|
|
REQ |
NEW |
Add a voice port |
|
TYPE |
2008 |
|
|
AST |
00 01 |
Associated set assignment on key 0 and key 1 (required for MLS messages) |
Introduction
Avaya contact center needs a Voice Services provider, such as Avaya Messaging, to do voice processing and to support some caller interactions.
Two ways to do voice processing
Avaya Contact Center Server supports voice processing using the following methods.
•Script commands: Calls terminate on CDNs and enter the Avaya Aura Contact Center server script. The script statements can connect the call to a voice port or RAN trunk for voice processing interactions.
•Front-end IVR: Calls terminate directly on a Avaya Messaging voice port, voice menu, and are not passed to the Avaya Contact Center Server until the voice processing system transfers the call to a CDN. This method of voice processing is largely transparent to the Avaya Aura Contact Center Server. The Contact Center Server must not acquire the voice ports used for front-end IVR.
Different ways to interact with callers
You can interact with callers in several ways.
Play a message to a caller
You can use any of the script commands listed in the following section to play a message to a caller. You can use the Give Controlled Broadcast command to play a recorded announcement to a caller in either Start/Stop mode (where the caller hears the entire message from start to finish), or Continuous mode (where the caller can enter and exit at any point in the message). Other announcements do not use these modes.
Interact with an external voice system
Interaction with an external voice system enables the Avaya Contact Center Server to control communication with the caller through commands and treatments placed in the scripts. You can use the Open Voice Session and End Voice Session commands to interact with a caller directly. To use these commands, you must use Avaya Aura Contact Center Voice Services on Avaya Messaging.
Interact with a caller indirectly
Communication with the caller is controlled by the voice processing system. You can interact with a caller indirectly by using the Give IVR command to connect them to a voice port controlled by an Avaya Messaging voice menu.
Script commands
The Avaya Contact Center Server supports the following voice processing commands.
•Give RAN: Use this command to play announcements using a MIRAN card, or an announcement machine connected to a RAN trunk. The RAN Broadcast feature in X11 r. 23 allows you to connect multiple callers to the same RAN port. As the call is connected to a RAN trunk rather than a voice port, this is not strictly a voice processing command. However, it does allow you to play a message for a caller.
•Give IVR: Use this command to play an announcement or IVR session using a Avaya Messaging voice menu. The voice processing system controls the processing of the call. This is be based upon the IVR ACD-DN or the DN. Digits can be collected from the caller, but they cannot be accessed from the script.
•Give Controlled Broadcast: Use this command to play a message for multiple callers using the same voice port. It requires Avaya Aura Contact Center Voice Services on Avaya Messaging.
•Open/End Voice Session: Use this set of commands to provide an interactive voice session in which you can play prompts and collect digits. It requires Avaya Aura Contact Center Voice Services on Avaya Messaging.
|
Note: During script execution, all voice processing commands, as well as the Give RAN command, suspend the script until the command completes. Once the command completes, the next statement in the script is executed. |
Communication
The server communicates with both the PBX and Avaya Messaging.
Communicating with the PBX
The server executes scripts and instructs the PBX to set up the speech paths necessary to connect calls to voice ports, agents, or RAN trunks, and to provide tone treatments to calls (e.g. ringback and busy). The server communicates with the PBX over the ELAN subnet using the AML messaging protocol.
Communicating with Avaya Messaging
The Avaya Contact Center Server communicates with Avaya Messaging to instruct it to play prompts, collect digits input by callers, or both.
For basic voice processing (Give IVR), the server communicates with Avaya Messaging over the CLAN using the Meridian Link interface.
For advanced voice processing (controlled broadcast and voice session commands), the server tells Avaya Messaging which prompts to play using the ACCESS protocol over the ELAN subnet. Messages between the PBX and Avaya Messaging (call arrival messages) travel on the ELAN subnet to the Avaya Contact Center Server, which then sends them over the CLAN to Avaya Messaging using the MLS protocol.
Voice processing resource acquisition summary
The following table summarizes the resources that the Avaya Contact Center Server must acquire for the different voice processing commands.
|
Command |
IVR ACD_DN |
Voice Port TN |
Voice Port Channel |
|---|---|---|---|
|
Give IVR |
Yes |
Yes |
No |
|
Controlled Broadcast |
Yes |
Yes |
Yes |
|
Voice Sessions |
Yes |
Yes |
Yes |
|
Front-end IVR |
No |
No |
No |
Configuration
1.On the Avaya Contact Center Server, go to
Start > All Programs > Avaya > Contact Center > Manager Server > Server Configuration.
2.Select PBX CS1000. Since Contact Center Server codes have not changed, select CallPilot and enter the ELAN network interface IP Address of Avaya Messaging under IP Address.
Record the value for Switch Customer Number (this value can be changed if required) for use in step 3 (Voice Servers: SCCS_SERVER) below.
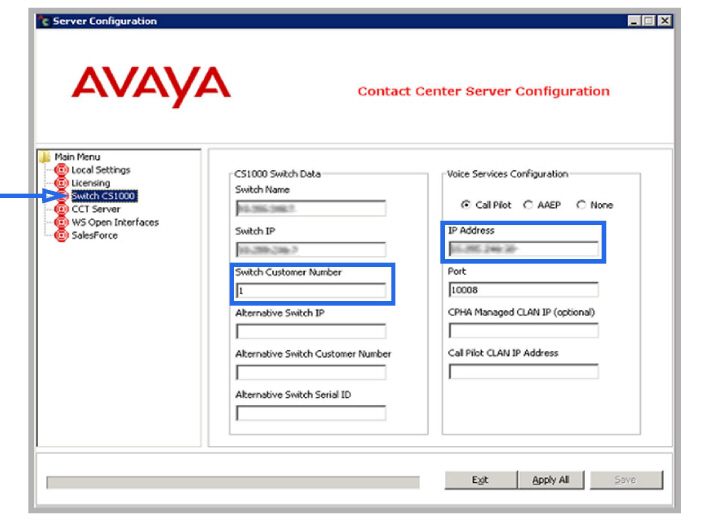
3.Click Apply All.
4.Click Yes.
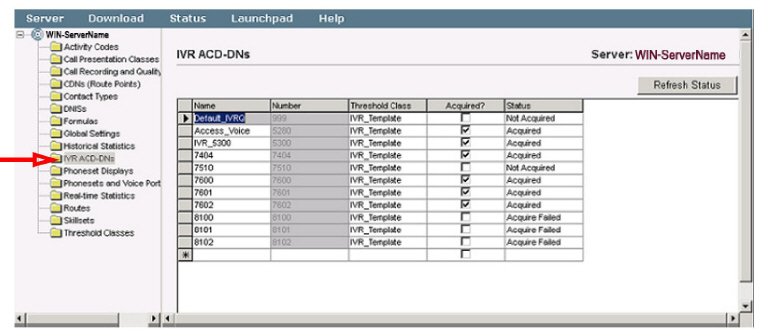
Configuring IVR ACD-DNs on the Server
Configure and acquire the PBXes ACCESS/IVR ACD-DN uses for voice processing (an ACD-DN where the voice ports are defined) by Avaya Contact Center Server.
To configure and acquire an IVR ACD-DN:
1.Through your web browser, enter the URL for the Contact Center Manager and login.
2.Go to Configuration.
3.In the left-hand pane, select the server to add the IVR ACD-DN onto.
4.Select IVR ACd-DNs.
5.In the field for Name, enter the name of the IVR ACD-DN.
6.In the field for Number, enter the ACCESS/IVR ACD-DN number. This number must match the DN configured on the CS 1000 system.
7.Select the Threshold Class.
8.Click on any other row in the table, and the system adds the ACD DN. The status will show as Not Acquired.
9.Enabled Acquired for the DN just created.
10.Click Refresh Status until the status is updated to Acquired.
11.Repeat steps 5 to 10 to configure additional ACD DNs.
|
Note: To reconfigure an ACD-DN, first release the ACD-DN, edit the configuration parameters, and then recapture the ACD-DN. |
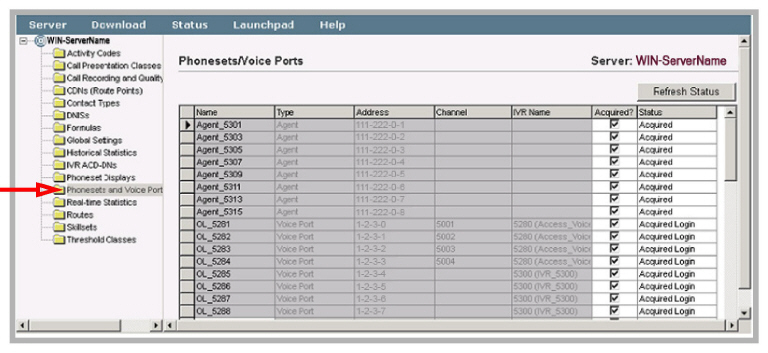
Configuring Voice Ports on the Server
Configure and acquire the ACCESS/IVR voice ports and ACCESS channel numbers used by the Avaya Contact Center.
|
Note: If there are ACCESS/IVR ports already configured for CallPilot and you do not want to use them for Avaya Messaging, remove them and add new ACCESS/IVR ports. |
To add/change a phoneset as a voice port:
1.Through your web browser, enter the URL for the Contact Center Manager and login.
2.Select Configuration.
3.In the left-hand pane, select the server to add telephones and voice ports onto.
4.Select Phonesets and Voice Ports.
5.In the field for Name, enter the name of the telephone as it will appear in reports.
6.In the field for Type, select Voice Port.
7.In the field for Address, enter the TN of the telephone.
|
Note: For ACCESS voice ports only, type the Channel number. This must match the classId configured for ACCESS Ports on Avaya Messaging. |
8.Click on any other row in the table, and the system adds the voice port. The status will show as Not Acquired.
9.Enable Acquired for the TN just created.
10.Click Refresh Status until the status is updated to Acquired.
11.Repeat steps 5 to 10 to configure additional TNs.
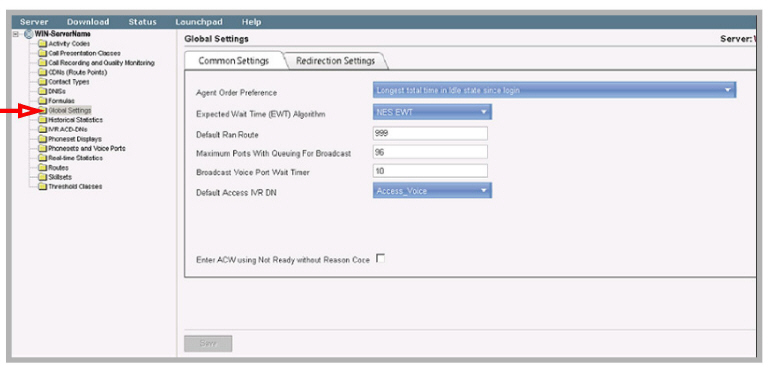
Configuring IVR ACD-DN Global Settings
To support voice processing in Avaya Contact Center you must configure a number of items under IVR ACD-DN Global Settings. These ARE:
•The number of voice ports that can be used for broadcast announcements.
•The wait time for a start/stop broadcast announcement (the amount of time between the arrival of the first call for the start/stop broadcast announcement and when it starts).
•The default ACCESS treatment DN for the controlled broadcast and voice session script commands (the ACCESS ACD-DN).
To configure IVR ACD-DN Global Settings
1.Through your web browser, enter the URL for the Contact Center Manager and login.
2.Select Configuration.
3.In the left-hand pane, select the server to configure.
4.Select the Global Settings.
5.Select the ACCESS ACD_DN that was defined in IVR ACD_DNs for Default Access IVR DN.
Defining Voice Segment Variables
Avaya Contact Center scripts reference voice segments on Avaya Messaging by using voice segment variables. Voice segment variables can contain one or more voice segments. These voice segments contain specific words or phrases imported from CallPilot or recorded in Avaya Messaging.
To define Voice Segment Variables
1.Go to Orchestration Designer > Contact Server name > Application Variables.
2.Right-click Voice_Segments.
3.Click New.
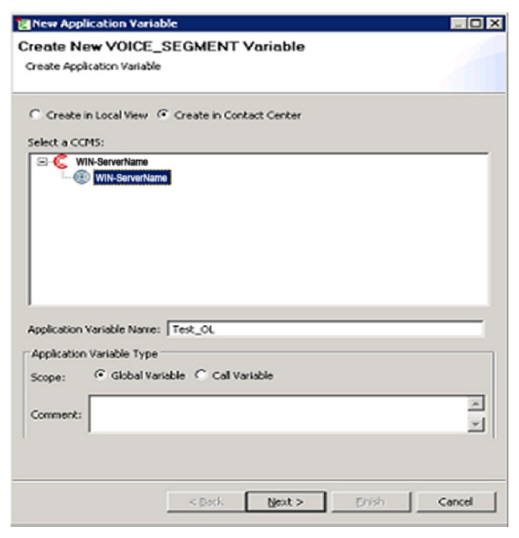
4.Enter an Application Variable Name.
5.Click Next.
6.Select a Language.
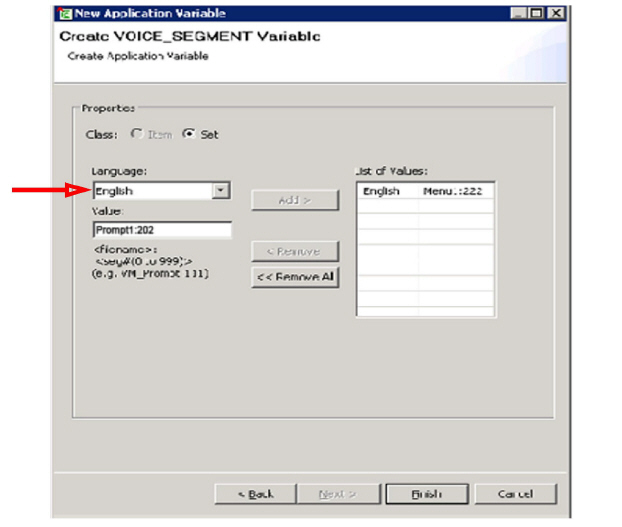
7.In the Value field, type in the [Application Name]:[Segment Number]. The application name is case sensitive and must be same for the application imported or created in Avaya Messaging.
9.Repeat steps 7 to 8 to add more segments to variable as required.
10.When ready, click Finish.
Introduction
The Avaya Messaging server will be the new voice services provider for the Avaya Contact Center.
Communication
The Avaya Messaging voice server communicates with the PBX, DMG and the Avaya Contact Center.
Communicating with the PBX
The server connects to the PBX through the CLAN for the SIP voice ports used for messaging and unified communication.
Communicating with the DMG
The server is connected to the Dialogic Media Gateway over the CLAN subnet using SIP for ACCESS/IVR ports to provide services to the Avaya Contact Server. On the PBX, these ports are configured as an SL1 phone set TN (virtual agents).
|
Important: Older model PBXs may not support SIP. In this case, all traffic must be routed through the DMG. A direct link with the voice server cannot be established since Avaya Messaging only supports SIP. |
Communicating with the Avaya Contact Center
The server communicates with the Avaya Contact center over:
•ELAN subnet using ACCESS protocols for voice services.
•CLAN subnet using MLink protocols for Give IVR.
Voice Services
Avaya Contact Center Server can access the voice services provided by Avaya Messaging through:
•Give IVR
•Give Controlled Broadcast
•Open Voice Session
Give IVR
To support Give IVR commands, for each treatment DN an entry should be added to the Avaya Messaging routing table. The Treatment DN must be used for Caller ID/DNIS, and the desired voice menu must be assigned to this entry.
When the Give IVR script command is used, the Avaya Contact Center Server sends the command along with an ACD-DN and a treatment DN (if specified) over the AML (ELAN) connection to the PBX. When the call arrives at an Avaya Messaging voice port, the PBX alerts Avaya Messaging:
•Through Avaya Contact Center Server. The alert is sent over the CLAN using the Meridian Link interface and managed by Avaya Messaging.
•Through the DMG. The alert is sent over the CLAN using SIP.
Upon receiving a new SIP call, Avaya Messaging waits to receive an MLink notification through UCMlinkService and UCSCCSHandler, then uses the treatment ID as DNIS information to find the assigned voice menu in the routing table.
ACCESS Voice Services
When the Give Controlled Broadcast Announcement or Open Voice Sessions script commands are used, Avaya Contact Center Server sends the command and the ACD-DN over the AML (ELAN) connection to the PBX. When the call arrives at an Avaya Messaging voice port, the PBX alerts Avaya Messaging:
•Through Avaya Contact Center Server. The alert is sent over the CLAN using the Meridian Link interface and managed by Avaya Messaging.
•Through the DMG. The alert is sent over the CLAN using SIP.
Upon receiving a new SIP call on ACCESS channels, Avaya Messaging will not answer the call. It will wait for Avaya Contact Center to handle the call using ACCESS protocol commands.
Configuration
It is assumed that Avaya Messaging is installed, configured and operating normally.
To configure Avaya Messaging to support Avaya Contact Server voice services:
•Use the UCAPEConfig utility to define the ACCS/IVR pbx node, ACCESS/IVR ports and other entities.
•Use UC Admin to add new routing table entries and voice menus.
•Use Sip Configuration to define the ACCS/IVR PBX node and ACCESS/IVR ports for SIP service.
UCAPEConfig
Each site will employ either of the following configurations:
Standard
Typical standard configuration consist of one Avaya Contact Server and one Avaya Messaging server which supports up to 120 ports (ACCESS, IVR and regular).
High Capacity
This type of configuration is for customers with more than 120 ports, or with multiple Avaya Contact Servers. In this instance, multiple Avaya Messaging servers should be installed in a High Availability (HA) configuration.
A bundle of two or more Avaya Messaging servers should be used to provide voice services per each ACCS server. The number of ACCESS/IVR ports for the ACCS server determines the number of Avaya Messaging servers in a given bundle.
Each ACCS server can connect to only one Avaya Messaging server. Therefore, in any bundle one Avaya Messaging server should be configured to connect to the ACCS server to manage ACCESS and MLINK connections. This server has SCCS_SERVER role.
All other servers in a bundle send or receive ACCESS/IVR messages through the SCCS_SERVER and their role is set to SCCS_CLIENT.
•Example 1: The customer has one ACCS server with 300 ACCESS/IVR ports.
Using an HA configuration, a bundle of three Avaya Messaging servers are providing voice services to the ACCS server. The unused 60 ports could be used for regular voice messaging services. The HA configuration may have other servers to provide more regular ports based upon the customer’s voice messaging needs.
•Example 2: The customer has three ACCS servers with each supporting 200 ACCESS/IVR ports.
Using an HA configuration, three bundles of two Avaya Messaging servers provide voice services to the 3 ACCS servers. In each bundle, the unused 40 ports could be used for regular voice messaging services. The HA configuration may have other servers to provide more regular ports based upon the customer’s voice messaging needs.
Use the UCAPEConfig utility to setup a site to your specific requirements. With this utility you are able to:
•Define the settings for the PBXNodes that contain ACCESS/IVR channels.
•Change a voice server’s role from a regular Avaya Messaging server to SCCS server or client.
•Add ACCESS/IVR ports to servers that are used for ACCS integration (Server or Client).
•Define Applications and add voice segments.
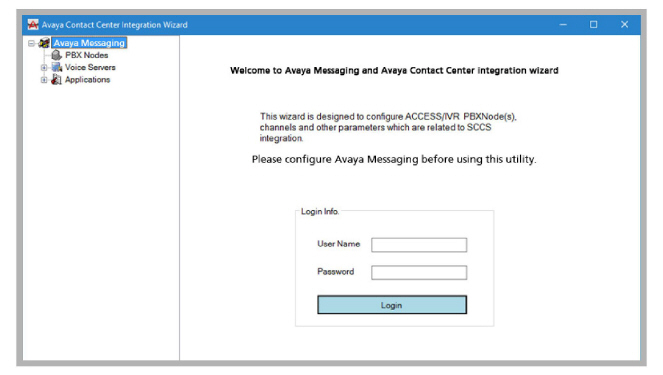
Run UCAPEConfig.exe from the SCCS folder in the Avaya Messaging program folder, and login.
PBX Nodes
The Access/IVR ports must be dedicated to Avaya Contact center voice services. Define a dedicated PBX Node, then assign all ACCESS/IVR ports to it. This will prevent these ports from being used for other purposes.
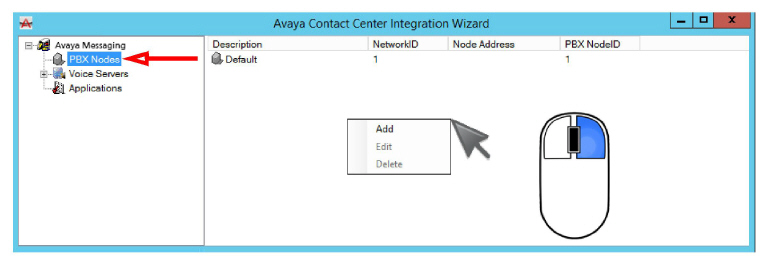
1.Select PBX Nodes in left-hand pane. In the right-hand pane, right-click an open area and choose Add.
2.Fill in the fields with your site details. Avaya Messaging requires that the Node Descriptions for all SCCS (ACCESS/IVR) nodes starts with SCCS_APE_ .
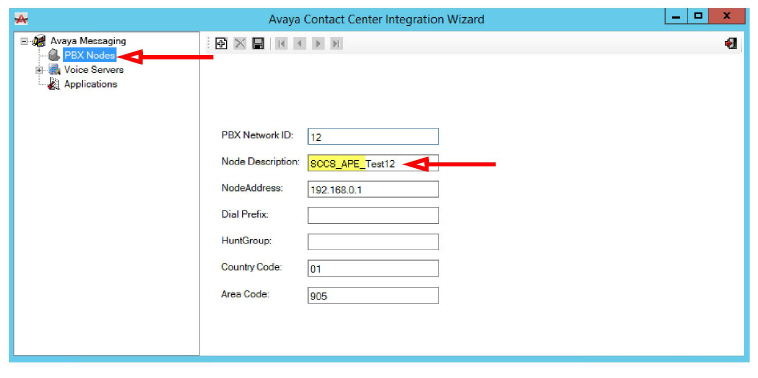
PBX Network ID: Enter an unique PBX network node ID. This ID will be used in the SIP configuration utility to define ACCESS/IVR ports.
Node Description: Ensure the description starts with SCCS_APE_ followed by whatever other description you require.
Node Address: Enter the IP Address of the PBX Node.
Dial prefix: Enter the dial prefix for the PBX node.
HuntGroup: Enter the HuntGroup for the PBX node.
Country Code: Enter the Country Code from which most calls will be made.
Area Code: Enter the Area Code from which most calls will be made.
Selecting an existing voice server to change it into a SCCS_SERVER or SCCS_CLIENT, then configure the settings for its role.
|
Note: You cannot add a new server with this utility. When you delete an SCCS_SERVER or SCCS_CLIENT, it is reset to a regular Avaya Messaging voice server. Before deleting a SCCS_SERVER or SCCS_CLIENT all of their associated ports must be deleted or transferred to another server. |
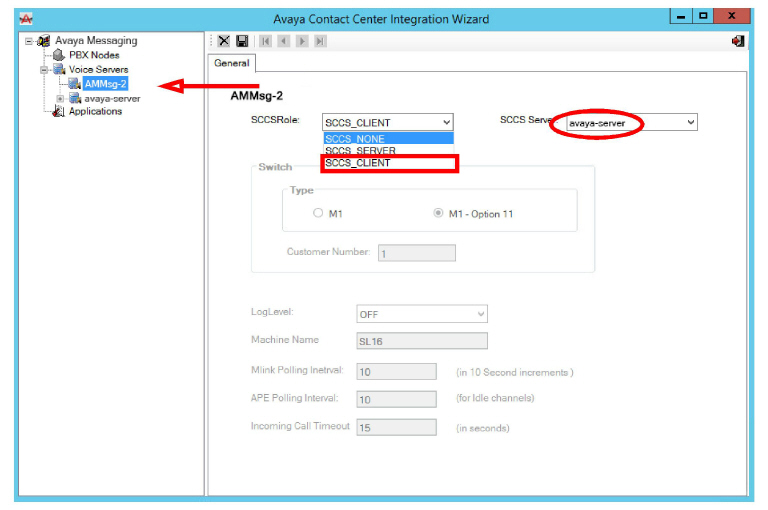
To change a server’s role:
1.In the left-hand pane, open the Voice Servers item and select a server to change.
2.In the right-hand pane, use the dropdown menu for SCCSRole to change the server into either an SCCS_SERVER or SCCS_CLIENT.

Configure the server for its role as the SCCS_SERVER or SCCS_CLIENT.
|
Note: For the computers that provide voice services to an Avaya Contact Server, one should be configured as the SCCS_SERVER, and the remainder should be configured as SCCS_CLIENTs. The SCCS_Server should be configured first since the CLIENT machines must have a SERVER to reference during setup. |
3.On the General tab, define parameters for the ACCESS and MLink protocols.
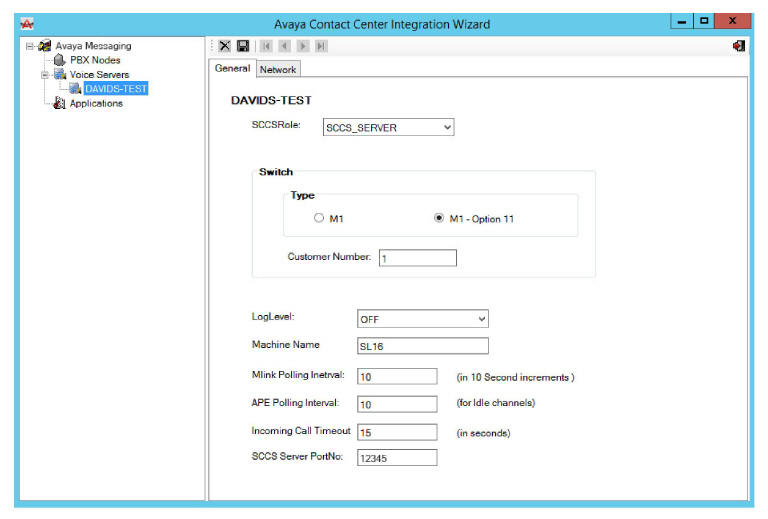
SCCSRole: Set to SCCS_SERVER to enable Avaya Contact Center integration in Avaya Messaging and start the required services to manage MLink and ACCESS protocols.
Customer Number: This must be the same as the Switch Customer Number recorded from step 2 above (Connecting to Avaya Messaging).
LogLevel: This sets the level of information sent to log files.
Machine Name: Give the machine a name.
Mlink Polling Interval: Assign a value between 10 seconds and 10 minutes, in 10 second increments. When the interval is reached and there is no message flow from the Avaya Messaging to Mlink during this time, Meridian sends a Polling message to Avaya Messaging. Meridian gives Avaya Messaging two chances to respond. If Avaya Messaging does not reply to the polling message within 10 seconds of the second attempt, Mlink releases the application and all of its resources. Polling prevents Avaya Messaging from generating excessive network traffic.
APE Polling Interval: Enter a value in seconds. When the polling timeout expires and there is no activity on ACCESS channel during this time interval, the Avaya Messaging sends a polling message to the Avaya Contact Center ACCESS Protocol Emulator.
Incoming Call Timeout: Enter a value in seconds. Avaya Messaging receives incoming call notifications from two sources (SIP and MLINK) on the ACCESS/IVR channels. Avaya Messaging must wait to receive both notifications before sending Incoming call messages to the Avaya Contact Center ACCESS Protocol Emulator. This interval specifies how long an incoming call notification will be considered valid.
SCCS Server PortNo: Set the value for this field to any available port on the server except ports 3000 and 10008 as they are reserved for system operations.
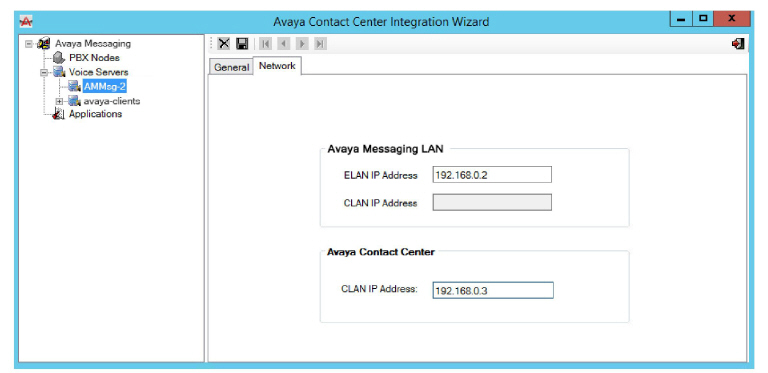
4.On the Network tab, define parameters for the ACCESS and MLink protocols.
|
Note: The Network tab is only available when an SCCS_SERVER is being configured. Skip this step when configuring an SCCS_CLIENT machine. |
Avaya Messaging LAN
ELAN IP Address: Enter the IP address of the Avaya Messaging ELAN subnet network interface.
CLAN IP Address: Shows the internal IP address of voice server if it was set. Otherwise Enter the IP address of Avaya Messaging CLAN subnet network interface.
Avaya Contact Center
CLAN IP Address: Enter the IP address of the Avaya Contact Center server CLAN subnet network interface.
5.Click the Save icon ![]() when finished.
when finished.
Voice Servers: SCCS_CLIENT
With an SCCS_SERVER configured, setup one or more computers to act as SCCS_CLIENTs. This clients connect to the selected SCCS_SERVER to send and receive MLink and ACCESS messages.
1.Select the computer to use as the client from the list in the left-hand pane.
2.Set the SCCSRole as SCCS_CLIENT. In the field for SCCS Server, select the server to place the client under.
3.Click the Save icon ![]() when finished.
when finished.
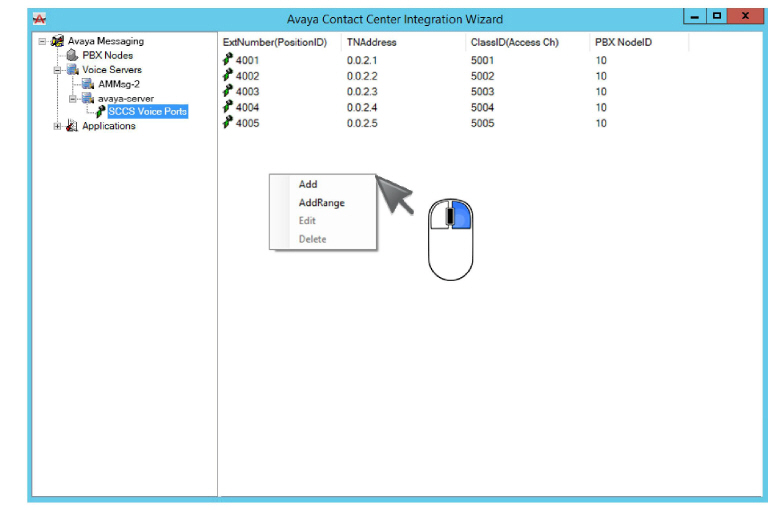
SCCS (ACCESS/IVR) Voice ports
Selecting an SCCS_SERVER in left-hand pane will display all configured ACCESS/IVR voice ports. Add new ports as necessary in the right-hand pane.
Add a Port
1.Click an existing port to edit, or right-click in an open area of the right-hand pane and select Add to create a new port.
2.Add the details required.
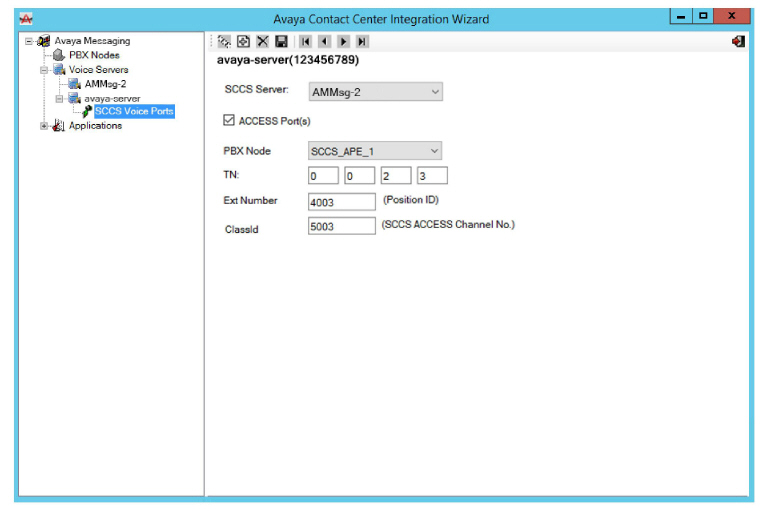
SCCS Server: From the dropdown menu, choose the SCCS Server that this SCCSClient should be associated with.
ACCESS Ports: Enable to add ACCESS ports. This will enable the ClassId field.
PBX Node: Select the SCCS PBX node that added port(s) belong to from the dropdown menu.
TN: Enter the loop, shelf, unit, and card numbers defined on the PBX for the (starting) port.
Ext Number: Enter the Position ID that is defined for this port on the PBX.
ClassId: Enter a unique number for ACCESS port(s) only. This number will be used as the channel number when configuring the Avaya Contact Center ACCESS voice ports.
Add a Range of Ports
1.Click an existing port to edit, or right-click in an open area of the right-hand pane and select Add Range to create a series of new ports.

2.Add the details required.
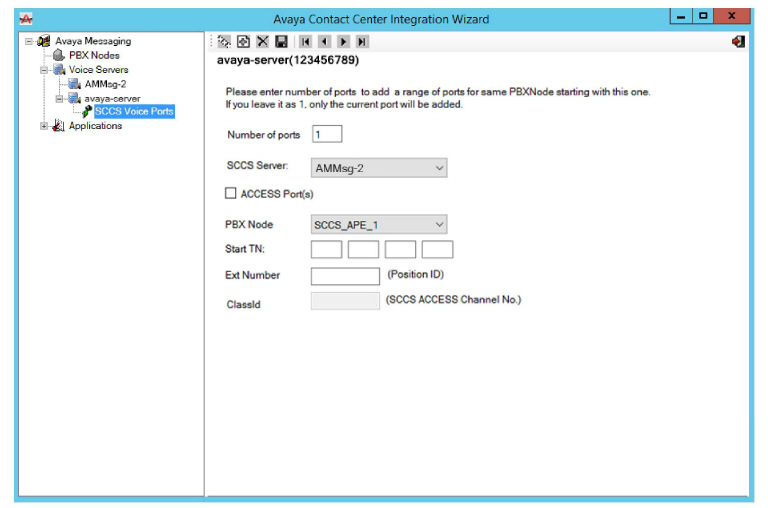
Number of Ports: Enter the number of ports to be added to the PBX node.
SCCS Server: From the dropdown menu, choose the SCCS Server that this SCCSClient should be associated with.
ACCESS Ports: Enable to add ACCESS port(s). This will enable the ClassId field.
PBX Node: From the dropdon menu, select the SCCS PBX node that added ports will belong to.
Start TN: Enter the loop, shelf, unit, and card numbers defined on the PBX for the (starting) port.
Ext Number: Enter the Position ID that is defined for this port in the PBX.
ClassId: Enter a unique number for ACCESS port(s) only. This number will be used as the channel number when configuring the Avaya Contact Center ACCESS voice ports.
Verification
Once all of the ACCESS/IVR ports have been configured, run Avaya Messaging Admin and verify the ports are assigned to the correct PBX node(s).
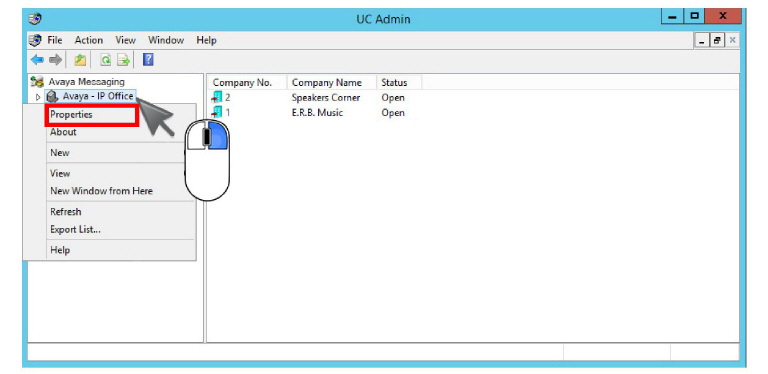
1.On the Avaya Messaging voice server, open Avaya Messaging Admin from the desktop.
Right-click the PBX and select Properties.
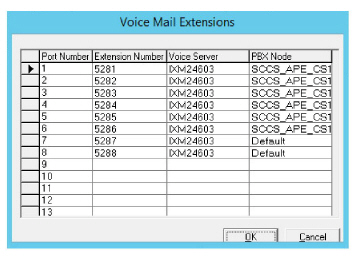
2.On the General tab, click Voice Mail Extensions.
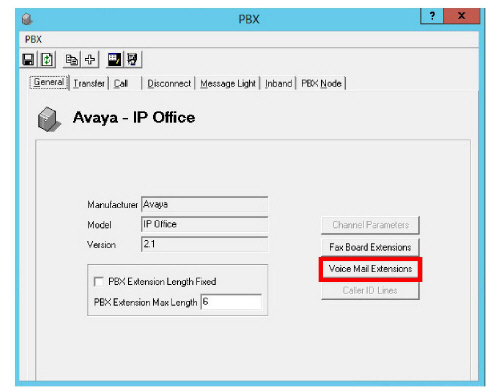
3.Verify that the required ports are present.
Applications
CallPilot applications are similar to Avaya Messaging voice menus. CallPilot keeps voice segments within an application, but it has no associated actions and is just a container for the segments.
For ACCESS voice services, Avaya Contact Center passes an application name in a Open File command to get the file handle. To play a voice segment, it passes file handle along with segment number to the voice services provider.
1.Click Applications in the left-hand pane to see all existing applications.
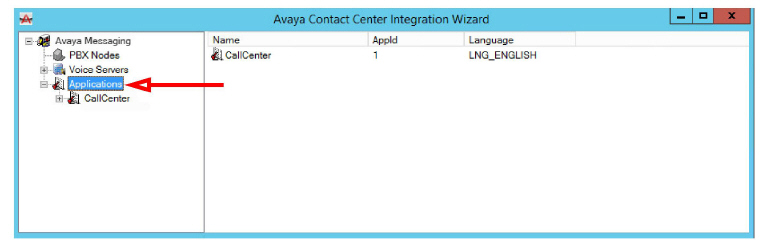
2.Select an existing application, or right-click on an empty area in the right-hand pane and choose Add to create a new one.
3.Double-click an existing voice segment to edit, or right-click in an open area in the right-hand pane and select Add to create a new one.
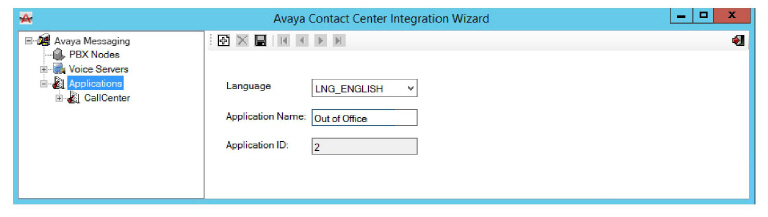
Language: Select the language for this application.
Application Name: Enter a unique name for this application. The name is used as the filename when you create Voice Segment variables in Avaya Contact Center.
Application ID: Automatically populated, this is a unique ID created for this application.
4.Enter the details for the voice segment.
Voice Segments
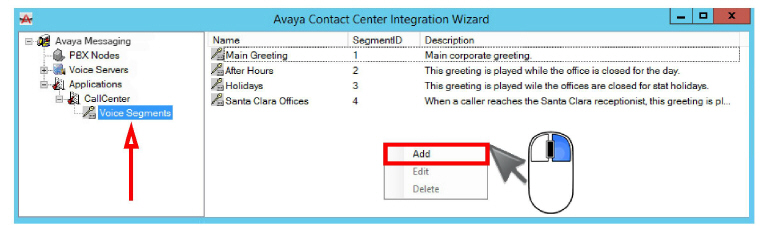
Expand an application in left pane and select Voice Segments to see the voice segments already defined for that application. You are able to add new voice segment from context menu.
1.Select a voice segment under Applications. To create a new one, right-click on an open area and choose Add.
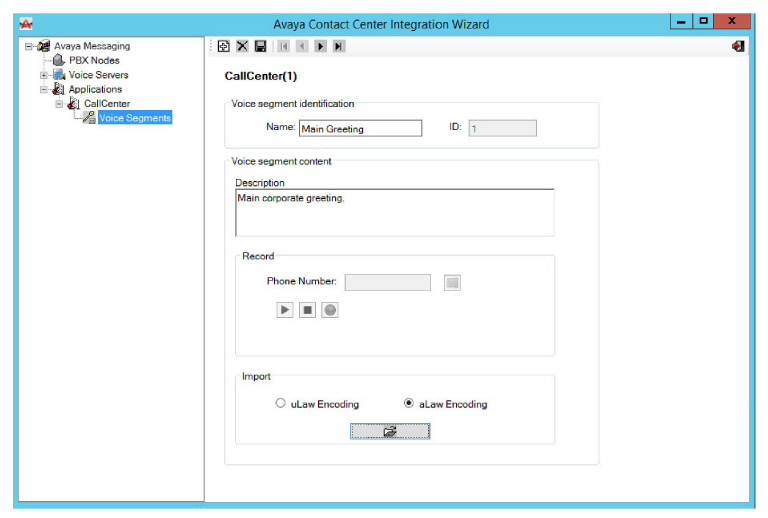
2.Fill in the details for this voice segment file.
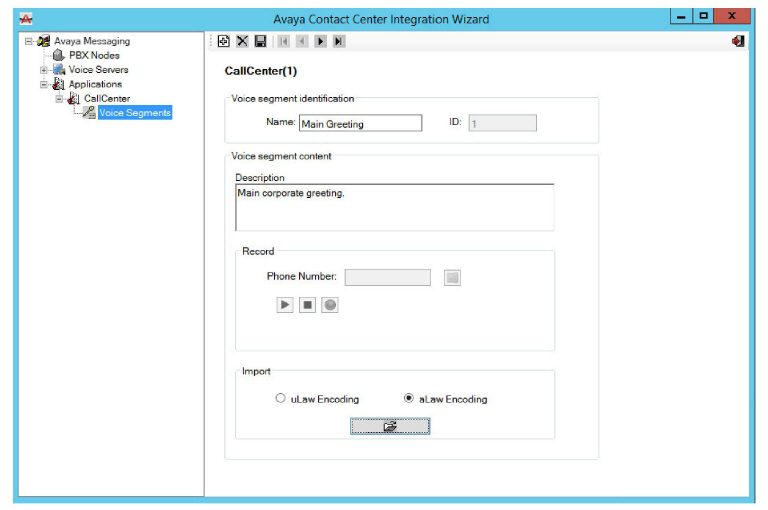
Name: Enter a unique name for the voice segment.
Description: Enter a description to track the content of voice segment.
Record - If this utility is running on a SCCS_SERVER server this group will be enabled.
PhoneNumber : Enter your internal phone number and press Phone.
![]() Phone: Click to place a call to phone number. Answer the phone to be able to record or play voice segments.
Phone: Click to place a call to phone number. Answer the phone to be able to record or play voice segments.
![]() Record: Click to record a voice segment.
Record: Click to record a voice segment.
![]() Stop: Click to stop recording or playing the segment.
Stop: Click to stop recording or playing the segment.
![]() Play: Click to play the voice segment.
Play: Click to play the voice segment.
Import
Encoding: Select the proper encoding (aLaw or μLaw) should be used in importing WAV files.
Import: Click to import WAV or VOX file into this voice segment. Select the file to be imported as recording for the current voice segment.
|
Hint: You can play the imported file over the phone by clicking the Play button. |
GIVE IVR Configuration
To support Give IVR in Avaya Messaging, a voice menu must be created for the application and assigned a path in the routing table.
Voice Menu
Refer to chapter 9 for complete information on configuring Voice Menus.
Routing Table
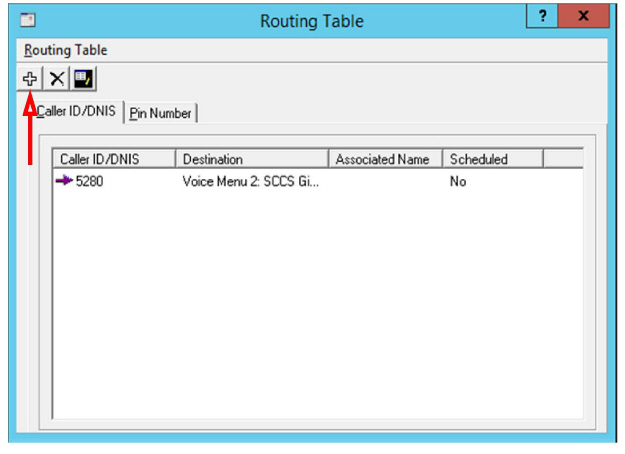
Add a new route for each treatment ID used to send the Give IVR command.
Click + to create a new routing table.
Add Route
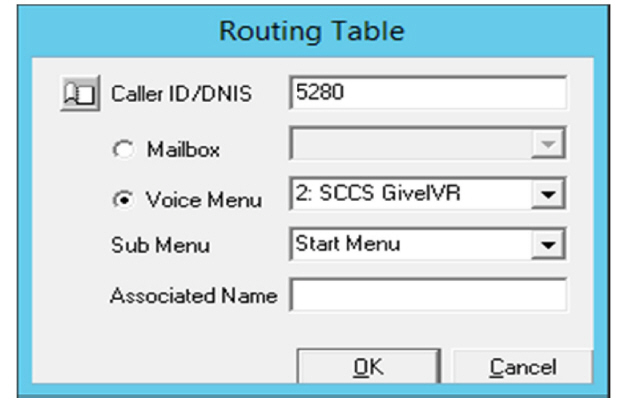
Caller ID/DNIS: Enter the treatment ID.
Voice Menu: Enable this option. From the dropdown menu, select the Voice Menu created for the treatment ID.
Sub Menu: From the dropdown menu, select the sub menu to use. Callers with this DNIS and treatment ID will be brought to selected sub menu of the chosen Voice Menu.
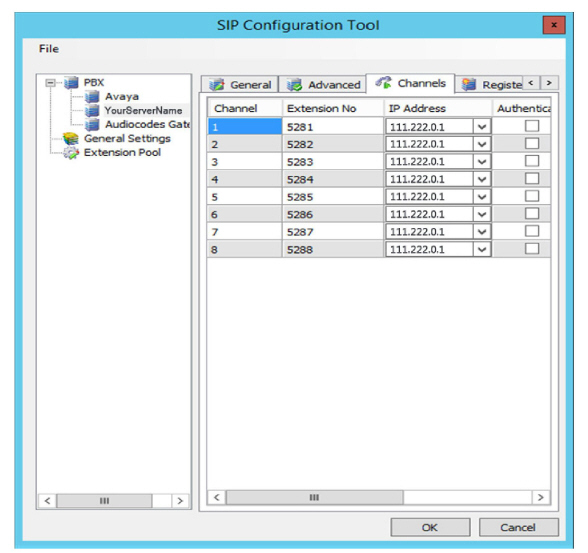
SIP Configuration Tool
Dialogic Media Gateway ports must be configured using the SIP Configuration Tool.
|
Note: Sites listed in the SIP Configuration tool must appear in the same order as they are numerically configured in UC Admin > PBX in the PBX Network ID column. If SIP Configurator does not have a connection to one of those devices, then a dummy PBX (i.e. no channels defined) must be added to the SIP Configuration Tool in the correct position to keep both utilities aligned. For example, if there are 5 devices installed in UC Admin, there must be 5 devices also in SIP Configurator in the same order. 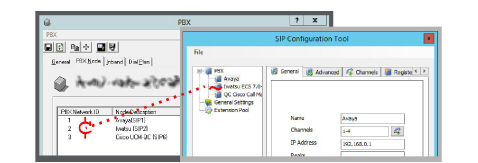
PBX # / Node Description SIP Configuration 1 Avaya Avaya 5 Cisco Mitel 3 Iwatsu Dummy 1 2 Mitel Broadsoft 4 Broadsoft Dummy 2 |
Go to the General tab.

Port Routing: Enter 1 to configure the DMG ports as SIP agents.
Go to the Channels tab and add channels with Extension numbers. These are the Position IDs that are assigned to ACCESS/IVR ports in CS1000 configuration.
Avaya Messaging ACCESS/IVR voice ports must be configured on the DMG. TDM trunk groups and corresponding routing rules must be created for every voice port.
For each DMG port used, the CS1000 must have an AST license.
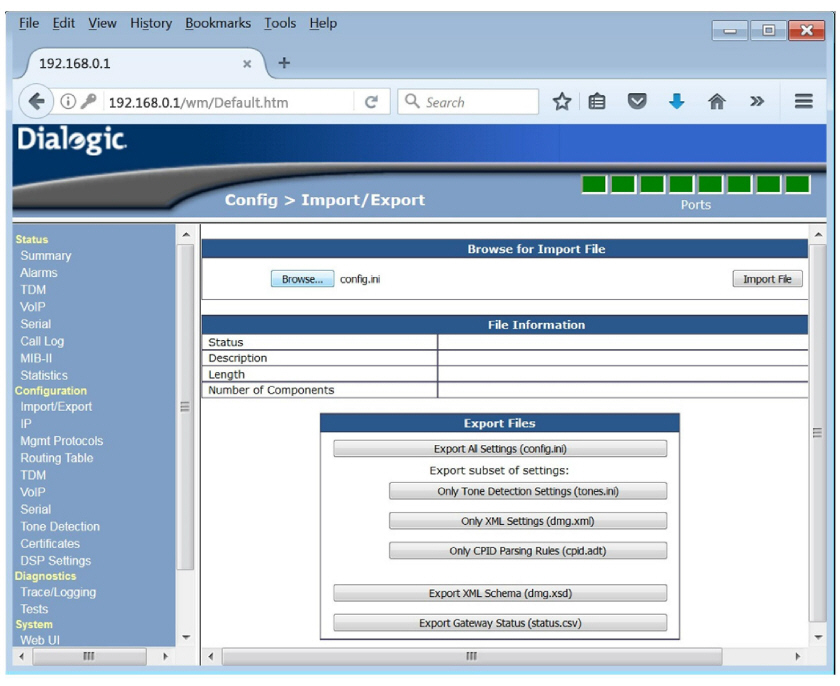
Export the DMG configuration into a file.
Login to the DMG Web Console and go to Configuration > Import/Export. Click Export All Settings (config.ini).

Changes in the DMG Config File.
TDM Trunk groups.
Open the config.ini file in a text editor (i.e. Notepad) and find <TdmTrunkGroups>.
<TdmTrunkGroups>
<Group>
<Name>TdmAll</Name>
<SelectMode>
<Direction>Ascending</Direction>
<Mode>Linear</Mode>
</SelectMode>
<Exp>*</Exp>
</Group>
Add the following lines for every voice port.
<Group>
<Name>Tdm1</Name>
<SelectMode>
<Direction>Ascending</Direction>
<Mode>Linear</Mode>
</SelectMode>
<Exp>1(1)</Exp>
</Group>
The final TDM Trunk groups section should look like the following.
<TdmTrunkGroups>
<Group>
<Name>TdmAll</Name>
<SelectMode>
<Direction>Ascending</Direction>
<Mode>Linear</Mode>
</SelectMode>
<Exp>*</Exp>
</Group>
<Group>
<Name>Tdm1</Name>
<SelectMode>
<Direction>Ascending</Direction>
<Mode>Linear</Mode>
</SelectMode>
<Exp>1(1)</Exp>
</Group>
<Group>
<Name>Tdm2</Name>
<SelectMode>
<Direction>Ascending</Direction>
<Mode>Linear</Mode>
</SelectMode>
<Exp>2(1)</Exp>
</Group>
……….
</TdmTrunkGroups>
Create outbound group
If your PBX does not have a SIP port connected to the voice server, at least one TDM port should be dedicated for message tasks as well as recording voice segments through the UCAPEConfig utility.
Add the following group in Exp. List the ports that should be used for the messaging system.
<Group>
<Name>TDM Messaging group </Name>
<SelectMode>
<Direction>Ascending</Direction>
<Mode>Linear</Mode>
</SelectMode>
<Exp>7(1),8(1)</Exp>
</Group>
……….
</TdmTrunkGroups>
Create Routing rules
In the <Rules> section add a routing rule for every voice channel. The rules must be before any other rules configured on the DMG.
<Rules>
<InboundTdm>
<Name>InboundTdm1</Name>
<Enabled>true</Enabled>
<Match>
<RequestType>Any</RequestType>
<TrunkGroup>Tdm1</TrunkGroup>
<CpidExpressions>
<CallingName>*</CallingName>
<CallingNumber>*</CallingNumber>
<CalledName>*</CalledName>
<CalledNumber>*</CalledNumber>
<RedirName>*</RedirName>
<RedirNumber>*</RedirNumber>
</CpidExpressions>
</Match>
<Route>
<VoipRoute>
<Method>Bridged</Method>
<HostGroup>Avaya MessagingHG</HostGroup>
<CpidManipulation>
<CallingName>S</CallingName>
<CallingNumber>S</CallingNumber>
<CalledName>D</CalledName>
<CalledNumber>"5281"</CalledNumber>
<RedirName>R</RedirName>
<RedirNumber>R</RedirNumber>
</CpidManipulation>
</VoipRoute>
</Route>
</InboundTdm>
<InboundTdm>
<Name>InboundTdm2</Name>
<Enabled>true</Enabled>
<Match>
<RequestType>Any</RequestType>
<TrunkGroup>Tdm2</TrunkGroup>
<CpidExpressions>
<CallingName>*</CallingName>
<CallingNumber>*</CallingNumber>
<CalledName>*</CalledName>
<CalledNumber>*</CalledNumber>
<RedirName>*</RedirName>
<RedirNumber>*</RedirNumber>
</CpidExpressions>
</Match>
<Route>
<VoipRoute>
<Method>Bridged</Method>
<HostGroup>Avaya MessagingHG</HostGroup>
<CpidManipulation>
<CallingName>S</CallingName>
<CallingNumber>S</CallingNumber>
<CalledName>D</CalledName>
<CalledNumber>"5282"</CalledNumber>
<RedirName>R</RedirName>
<RedirNumber>R</RedirNumber>
</CpidManipulation>
</VoipRoute>
</Route>
</InboundTdm>
………………….
</Rules>
Where:
•InboundTdm1, InboundTdm2,... - the names of the inbound TDM routing rules,
•Tdm1, Tdm2,.... - the names of TDM trunk groups,
•1(1), 2(1),.... - port (channel) content,
•Avaya MessagingHG - the name of the VoIP hunt group configured for Avaya Messaging,
•"5281", "5282",.... - channels extension numbers.
VoIP Routing
For regular messaging services in the <Rules> section add a routing rule for VoIP channel. The rules must be before any other rules configured on the DMG.
<InboundVoip>
<Name>Inbound VoIP Rule #21</Name>
<Enabled>true</Enabled>
<Match>
<RequestType>Call</RequestType>
<HostExpression>10.255.246.30</HostExpression>
<CpidExpressions>
<CallingName>*</CallingName>
<CallingNumber>*</CallingNumber>
<CalledName>*</CalledName>
<CalledNumber>*</CalledNumber>
<RedirName>*</RedirName>
<RedirNumber>*</RedirNumber>
</CpidExpressions>
</Match>
<Route>
<TdmRoute>
<Method>Bridged</Method>
<TrunkGroup>TDM Messaging group </TrunkGroup>
<CpidManipulation>
<CallingName>S</CallingName>
<CallingNumber>S</CallingNumber>
<CalledName>D</CalledName>
<CalledNumber>D</CalledNumber>
<RedirName>R</RedirName>
<RedirNumber>R</RedirNumber>
</CpidManipulation>
</TdmRoute>
</Route>
</InboundVoip>
Import the Configuration File into the DMG.
Login to the DMG Web Console and go to Configuration > Import/Export. Click Browse. Select the modified configuration file and click Import File.
When finished, restart the DMG.