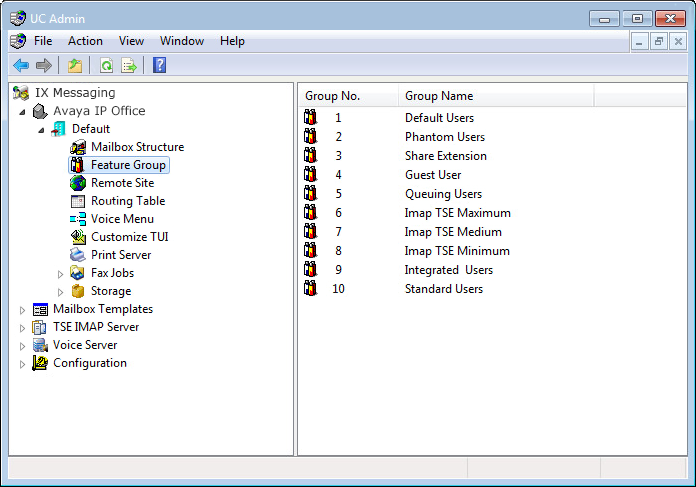
Feature Group
Introduction
Feature Group, similar to Company, determines the rules for the Mailboxes that are associated with it. By creating numerous Feature Groups for different purposes, you will be able to allocate users to custom settings with a single click, rather than having to individually assign multiple rules to each mailbox. The features that the FG is able to manage include recording limits, message expiration, notification, transfer supervision, transfer options, IMAP settings and other features that are related to the mailboxes. Feature Group will prove to be an invaluable tool, especially if you are managing large numbers of users.
Feature Group Buttons
|
Button
|
Description
|
|

|
Add a new Feature Group.
|
|

|
Delete current Feature Group.
|
|

|
Save current Feature Group.
|
|

|
Refresh current Feature Group settings.
|
|

|
Move to first Feature Group.
|
|

|
Move to previous Feature Group.
|
|

|
Move to next Feature Group.
|
|

|
Move to last Feature Group.
|
General Tab
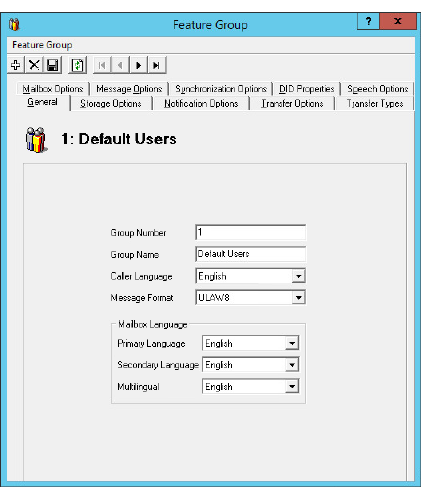
The General tab of Feature Group allows you to configure identification and localized settings.
Group Number: Enter the number that will be assigned to the Feature Group. By default, the next available number will be assigned to a new Feature Group. The range of possible Feature Group numbers is 1-999.
Group Name: Enter a name for the Feature Group.
Caller Language: From the dropdown menu, select the default language that the caller is greeted by if the caller does not choose a language when prompted by the automated attendant.
Message Format: From the dropdown menu, select the format the messages will be stored and played back in.
|
Note: If you are integrating IBM Notes with the UC system you must select the WAV format and must use the Dialogic JTC voice card.
|
|
Note: The message format selections available are defined by the type of board drivers that are loaded on the system.
|
|
Note: If set to the WAVMSGSM6106, 6108, 61011 or WAVETPGSM6106, 6018, 61011 formats, the user will not have full Control Key capabilities when using the Telephone User interface. Using the WAVGSM* formats will disable the fast-forward and rewind capabilities while listening to a message.
|
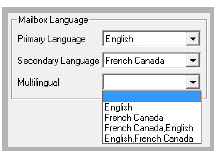
Primary Language: Select the language to be used as the main language for mailbox prompts for all members of this Feature Group.
Secondary Language: Select the language to be used as an alternate language for mailbox prompts for all members of this Feature Group.
Multilingual: From the dropdown menu, choose the order the prompts will be played: Primary only, Secondary only, Primary then Secondary, or Secondary then Primary.
|
Important: The appropriate languages must be installed on the voice server before they will be available here. Additional languages can be purchased as part of your Avaya Messaging license.
|
When an external caller reaches the mailbox of a member of this Feature Group, they will hear the mailbox prompts (e.g. “Please leave a message at the tone.”) in the order chosen under Multilingual.
When an internal caller reaches a mailbox, the voice server will scan their mailbox language preferences and play the prompts in the appropriate language.
|
Note: This option will not be available if has not been enabled in the Company > Advanced tab (found here).
|
Storage Options Tab
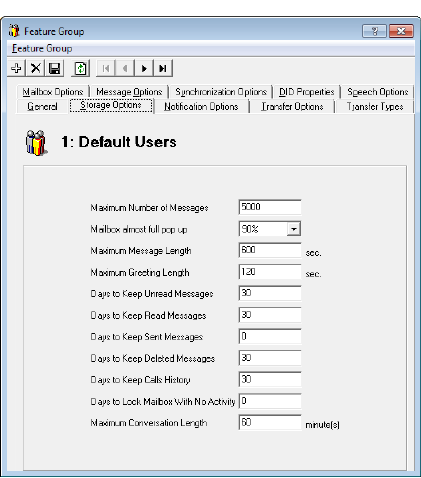
The Storage Options tab of Feature Group allows you to configure message storage settings that will be enforced on the Mailboxes associated with the current Feature Group.
Maximum Number of Messages: Enter the maximum number of messages that are allowed for each Mailbox associated with the current Feature Group. The default is 200, and the maximum value is 32,000.
|
Hint: The maximum messages value should be based on the needs of the user. You should allow more than enough message storage space for each user to make sure that no messages get lost when a Mailbox reaches capacity. Ten (10) megabytes of hard drive space is equal to approximately one hour of voice message storage.
|
|
Note: The maximum value for this field is ignored if the mailbox is UM synchronized with an email environment.
|
|
Warning: Users may experience performance degradation with mailboxes having more than 32,000 messages.
|
Mailbox almost full pop up: From the dropdown menu, select a percentage value at which the users will be notified that their Mailbox is almost full in Web Access.
Maximum Message Length: Enter the maximum length of time (in seconds) that a recorded message can be for any given Mailbox within the Feature Group.
|
Note: This number is specified in seconds. This value should be set higher than the anticipated message length to ensure that callers are not disconnected in the middle of a message.
|
Maximum Greeting Length: Enter the maximum length of time (in seconds) that a recorded greeting can be for any Mailbox within the Feature Group. The maximum greeting length is 600 seconds.
Days to Keep Unread Messages: Enter the number of days (1-32767) the system will store unread messages before moving them to the deleted items folder. The default is 14 days.
Days to Keep Read Messages: Enter the number of days (1-32767) the system is to store read messages before moving them to the deleted items folder. The default is 14 days.
Days to Keep Sent Messages: Enter the number of days (1-32767) the system will keep sent messages before moving them to the deleted items folder. The default is 14 days.
Days to Keep Deleted Messages: Enter the number of days (1-32767, default is 14) to keep deleted messages in the deleted items folder. The messages are permanently deleted when they are removed from the deleted items folder.
Days to Keep Calls History: Enter the number of days to keep the call logs for inbound and outbound calls.
Days to Lock Mailbox With No Activity: Specify the number of days that a new voice, text or SMS message can be in the inbox and Unread before the mailbox is deemed Inactive and security locked by the system. Mailboxes locked in this manner will have their presence set to Extended Absence, and the owner will be flagged as Unavailable. This event is also triggered if there is no activity (incoming or outgoing) in the mailbox for the specified number of days. Enter 0 to disable the option.
Maximum Conversation Length: Enter the maximum length of time (in minutes) that a conversation can be between two parties before the call is ended by the system. The default is 60 minutes.
|
Note: The call needs to be supervised (e.g. trombone transfer) in order for the system to restrict the conversation length.
|
Notification Options Tab
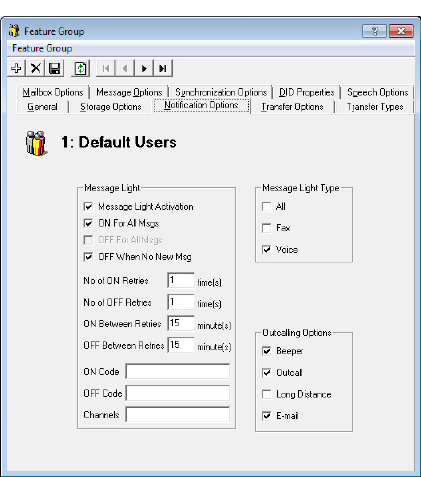
Notification Options in the Feature Group allows you to configure Message Waiting Light indicators along with paging and other outside notification methods that are enabled for new messages. These settings will be enforced on the Mailboxes associated with the current Feature Group.
Message Light
Message Light Activation: Enable this checkbox to allow the message waiting light to be turned on under the conditions specified.
|
Note: If you have telephone sets that provide for message waiting lights as well as some that do not, make sure that separate Feature Groups are assigned for each type of set. De-select Message Lights for the Feature Group that does not have message waiting lights.
If you have any Mailboxes that do not have a corresponding telephone extension (for example, phantom Mailboxes that are used for Voice Menus, guest Mailboxes), do not enable this feature, as there are no message lights to activate.
|
ON For All Msgs: Enable this checkbox to turn on the message waiting light (send ON code) when a new message arrives.
OFF For All Msgs: Enable this checkbox to deactivate the message waiting light (send OFF code) when at least one new message is read.
OFF When No New Msg: Enable this checkbox to deactivate the message waiting light (send OFF code) when no new messages are in the user's Mailbox.
No of ON Retries: Enter the number of retries the system will attempt when activating message light fails.
No of OFF Retries: Enter the number of retries the system will attempt when deactivating message light fails.
ON Between Retries: Enter the duration (in minutes) that the system will wait in between attempts to activate the message light.
OFF Between Retries: Enter the duration (in minutes) the system will wait between attempts to deactivate the MWI.
ON Code: Enter the code required to turn on message waiting lights.
OFF Code: Enter the code required to turn off message waiting lights.
|
Note: The ON Code and OFF Code fields should be used in situations where the code is too long to be input in the ON Code field in the PBX Message Light tab (usually MCI). As well, for multi-PBX configurations, different codes must be used for different PBXs. In this situation, certain Feature Groups can be assigned to a message waiting light code that reflects the different PBXs being used.
|
Channels: Enter the channel number that will be used to send message waiting light notifications.
Message Light Type
All: Enable this checkbox to send MWL code for all types of messages.
Fax: Enable this checkbox to turn on message lights only for new fax messages.
Voice: Enable this checkbox to turn on message lights only for new voice messages.
Outcalling Options
Beeper: Enable this checkbox to send notification messages to a pager when a new message arrives.
Outcall: Enable this checkbox to send notification messages to a telephone when a new message arrives.
Long Distance: Enable to send notification messages to a telephone (long distance) when a new message arrives.
E-mail: Enable this checkbox to send notification messages to an email when a new message arrives.
Transfer Options Tab
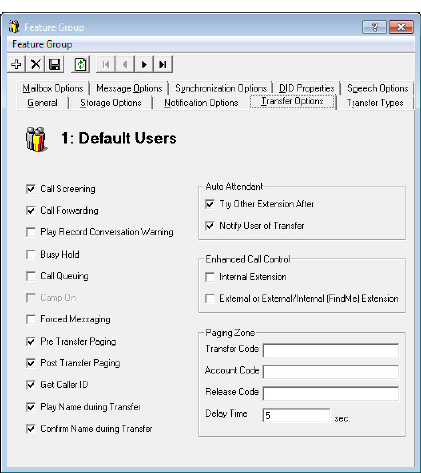
The Transfer Options tab of Feature Group allows you to configure the way in which the calls are handled. Transfer Options include Call Screening, Call Forwarding, Busy Hold, Call Queuing, and Paging Capabilities, either before the call is transferred or after the caller has reached the Mailbox.
Call Screening: Enable this checkbox to allow Mailbox users in this Feature Group to use Call Screening. Before initiating a transfer, the system will ask the caller for their name. When the recipient picks up, they will hear the recorded name and can decide what to do with the call.
Call Forwarding: Enable this checkbox to allow Mailbox users in the Feature Group to use Call Forwarding. When someone calls a Mailbox user, instead of ringing the Mailbox user's location, the system will forward the call to the person s/he has defined in their Mailbox.
Play Record Conversation Warning: Enable this checkbox to notify the callers that the call is being recorded if the recipient has recording enabled.
Busy Hold: Enable this checkbox to give callers the option to either hold for the extension, leave a message for that extension, or try another extension if the called Mailbox is busy. While on hold, callers may leave a voice message by pressing *.
|
Note: This feature is only available on telephone systems that provide a busy tone. Most telephone sets with multiple extension appearances do not produce a busy tone.
|
Call Queuing: Enable this checkbox to allow Mailbox users in the Feature Group to use Call Queuing. If someone calls a busy extension, they are given the option to be placed in a queue to hold or leave a message.
|
Note: Call queuing is available only on telephone systems that provide a busy tone. Most telephone sets with multiple extension appearances do not produce a busy tone.
|
Camp On: Enable this checkbox to allow Mailbox users in the Feature Group to use Camp On. If someone calls a Mailbox user who is on the phone, they can press * to be notified when the Mailbox user has finished their current call.
Forced Messaging: Enable this checkbox to force the caller to press a key before they can leave a message. If this is disabled, the system will automatically starting to record a message after the mailbox greeting. This option can help to reduce the number of blank messages left on the system.
Pre Transfer Paging: Enable this checkbox to allow Mailbox users in the Feature Group to use Pre Transfer Paging. Before a call is transferred to a Mailbox user, the system will page the user first.
Post Transfer Paging: Enable this checkbox to allow Mailbox users in the Feature Group to use Post Transfer Paging. If the Mailbox user is not available, the caller can page the user again.
Get Caller ID: Enable this checkbox to send a pop up screen with the Caller ID information to the Mailbox user when they receive an incoming call.
Play Name During Transfer: Enable this checkbox to play the Mailbox user’s name when the caller is being transferred to the Mailbox.
Confirm Name during Transfer: Enable this checkbox to confirm the Mailbox user’s name when a caller is being transferred to the Mailbox.
Auto Attendant
Try Other Extension After: Enable this checkbox to give callers an option to try another extension after they leave a message in the Mailbox.
Notify User of Transfer: Enable this checkbox to notify the Mailbox user of an incoming call transfer.
Enhanced Call Control
Internal Extension: Enable this checkbox to allow users to have access to Enhanced Call Control features from their internal phones.
External or External/Internal (Find Me) Extension: Enable this checkbox to allow Mailbox users to have access to Enhanced Call Control features from their external phones or phones that they are connected to through the Find Me/Follow Me feature. Users must be dialed through the auto attendant in order for them to have access to Enhanced Call Control.
Paging Zone
Transfer Code: Enter the transfer code required for paging.
Account Code: Enter the account code required for paging.
Release Code: Enter the paging release code.
Delay Time: Enter the time (in seconds) that the server is to wait before it transfers the caller to the specified extension after the user is paged.
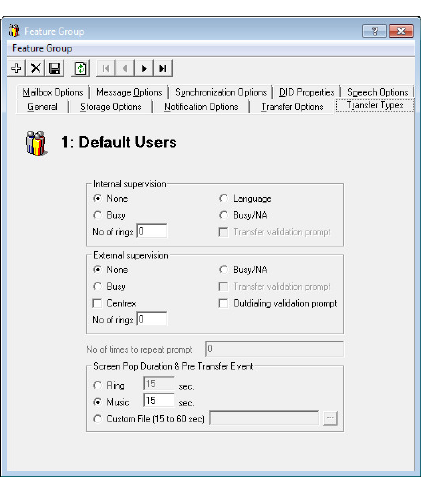
Transfer Types Tab
The Transfer Types tab of Feature Group allows administrators to configure the rules associated with transfers that occur between the server and any of the defined extensions.
|
Warning: Only one transfer option (in each of Internal and External supervision groups) may be selected per Mailbox group.
|
Internal Supervision
None: Select this radio button to transfer calls to extensions without supervising the call (blind transfer). The caller being transferred to an extension is placed on hold while the system makes the connection. The caller is then released to the telephone system and is no longer in control of any of the actions. Calls may be transferred back to the system if the telephone system has the ability to return the callers if the extension is busy or unavailable.
Busy: Select this radio button to supervise the call while the caller is being transferred to the extension. The caller being transferred to an extension is placed on hold while the system makes the connection. If the extension is busy, the system instructs the caller to leave a message. However, if the extension is not busy and a ring signal is heard, the caller is released to the telephone system and is no longer in control of any of the actions. Calls may be transferred back to the system only if the switch has the capability to forward calls on a No-Answer condition.
|
Note: Under IP integration the Busy and Busy/NA option will operate in the same manner.
|
Language: Select this radio button to supervise the call while the caller is being transferred to the extension, and keep a record of the language selection that the caller has made. When the caller returns to the system (failed transfer or return to system), they will hear the menu in the selected language.
|
Note: The port used for supervised transfers will not be available to receive any calls as long as the supervision is active.
|
Busy/NA: Select this radio button to supervise the call while the caller is being transferred to the extension. The caller being transferred to an extension is placed on hold while the system makes the connection. The system checks for both the busy and the no answer conditions and informs the caller of the options available to them when either situation arises.
|
Note: The port used for supervised transfers will not be available to receive any calls as long as the supervision is active.
|
No of rings: Enter the number of rings that the server will detect before returning the caller to the system. In most scenarios this value is set to 0 which means that the value configured in the PBX is used. You may enter a different value here to override the PBX value but the value must be lower than what is currently configured in the PBX.
Transfer validation prompt: Enable this checkbox to have the system prompt the extension before transferring the caller.
External Supervision
None: Select this radio button to transfer calls to extensions without supervising the call (blind transfer). The caller being transferred to an extension is placed on hold while the system makes the connection. The caller is then released to the telephone system and is no longer in control of any of the actions. Calls may be transferred back to the system if the telephone system has the ability to return the callers if the extension is busy or unavailable.
Busy: Select this radio button to supervise the call while the caller is being transferred to the extension. The caller being transferred to an extension is placed on hold while the system makes the connection. If the extension is busy, the system instructs the caller to leave a message. However, if the extension is not busy and a ring signal is heard, the caller is released to the telephone system and is no longer in control of any of the actions. Calls may be transferred back to the system only if the switch has the capability to forward calls on a No-Answer condition.
|
Note: Under IP integration the Busy and Busy/NA option will operate in the same manner.
|
Centrex: Enable this checkbox to supervise a transferred Centrex line so that the system can send the call back to the server if there is no answer.
Busy/NA: Select this radio button to supervise the call while the caller is being transferred to the extension. The caller being transferred to an extension is placed on hold while the system makes the connection. The system checks for both the busy and the no answer conditions and informs the caller of the options available to them when either situation arises.
|
Note: The port used for supervised transfers will not be available to receive any calls as long as the supervision is active.
|
No of rings: Enter the number of rings that the server will detect before returning the caller to the system. In most scenarios this value is set to 0 which means that the value configured in the PBX is used. You may enter a different value here to override the PBX value but the value must be lower than what is currently configured in the PBX
Transfer validation prompt: Enable this checkbox to have the system prompt the extension before transferring the caller.
Outdialing Validation prompt: Enable this checkbox to have the system prompt the extension before forwarding according to outdialing rules.
No of times to repeat prompt: Enter the number of times you want the system to repeat the validation prompts.
Screen Pop Duration & Pre-Transfer Event
Ring: Select this radio button to present the caller with a ring. Enter a length of time value (seconds) in the field.
Music: Select this radio button to present the caller with the system default music. Enter a length of time value (seconds) in the field.
Custom File: Select this radio button to present the caller with the a custom sound. Click on the ellipsis button  to select the file you want the caller to hear.
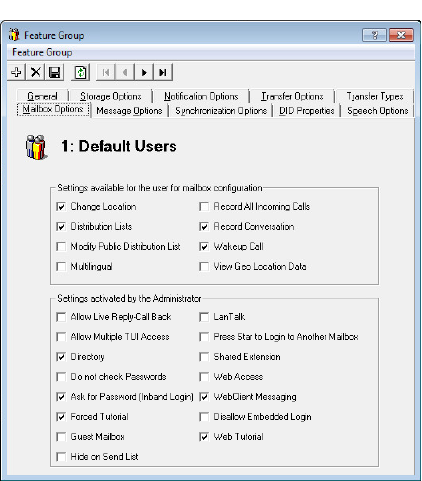
Mailbox Options Tab
The Mailbox Options tab of Feature Group allows you to configure the level of features that the Mailboxes associated with the current Feature Group can utilize.
|
Note: For some functions, the Feature Group only gives the authority to enable the setting from the Mailbox properties. These functions must be manually added to the Mailbox after authorizing from the Feature Group.
|
Settings available for the user for Mailbox configuration
Change Location: Enable this checkbox to allow users in the Feature Group to change their location in iLink Pro Desktop and Web Access.
Distribution Lists: Enable this checkbox to allow members of the Feature Group to use distribution lists.
Modify Public Distribution List: When enabled, the user will have access (add/delete members, create/remove lists) to a public distribution list on the system using Web Access. If disabled, users can access the list but not make changes to it.
Multilingual: Enable this checkbox to allow users in the Feature Group to record greetings for multiple languages. The user will be prompted to select the language to record the greeting for.
Record All Incoming Calls: Enable this checkbox to allow users in the Feature Group to record all incoming calls.
Record Conversation: Enable this checkbox to allow users to record a telephone conversation, both incoming and outgoing calls. Recording function is managed through the iLink Pro Desktop.
Wakeup Call: Enable this checkbox to allow users in the Feature Group to manage wakeup calls.
View Geo Location Data: Enables the Show on a Map feature in iLink Pro. Users can click that item and see your location through Google Maps. When disabled, this menu item is not available.
Settings Activated by the Administrator
Allow Live Reply-Call Back: Enable this checkbox to allow Mailbox users to use the "Call Back to Sender" TUI action after listening to a message.
Allow Multiple TUI Access: Enable this checkbox to allow two or more users to log into a single Mailbox account at the same time. This feature is intended for shared/public Mailboxes.
Directory: Enable this checkbox to allow users to be listed both in the dial-by-name directory and the complete directory. The dial by name directory is set up in ascending order with respect to Mailbox number. Callers may access the dial by name directory by pressing the * key when they reach the auto attendant, or they may listen to the complete company directory (arranged in ascending order according to Mailbox number) by pressing the * key a second time.
Do not check password: Enable this checkbox to skip the password check. The user will be sent directly to the TUI.
Ask For Password (Inband Login): Enable to prompt the users to enter their passwords every time they log in.
Forced Tutorial: Enable this checkbox to prohibit users from picking up messages until they have completed the tutorial. You can select a full or simple tutorial through UC Admin > Voice Server > Advanced > Simple Tutorial (page 323).
Guest Mailbox: Enable this checkbox to utilize a simplified messaging menu.
Hide On Send List: Enable this checkbox to hide all Mailboxes associated with the current Feature Group from the directory which is used to search users in iLink Pro Desktop and Web Access.
Chat: Enable this checkbox to allow users to send and receive Chat messages.
Press Star to Login to Another Mailbox: Enable this checkbox to allow users to log into another Mailbox at the Password Request prompt when they dial into the system by pressing *.
Shared Extension: Enable this checkbox if the users in this Feature Group are sharing extensions. If the system is dialed from a shared extension, the system will ask for the Mailbox number to log in to. If someone calls a shared extension, when the phone is answered, the system will say who the call is for.
Web Access: Enable this checkbox to give the users Web Access capability.
WebClient Messaging: Enable this checkbox to allow users to have messaging capabilities (email, voice mail, fax mail) while using Web Access. Users will have no access to their inbox from the Web Access if this feature is disabled.
Disallow Embedded Login: Client applications, such as iLink Pro, can login to the voice server automatically once configured. Enable this option to force users to login each time they connect through an app.
Web Tutorial: When enabled, the user will be forced to complete the web tutorial to setup their account.
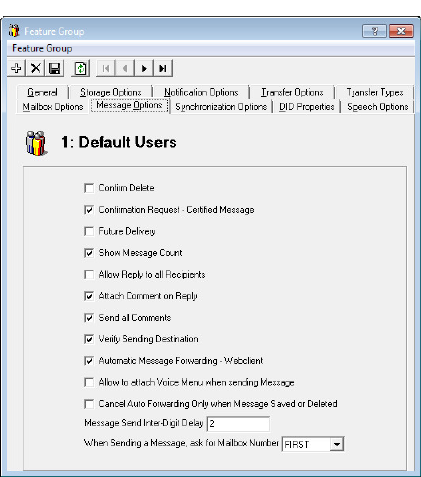
Message Options Tab
The Message Options tab of Feature Group allows you to configure comment attachments to messages, as well as message sending information.
Confirm Delete: Enable this checkbox to have the users prompted to confirm the deletion of a message.
|
Note: If Message Recovery is active any message that has been deleted may be reclaimed during the same day.
|
Confirmation Request-Certified Message: Enable this checkbox to instruct the server to prompt users to send a standard or certified message.
Future Delivery: Enable this checkbox to allow users to schedule a message delivery at a later date.
Show Message Count: Enable this checkbox to have the Web Access display how many unread messages are in the Mailbox user's Inbox. Also, when a new message notification appears in iLink Pro Desktop, it will display the number of unread messages in the Inbox.
Allow Reply to all Recipients: Enable this checkbox to allow users to Reply All when replying to a message.
Attach Comment on Reply: Enable this checkbox to attach the original message body to the new message body when replying.
Send all Comments: Enable this checkbox to indicate whether or not to send all attachments of the original message when forwarding.
Verify Sending Destination: Enable this checkbox to verify the destination of outgoing messages.
Automatic Message Forwarding - Webclient: Enable this checkbox to allow messages received by this Feature Group to be forwarded to other Mailboxes and extensions.
Allow to attach Voice Menu when sending Message: Enable this checkbox to allow users to attach a voice menu along with the messages. This feature can be activated in the Voice Menu or the TUI. At the end of message playback, the recipients will be sent to the attached Voice Menu instead of the typical end of message menu.
Cancel Auto Forwarding Only when Message Saved or Deleted: Enable this checkbox to instruct the server to cancel auto forwarding if the message has been saved or deleted.
Message Send Inter-Digit Delay: Enter the number of seconds that the server will wait while the user is entering a message before it decides that the caller has finished.
When Sending a Message, ask for Mailbox Number: From the dropdown menu, choose the option to select the destination Mailbox either before (first) or after (last) recording the message.
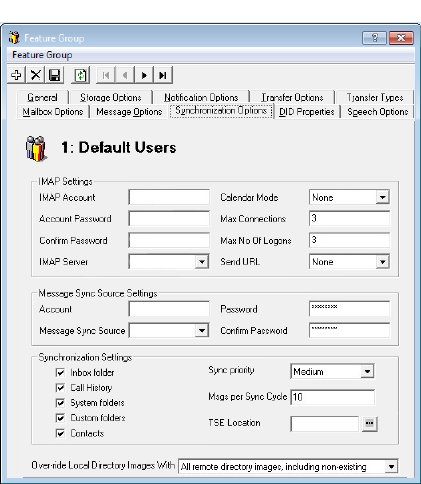
Synchronization Options Tab
The Synchronization Options tab of Feature Group allows you configure the IMAP account for all Mailboxes associated with the current Feature Group. If you are using a superuser account with an Exchange server, this is where you enter the credentials.
IMAP Account: Enter the superuser account name. This user was created on the Exchange server and has full control over all other accounts and has a permanent password.
Account Password: Enter the password for the superuser.
Confirm Password: Re-enter the superuser password for confirmation.
IMAP Server: Select the IMAP server from the dropdown menu. The IMAP servers are defined in the chapter Security Enhancements on page 641.
Calendar Mode: From the dropdown menu, select None to not sync any calendar entries, Sync with mail server to sync calendar entries between UC server and Exchange or Gmail servers, or Outlook client calendar to sync calendar entries between UC server the Outlook email client. Outlook client calendar requires the user to be logged into iLink Pro Desktop and that a version of Outlook compatible with UC Client forms is installed.
Max Connections: Enter the maximum number of failed system connection attempts that can occur before the user is locked out.
|
Note: It is recommended that this number is kept fairly high (1000+). The user can get locked out when, for example, the IMAP or email server goes down and there is no possibility of establishing a connection. This can happen on a re-boot.
|
Max No of Logons: Enter the maximum number of failed system logons to the IMAP server that can occur before the user is locked out.
|
Note: This number should be less than that specified in the user’s NT account for locking an account.
|
Send URL: From the dropdown menu, select the type of messages that you wish to use the Send URL feature with. Send URL will send a link of the attached files (rather than the actual file itself) for selected type of messages. This feature may be used as a security measure, in addition to reducing bandwidth usage. This feature requires additional configuration setup which can be found in Security Enhancements on page 641.
Synchronization Settings
Inbox folder: Enable this checkbox to synchronize the messages in the Inbox folder between the IMAP server and the UC server. This is enabled by default.
Call History: Enable this checkbox to synchronize call history from the UC server to the IMAP server.
System folders: Enable this checkbox to synchronize messages in default system folders (e.g. Inbox, Sent, Deleted) between the IMAP server and the UC server.
Custom folders: Enable this checkbox to synchronize messages in custom folders (i.e. user created folders) between the IMAP server and the UC server.
|
Note: Once IMAP synchronization is enabled and configured, the Inbox folder is synchronized at all times between the IMAP and the UC servers.
|
|
Note: In order for actions such as Copy and Delete to be available, checkboxes such as Sync folders and Custom folders must be checked.
|
Contacts: Enable this checkbox to synchronize contacts if the email server is compatible with UC server.
Sync Priority: From the dropdown menu, select the level of priority for IMAP Feature Group synchronization. This field will work relative to other Feature Groups. For example, all FGs with Maximum priority will sync messages quicker than the FGs with Medium or Minimum setting.
Msgs per Sync Cycle: Enter the number of messages that the server will attempt to synchronize during each synchronization cycle.
|
Note: The number you enter in this field depends on how evenly messages are distributed between all Mailboxes. The higher the number in this field, the longer it will take the server to start processing messages for the next Mailbox.
|
TSE Location: Enter or select the location of the UC TSE Cache Manager. This is only required if your CSE server is different from the UC server (e.g. using a stand alone CSE server).
Image Directory Settings
iLink Pro and iLink Pro Desktop include contact pictures if they have loaded a picture onto their Google profile. Image Directory Settings controls how the UC server deals with updated picture files.
Remote directory images, except non-existing: Picture files that are already in the storage directory that have changed since the last update will be downloaded.
All remote directory images, including non-existing: All picture files for contacts will be downloaded to the image directory.
Only images that are not present in local directory: Picture files that are not already in the image directory will be downloaded.
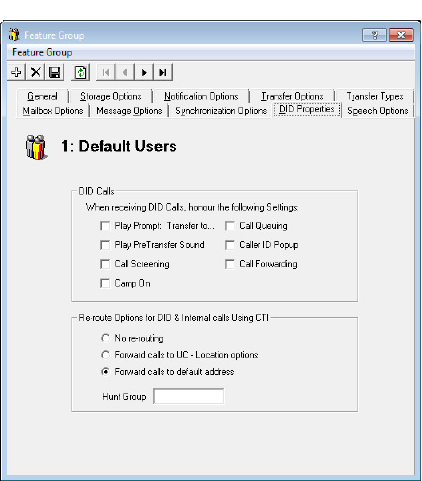
DID Properties Tab
The DID Properties tab of Feature Group allows you to select specific features for incoming DID calls.
DID Calls
Play Prompt: Enable this checkbox to have the default transfer prompt played when a DID call comes in.
Play PreTransfer Sound: Enable this checkbox to play the default pre-transfer sound for incoming DID calls.
Call Screening: Enable this checkbox to instruct DID callers who wish to transfer to an extension to state their name at the tone.
Camp On: Enable this checkbox to enable the Camp On feature. When this function is enabled and the extension is currently busy, the caller may choose to be alerted when the user hangs up and the extension becomes available.
Call Queuing: Enable this checkbox to place incoming DID calls in a queue when an extension is busy. Callers are informed of their position in the hold queue and are given opportunities to either continue to hold or leave a voice message.
CallerID Popup: Enable this checkbox to have the Caller ID of the DID callers pop up when their call comes in.
Call Forwarding: Enable this checkbox to enable call forwarding on DID calls.
Re-route Options for DID and Internal Calls Using CTI:
No re-routing: Select this radio button if DID/Internal calls are not to be forwarded on the UC system. Incoming calls will advance no further than the number originally dialed. This is the default option.
Forward calls to UC - Location options: Select this radio button to exploit the UC server’s Find Me/Follow Me abilities. Incoming calls will search for the intended recipient according to a previously specified path.
Forward calls to default address: Select this radio button to re-route the call to the default address defined in the Mailbox.
Hunt Group: Enter the number to be dialed to access DID messages.
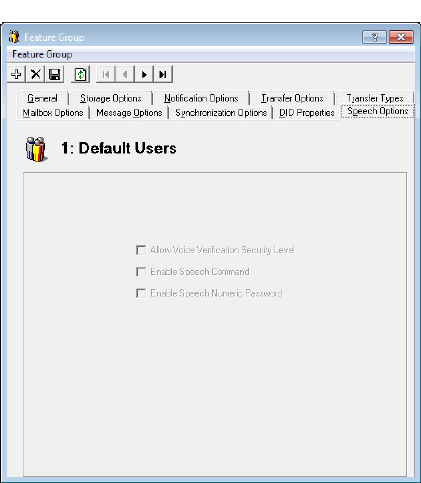
Speech Options Tab
The Speech Options tab of Feature Group allows you to configure Automatic Speech Recognition (ASR) related features.
Allow Voice Verification Security Level: Enable this checkbox to give the Mailboxes associated with the current Feature Group the ability to change their Voice Verification security level through TUI. The Voice Verification feature needs to be enabled in Company properties first.
Enable Speech Command: Enable this checkbox to give the Mailboxes associated with the current Feature Group the ability to use voice as their navigation method along with DTMF input. This feature has to be allowed in Company properties first.
|
Note: If there is an overlap of commands between a TUI action and an action key (e.g. 7 to save message and also 7 to fast forward during playback), the speech action will always activate the TUI action. Action keys can only be accessed through DTMF key input.
|
Enable Speech Numeric Password: Enable this checkbox to give the Mailboxes associated with the current Feature Group the ability to use voice to enter their password.
This means that the user will be able to say the numeric password (e.g. 1, 2, 3, 4) to log into their mailbox instead of entering the number through DTMF. This feature is different from voice verification and can be a security risk since the spoken password can be heard by a third party.
Other Feature Group Related Options/Configuration
Add/Edit Feature Group
Adding a Feature Group
Double click on a Feature Group entry then click on the Add New button.
OR
Right click on the empty space on the right pane of the Admin window then select New.
Editing a Feature Group
Double click on a Feature Group entry that you wish to modify.
OR
Right click on the Feature Group Entry that you wish to modify then select Properties.